


Monthly Archives: June 2026
Professional Finishing Protocols: Achieving Surface Purity with Tack Cloth Paint
Source:https://sawsonskates.com
You have spent hours sanding a beautiful piece of oak cabinetry or smoothing out a freshly patched patch of drywall. You vacuumed the area, wiped it down with a damp rag, and applied your premium topcoat. But as the paint dries under the workshop lights, your heart sinks. Tiny, rough bumps appear across the surface, making your hard work feel like sandpaper.
In my ten years of managing high-end residential finishing projects, I have seen this exact nightmare ruin hundreds of finishes. Homeowners always blame the brush, the roller, or the paint brand. In reality, the culprit is microscopic debris.
Vacuuming and standard wiping only stir up or displace dust particles; they don’t eliminate them. To achieve that mirror-smooth, professional glaze, you need to implement a true surface purity protocol. That is where integrating a tack cloth paint preparation routine becomes the ultimate game-changer for your DIY projects.
The Science of Debris: Why Standard Wiping Fails
To understand why a tack cloth paint step is non-negotiable, we have to look at how microscopic dust behaves. When you sand wood, primer, or drywall, you generate millions of sub-micron particles. These particles carry a natural static charge that binds them tightly to the surface.
Think of a standard microfiber cloth like a broom sweeping a dusty floor—it moves the big pieces but kicks the fine dust into the air, only for it to settle right back down onto your wet paint. A specialized tack cloth, however, acts like a high-powered magnet.
+-------------------------------------------------------------+
|                SURFACE PREPARATION EFFICIENCY               |
+-------------------------------------------------------------+
| Standard Rag:     [ Pushes Dust ] ──> Creates Air Airborne  |
| Tack Cloth:       [ Traps Dust ]  ──> Locks into Resin Matrix|
+-------------------------------------------------------------+
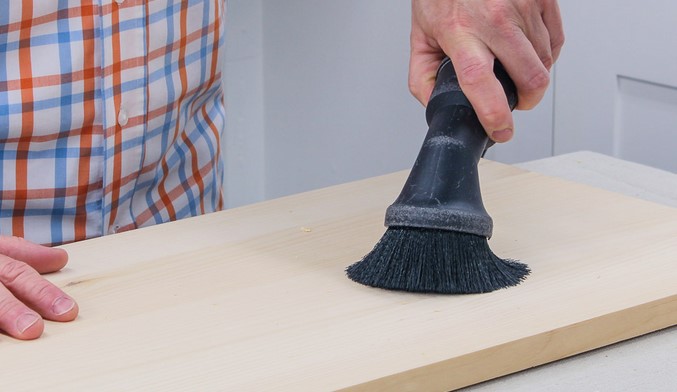
A tack cloth is a loosely woven cheesecloth material impregnated with a permanently tacky, semi-cured resin. When you glide it across a surface, the resin matrix chemically grabs and locks away loose dust, lint, sawdust, and metal shavings without leaving a sticky film behind.
Mastering the Protocol: How to Use Tack Cloth Paint Prep Correctly
Using a tack cloth seems simple enough, but over my decade in the trades, I have noticed that beginners often misuse it, creating more problems than they solve. Let’s break down the professional protocol for flawless execution.
1. The Open and Unfold Ritual
Never use a tack cloth straight out of the package while it is still folded into a tight square. This concentrates the resin in one spot and reduces its surface area.
Completely unfold the cloth until it is a large, loose sheet, then bunch it up loosely in your hand like a soft snowball. This bunching technique creates thousands of tiny pockets and contours that trap debris efficiently while keeping your hand pressure evenly distributed.
2. The Zero-Pressure Glide
The absolute golden rule of tack cloth paint preparation is to use zero downward pressure. You are not scrubbing a countertop; you are floating across a fragile surface.
-
Let the natural tackiness of the cloth do all the heavy lifting.
-
Gently glide the bunched cloth in long, single-direction strokes across the workpiece.
-
Moving in a single direction ensures you aren’t dragging trapped dust back onto a clean zone.
Pro Tip: Keep an eye on the cloth as you work. As the surface of the bunched cloth changes color from clean amber to grey with dust, refold the cloth to expose a fresh, clean section of resin. One single cloth can be refolded dozens of times before it loses its effectiveness.
Selecting the Right Grade for Your Substrate
Not all tack cloths are created equal. Depending on whether you are working with water-based latex, high-gloss oils, or delicate automotive primers, you must select the appropriate style for your high-durability surface management.
| Cloth Base Material | Resin Formulation | Best Application |
| Cotton Mesh | High-Tack Petroleum | Heavy woodworking, raw lumber, baseboards |
| Synthetic/Polyester | Low-Tack Hydrocarbon | Automotive, high-gloss cabinets, water-based acrylics |
| Micro-Fiber Blend | Anti-Static Solvent-Free | Ultra-delicate finishes, clear coats, varnishes |
For intermediate DIYers spraying or rolling modern water-based acrylic enamels on trim or cabinets, a low-tack synthetic cloth is ideal. High-tack cotton variants can occasionally transfer heavy oils to the surface if pressed too hard, which can interfere with water-based topcoat adhesion.
Expert Advice: Hidden Warnings for a Flawless Finish
Before you open your next can of paint, let me share two crucial job-site warnings that will save your finish from catastrophic failure:
-
The Solvent Contamination Trap: Never use a tack cloth on a surface that is still damp from chemical solvents, de-glossers, or mineral spirits. The liquid solvents will instantly dissolve the tack cloth’s resin coating, melting it directly onto your substrate. This creates an invisible, greasy film that causes your topcoat to bubble, separate, or fish-eye. Always ensure your chemical pre-wipes are 100% dry.
-
Storage Longevity: Exposure to open air is the ultimate enemy of a tack cloth. The moment you are done with a project phase, seal the used cloth inside a heavy-duty, airtight zip-top plastic bag. If left sitting out on a workbench, the resin will oxidize and cure completely, turning your valuable finishing tool into a useless piece of dry rag within 24 hours.
Conclusion
The difference between an amateur DIY paint job and an ultra-smooth, factory-grade professional finish isn’t found in the price of the paint. It is earned in the final 60 seconds before the brush hits the surface. By implementing a disciplined tack cloth paint protocol, you eliminate the invisible debris that ruins shadow lines and reflections, ensuring your hard work looks flawless for years to come.
Are you getting ready to spray a set of kitchen cabinets, or are you currently fighting a losing battle against dust bumps on your trim? Drop a comment below, tell me what material you are finishing, and let’s optimize your workshop protocol together!
Luxury Residential Branding: Enhancing Property Valuation with the Walk-in Shower
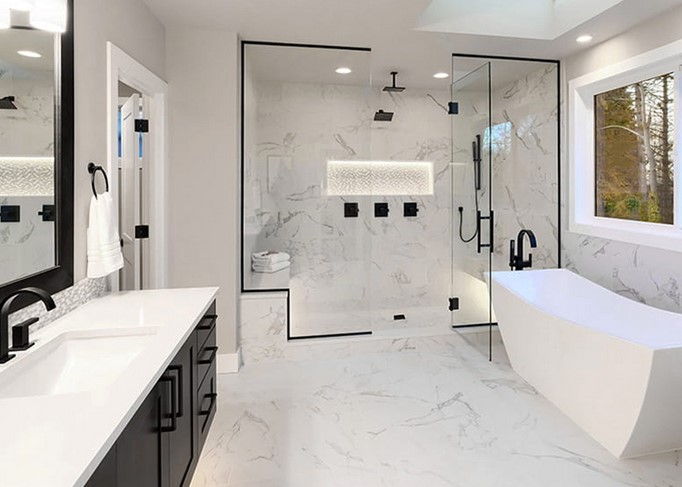 Imagine stepping into a master suite where the bathroom door opens to reveal a cramped, acrylic tub-and-shower combo covered by a plastic curtain. Now, picture walking into that same space, but your eyes are immediately drawn to a seamless expanse of floor-to-ceiling porcelain tile, a frameless glass enclosure, and a minimalist floor drain that looks like it belongs in a five-star boutique hotel. Which house sells faster, and for a premium?
In my ten years of remodeling residential properties and consulting on luxury real estate flips, I have noticed a massive shift in buyer psychology. Homebuyers are no longer looking for utilitarian washrooms; they want an experiential sanctuary.
When clients ask me where to allocate their renovation budget for the absolute highest return on investment (ROI), my advice is definitive: rip out the dated bathtub and install a custom walk-in shower. It is the single most impactful architectural upgrade you can make to elevate your property’s branding and command a higher appraisal value.
The Economics of the Modern Bath: Why Curbless Wins
To understand why a walk-in shower drives up property valuation so dramatically, we have to look at the numbers. According to housing market data, master bathroom remodels yield an average ROI of 60% to 70%. However, that number jumps significantly when you transition from a standard enclosed stall to an open-concept, universal design.
Think of a traditional shower enclosure like a bulky piece of furniture in a small room—it physically and visually chops up the floor plan. A curbless or low-profile walk-in design acts like an open-concept kitchen. By eliminating the step-over threshold, the bathroom floor flows uninterrupted from wall to wall.
+-------------------------------------------------------------+
|                VISUAL SPACE & FLOW COMPARISON               |
+-------------------------------------------------------------+
| Traditional Tub:   [ Bathroom Floor ] | BARRIER | [ Tub Base ]|
| Walk-in Shower:    [ Bathroom Floor ═════════════════> Drain ]|
+-------------------------------------------------------------+
This structural continuity tricks the brain into thinking the entire room is nearly double its actual square footage. In luxury residential branding, perceived space equals premium value.
Technical Foundations: Waterproofing and Slope Physics
For beginners and intermediate DIYers, the visual elegance of a open-concept shower can overshadow the strict engineering required beneath the tile. If a walk-in system is not built correctly, water will migrate into your subfloor, leading to thousands of dollars in structural rot.
The Critical Role of the Slope
Water follows gravity. In a curbless configuration, your floor must have a precise slope of 1/4 inch per linear foot leading directly toward the waste outlet. If the slope is too shallow, water will pool on the bathroom floor; if it is too steep, your tile layout will warp, creating unsafe tripping hazards.
Selecting Your Drainage System
The choice of drain heavily influences both the layout complexity and the final aesthetic.
| Drain Type | Tile Cutting Requirement | Visual Impact | Placement |
| Traditional Center Drain | Complex 4-way slope (envelope cut) | Functional / Standard | Center of shower pan |
| Linear Drain | Simple 1-way single plane slope | High-end / Minimalist | Along the back wall or threshold |
A linear drain is highly recommended for mid-to-high-tier branding. It allows you to use large-format tiles across the entire floor without cutting them into awkward triangles, preserving the clean geometric lines that luxury buyers expect.
Step-by-Step Anatomy of a High-End Walk-in System
Building a robust, leak-free system requires a disciplined layering approach. Here is how we build them on our luxury job sites to ensure they last a lifetime.
1. Pre-Pan Infrastructure and Framing
Before any decorative tile is laid, the wood or concrete subfloor must be evaluated. For a true curbless entryway, the joists beneath the shower area must often be notched or lowered to accommodate the thickness of the sloped mortar bed or pre-fabricated foam tray.
2. Advanced Waterproofing (The Moisture Barrier)
Never rely on tile and grout to stop water; grout is porous. We utilize a multi-layer waterproofing system. After installing a cement backer board or high-density foam panels on the walls, apply a continuous sheet membrane or a liquid-applied elastomeric waterproofing compound.
Pro Tip: Apply the liquid waterproofing membrane in three distinct coats, alternating the direction of your brush strokes (vertical then horizontal). Treat this layer like an underground pool liner—if it isn’t completely airtight before tile goes on, your installation is vulnerable.
3. Selecting High-Appraisal Materials
To maximize your valuation impact, choose materials that scream luxury but offer practical longevity. Porcelain tile is preferred over natural marble for intermediate projects because it is completely non-porous, scratch-resistant, and doesn’t require annual sealing, while still mimicking high-end stone aesthetics.
Expert Advice: Hidden Pitfalls in Luxury Showers
Before you pick up your trowel or hire a contractor, let me pass down two crucial pieces of job-site insight that separate amateur attempts from elite designs:
-
The Glass Gauge Trap: If you install beautiful tile but enclose it with cheap, thin 1/4-inch glass panels held together by a bulky metal frame, you completely destroy the luxury branding. Opt for 3/8-inch or 1/2-inch thick frameless tempered glass. The heavy weight of thick glass gives a satisfying, rock-solid feel when opened and completely eliminates ugly perimeter metal tracking.
-
The Slip-Resistance Oversight: Large-format 24×24-inch polished tiles look incredible on walls, but placing them on a shower floor is an absolute hazard. When wet, polished surfaces turn into ice. Ensure your floor tile has a high Dynamic Coefficient of Friction (DCOF) rating of 0.42 or greater. Alternatively, use mosaic tiles on the floor; the dense network of grout lines provides natural, built-in slip resistance for bare feet.
Conclusion
Elevating your property’s value isn’t about chasing fleeting decor trends; it is about making permanent structural improvements that enhance daily living. Investing in a masterfully executed walk-in shower blends universal accessibility with breathtaking aesthetic appeal. It transforms an ordinary asset into a highly branded piece of luxury real estate that stands out dramatically in a competitive market.
Are you planning to convert an old tub into a sleek walk-in system, or are you trying to figure out if your bathroom floor plan can handle a curbless transition? Let’s talk layout strategies—drop your measurements or layout questions in the comments below!
High-Durability Surface Management: Strategic Selection of Bathroom Paint
Source:https://finishpainting.au
Imagine stepping into your bathroom on a crisp morning, turning on the shower, and watching the room fill with warm steam. It feels like a private spa ritual until you glance up at the ceiling and notice dark, ugly streaks running down the walls like tears. Or worse, small black spots beginning to colonize the corners.
In my ten years of flipping houses and managing residential renovations, I have seen more paint failures in the bathroom than in any other room in the house. Homeowners spend thousands on beautiful tile and high-end fixtures, only to skimp on the final bucket of wall coating.
A bathroom is not just another room; it is a residential pressure cooker. The air transitions from bone-dry to 100% humidity in a matter of minutes. To survive this brutal cycle, selecting the right bathroom paint is your first and most critical line of defense against structural decay and cosmetic ruin.
The Physics of a Wet Room: Why Standard Paint Fails
To understand why specialized formulas are necessary, we need to look at what happens at a microscopic level when you coat a wall. Standard latex paint dries to form a slightly porous film. In a dry living room or bedroom, those microscopic pores are completely harmless.
Think of standard interior paint like a high-density sponge, while specialized bathroom paint acts more like a rain jacket. When high humidity hits standard paint, moisture penetrates the film, gets trapped against the drywall paper, and creates a breeding ground for mold and mildew. Over time, this trapped moisture breaks down the adhesive bond, causing the paint to blister, crack, and eventually peel away in large sheets.
+-------------------------------------------------------------+
|                MICROSCOPIC MOISTURE REACTION                |
+-------------------------------------------------------------+
| Standard Paint:   [ Moisture ] ──>  ░░ (Porous Hole) ──> Peel |
| Bathroom Paint:   [ Moisture ] ──>  ▓▓ (Sealed Wall) ──> Shed |
+-------------------------------------------------------------+
Modern formulations for wet environments are engineered with a tighter molecular structure. They use harder acrylic resins that cure into a smooth, hydrophobic barrier. Water beads up on the surface and evaporates into the air instead of soaking into your structural walls.
Decoding Sheen and Specialized Additives
When walking down the paint aisle, beginners are often overwhelmed by choices. Should you buy a standard paint mixed in a high gloss, or a specialized can with an elevated price tag? Let’s break down the technical differences.
The Role of Antimicrobial Biocides
True, premium bathroom paint contains active ingredients known as biocides. These are EPA-registered antimicrobial agents blended directly into the liquid during manufacturing. The biocides slowly leach to the surface over a span of several years, actively killing mold spores on contact and preventing them from establishing a colony on your walls.
Gloss Level: Balancing Aesthetics and Performance
Historically, if you wanted water resistance, you were forced to use a blindingly shiny high-gloss paint. Thankfully, resin technology has evolved dramatically over the last decade.
| Paint Sheen | Water Resistance | Imperfection Hiding | Best For |
| Flat / Matte | Very Low | Excellent | Avoid in Bathrooms |
| Eggshell | Medium-Low | Good | Half-baths / Powder rooms |
| Satin | High | Medium | Modern Bathroom Walls |
| Semi-Gloss | Very High | Low | Trim, Baseboards, and Ceilings |
For a modern, sophisticated aesthetic that still offers high-durability surface management, Satin finish is the absolute sweet spot for primary bathroom walls. It offers enough sheen to shed water efficiently without highlighting every minor ding, dent, or drywall imperfection.
Step-by-Step Execution: Prepping for a Moisture-Proof Finish
In my decade of hands-on experience, I have learned that a paint job is 80% preparation and only 20% actual rolling. If you skip the prep work in a high-moisture environment, your new coat will fail within twelve months.
1. Eradicate Existing Mold First
Never paint over mold or mildew. It will simply feed on the moisture underneath and push through the new layer. Wash the entire surface with a solution of three parts water to one part bleach, or use a dedicated fungicidal spray. Let it sit for ten minutes, scrub it clean, and rinse thoroughly with clean water.
2. The Power of a Specialty Primer
If you are painting over raw drywall patch repairs, changing colors drastically, or dealing with old, peeling surfaces, you must apply a vapor-barrier primer first. Look for an alkali-resistant, stain-blocking primer designed specifically for high-humidity areas. This creates a uniform surface porosity so your topcoat can bond securely.
Pro Tip: Give your primer a full 24 hours to cure before applying your first coat of bathroom paint. Even if the label says “dry in 2 hours,” a longer cure time allows the primer to lock onto the substrate before it gets hit with moisture.
3. Application Mechanics
When applying the topcoat, use a high-quality 3/8-inch nap synthetic roller cover. Apply the paint in a steady, overlapping “W” pattern to ensure even distribution. Avoid rolling back over areas that have already started to tack up, as this tears the delicate drying film and creates weak spots where moisture can later enter.
Expert Advice: Hidden Warnings from the Job Site
Before you pick up your brush, let me share two critical warnings that separate amateur DIY attempts from a professional, long-lasting finish:
-
Beware of Surfactant Leaching: This is the technical term for those mysterious brown or sticky streaks that appear on freshly painted bathroom walls. It happens when ingredients in the paint (surfactants) rise to the top because the paint was exposed to heavy steam before it fully dried. To prevent this, do not use your shower for at least 48 to 72 hours after painting. Keep the exhaust fan running and windows open during this window.
-
The Ceiling Oversight: Homeowners frequently paint their bathroom walls with high-quality paint but use cheap, flat white ceiling paint overhead. This is a recipe for disaster. Rising steam hits the ceiling first and sits there. Always use the same high-durability, moisture-resistant formulation on your ceiling as you do on your walls.
Conclusion
Optimizing your bathroom’s defensive layers isn’t just about pick-and-choose color psychology; it is an investment in your home’s structural integrity. By carefully selecting a dedicated, premium bathroom paint with built-in biocides and a resilient satin or semi-gloss sheen, you protect your drywall from expensive water damage and keep your sanctuary looking pristine for years to come.
Are you getting ready to refresh a damp, tired bathroom, or are you currently battling a peeling ceiling paint disaster? Let’s get it sorted out together—drop your questions or current project scenarios in the comments section below!
Architectural Value Addition: Elevating Assets with Wainscoting Dining Room Design
 You have curated the perfect mid-century modern dining table, hung a stunning statement chandelier, and laid down a luxurious rug. Yet, when you step back to look at the room, it still feels incomplete—like a high-end tuxedo paired with worn-out canvas sneakers. The walls feel flat, cold, and entirely devoid of character.
In my ten years of flipping houses and remodeling residential spaces, I have noticed that the dining room is the hardest space to make feel “expensive.” It is a room dominated by furniture legs and vast expanses of blank drywall.
When clients ask me how to bridge the gap between ordinary and upscale without breaking the bank, my answer is always the same: permanent architectural character. Transforming a plain wall into a layered masterpiece using a thoughtful wainscoting dining room design is the ultimate secret weapon for adding immediate appraisal value to your property.
The Anatomy of Wall Trim: Breaking Down the Styles
Before you head to the local timber yard, it is vital to understand that wainscoting isn’t a one-size-fits-all solution. Historically used in 18th-century homes to shield plaster walls from dampness and scuffing chairs, modern millwork is all about scale, shadow lines, and texture.
Think of wainscoting like a well-tailored suit for your room. If the proportions are off, the entire space looks awkward. Here are the primary styles you will encounter when planning your layout:
+-----------------------------------------------------------------+
|                  POPULAR WAINSCOTING VARIATIONS                 |
+-----------------------------------------------------------------+
| 1. Raised Panel:   [ Classic / Traditional / Heavy Beveling ]   |
| 2. Flat Panel:     [ Shaker Style / Clean Lines / Craftsman ]   |
| 3. Beadboard:      [ Country Cottage / Vertical Grooves ]       |
| 4. Picture Frame:  [ Applied Molding / Elegant / Low Profile ]  |
+-----------------------------------------------------------------+
Traditional Raised Panel vs. Modern Shaker Flat Panel
Raised paneling involves a central wood panel that is bevelled so its surface sits flush with or slightly proud of the surrounding frames (stiles and rails). This is your go-to option for formal, historic elegance.
Conversely, Shaker-style flat paneling utilizes completely recessed center panels. This creates clean, sharp 90-degree shadow lines that fit beautifully into transitional, modern farmhouse, or contemporary minimalist dining spaces.
The Rule of Thirds: Getting the Proportions Right
The most common mistake I see intermediate DIYers make is choosing an arbitrary height for their millwork. A wall that is cut exactly in half creates a jarring visual line that makes your ceilings feel lower than they actually are.
To explain this to my apprentices, I use the Three-Box Analogy. Imagine your wall is divided vertically into three equal boxes. Your wainscoting dining room installation should ideally occupy the bottom box, leaving the top two boxes for paint, artwork, or wallpaper.
   THE GOLDEN RATIO WALL SPECIFICATION

   =================================== [ Ceiling Line ]
   │                                 │
   │       PAINT OR WALLPAPER        │ <- Upper 2/3 (Visual Air)
   │                                 │
   ├─────────────────────────────────┤ [ Chair Rail / Cap Molding ]
   │   Top Rail                      │
   │  ┌──────┐     ┌──────┐     ┌──────┐ │
   │St│Panel │Stile│Panel │Stile│Panel │ │ <- Lower 1/3 (Wainscoting)
   │  └──────┘     └──────┘     └──────┘ │
   =================================== [ Baseboard & Floor ]
For a standard 8-foot ceiling, aiming for a finished height between 32 to 36 inches from the floor (including the baseboard and the top chair rail) is the sweet spot. If you lucky enough to have 10-foot ceilings, you can safely push that height up to 48 inches to maintain a grand aesthetic.
Step-by-Step Execution: Crafting a Flawless Frame System
If you are a beginner or intermediate DIYer, jumping straight into full-blown sheet panel installation can feel incredibly overwhelming. Luckily, you can achieve the exact same high-end look using an applied molding technique (often called picture frame molding), where you use the existing drywall as the backing panel.
1. Mapping and Layout Calculations
Never buy a single piece of wood until you have sketched your layout on paper. Measure the total length of your dining room wall in inches. Deduct the width of your planned vertical stiles, and divide the remaining space equally to determine the perfect width for your inner panels.
Pro Tip: Use low-tack painter’s tape to map out the entire frame layout directly on your wall first. Step back and look at it from your dining table. This allows you to visually check for alignment with light switches, electrical outlets, and HVAC vents before cutting into your budget.
2. Precise Miter Cutting
For an elegant finish, the inner molding pieces must meet at perfect 45-degree miter joints. Invest in a quality miter saw or a precise manual miter box.
When cutting, ensure your measurements are taken from the long point to the long point of the angles. If your cuts are even a fraction of a millimeter off, you will end up with ugly gaps that ruin the illusion of seamless custom carpentry.
3. Installation and Adhesion
Locate the wall studs using a reliable stud finder and mark them lightly with a pencil. Apply a continuous zigzag bead of high-tack construction adhesive to the back of your molding pieces.
Press the molding firmly against your layout lines, then secure it using an 18-gauge brad nailer with 2-inch brad nails driven directly into the studs where possible. The adhesive handles the long-term holding power, while the brad nails act as a temporary clamp while the glue cures.
Expert Advice: Hidden Warnings for a High-End Finish
The difference between a glaring DIY job and a professional, architect-grade installation lies entirely in the final prep work. Here is what separates the amateurs from the veterans on the job site:
-
The Caulk Guardrail: Never skip caulking. Every single place where the wood meets the drywall, and every inside corner joint, must receive a thin bead of high-quality, paintable silicone-acrylic caulk. Wipe away the excess with a damp finger. This fills the microscopic voids and makes the trim look like it grew out of the wall naturally.
-
Flawless Fastener Concealment: Do not try to hide your nail holes with caulk; caulk shrinks as it dries, leaving noticeable dimples under your paint. Instead, fill every nail hole with shrink-free wood filler, overfilling it slightly. Once dry, sand it completely flush with 220-grit sandpaper until you cannot feel the transition with your eyes closed.
-
The Sheen Harmonization: To truly trick the brain into thinking the drywall inside your frames is solid wood, paint the wainscoting, baseboards, and chair rails with the exact same color and finish. A semi-gloss or satin sheen is ideal. The higher sheen reflects light off the shadow lines beautifully and makes cleaning up inevitable dinner party scuff marks a breeze.
Conclusion
Elevating your assets through intentional architectural upgrades pays dividends—both in daily personal enjoyment and long-term resale value. A custom wainscoting dining room project grounds your furniture, frames your space, and introduces a classic rhythm that instantly makes your home feel more historic, anchored, and expensive.
Are you planning to tackle a dining room transformation soon, or are you trying to decide which style fits your architectural era best? Drop a comment below, share your wall dimensions, and let’s plan your layout together!
Optimizing Sanitary Infrastructure: Reliable Maintenance with the Fill Valve Kit
 It’s 2:00 AM, the house is dead silent, and there it is again—that faint, ghostly hiss coming from the bathroom. Or worse, you walk in and notice a phantom flush when nobody has even touched the handle.
In my ten years of diagnosing plumbing headaches, I have found that a running toilet is the ultimate silent budget killer. A single malfunctioning toilet can waste up to 200 gallons of water a day. That is the equivalent of leaving your garden hose running for hours, sending your hard-earned money straight down the drain.
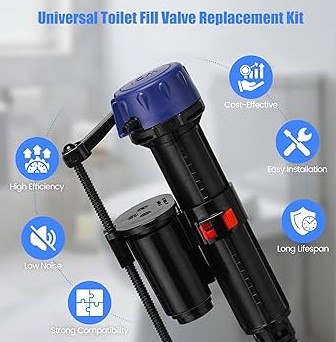
Most homeowners assume a noisy toilet means they need a completely new porcelain throne. But here is an insider secret from a decade in the trenches: 90% of the time, your internal tank components are just worn out. Upgrading your porcelain tank with a modern fill valve kit is the ultimate, cost-effective way to restore peace, quiet, and efficiency to your bathroom.
The Heart of the Tank: Understanding the Fill Valve
To understand why a fill valve kit is so revolutionary, we need to demystify what goes on beneath that heavy porcelain lid. Many beginners look inside a toilet tank and see a confusing web of plastic and rubber.
Think of your toilet tank like a miniature, automated water tower. The fill valve is the gatekeeper of that tower. Its sole job is to refill the tank with fresh water after a flush and shut off precisely when the water reaches the correct line.
+-------------------------------------------------------+
|             THE TOILET TANK ECOSYSTEM                 |
+-------------------------------------------------------+
|  [ Water Supply ] --> ( Fill Valve Kit )              |
|                             │                         |
|                             ▼                         |
|                     [ Tank Reservoir ]                |
|                             │                         |
|              (Flush Valve) ─┘                         |
+-------------------------------------------------------+
Older sanitary systems rely on a traditional ballcock assembly—that large, awkward brass rod with a floating copper or plastic ball attached to the end. These mechanical dinosaurs are prone to rusting, misalignment, and taking up too much physical space inside the tank. Modern kits replace this outdated setup with a compact, vertically gliding float cup design that measures water levels with pinpoint accuracy.
Signs It Is Time for a Fill Valve Kit Replacement
How do you know your current infrastructure is failing? Plumbing components don’t last forever; the constant exposure to water treatments, chlorine, and mineral deposits eventually degrades the internal seals.
If you notice any of the following symptoms, it is time to intervene:
-
The Endless Hiss: The toilet continuously runs or makes a trickling sound long after the flush cycle should have ended.
-
The Slow Refill: The tank takes more than two minutes to fill up completely after a flush.
-
Water Height Anomalies: The water level inside the tank sits higher than the overflow tube, causing water to constantly spill into the bowl.
Instead of paying a plumber a hefty diagnostic fee, a universal fill valve kit allows intermediate DIYers and beginners alike to swap out the entire mechanism in under 30 minutes using basic hand tools.
Step-by-Step Guide: Upgrading with a Fill Valve Kit
Before you begin, don’t be intimidated by the prospect of working with water lines. As long as you shut off the main water source, there is zero risk of flooding your bathroom.
1. Isolation and Drainage
First, locate the shut-off valve on the wall beneath the toilet tank. Turn it clockwise until it stops. Flush the toilet and hold the handle down to drain as much water from the tank as possible. Use an old towel or sponge to soak up the remaining puddle at the bottom of the tank.
2. Disconnecting the Old System
Place a small bucket under the tank to catch any stray drops. Unscrew the water supply line coupling nut from the bottom of the shank. Next, remove the plastic locknut that secures the valve shank to the bottom of the tank. You can now lift the old valve assembly out of the tank entirely.
3. Adjusting the New Height
One of the best features of a modern, universal fill valve kit is its adjustable height mechanism. Before dropping it into the tank, twist the upper body of the valve to adjust its length.
Critical Measurement: The top of the new fill valve cap must sit at least 3 inches above the top of the overflow pipe. This prevents dangerous siphoning back into your home’s clean water supply.
      CORRECT FILL VALVE HEIGHT

      [ Fill Valve Cap ]
             │   ▲
             │   │  At least 3 Inches
             ▼   ▼
      =================== [ Top of Overflow Pipe ]
             │
             │
4. Installation and Reconnection
Insert the new valve shank through the hole in the bottom of the tank, ensuring the rubber shank washer is seated firmly inside the tank to create a watertight seal. Tighten the locknut underneath by hand, then add just a quarter-turn with channel locks. Do not over-tighten, or you risk cracking the porcelain tank.
Connect the refill tube from the valve directly to the overflow pipe using the included clip. Reattach your water supply line, turn the water back on slowly, and check for any leaks around the base of the tank.
Expert Advice: Hidden Warnings for the Savvy DIYer
Over my career, I have seen well-intentioned homeowners make a few critical errors during this upgrade. Keep these professional pointers in mind:
-
The Anti-Siphon Guardrail: Always ensure your refill tube clips above the overflow tube. If you shove the flexible tubing directly down inside the overflow pipe below the water line, it will create a natural siphon that continuously drains your tank into the bowl.
-
Beware of Chemical Tablets: If you use those blue, bleach-heavy chemical cleaning tablets that drop directly into the tank, stop immediately. The harsh chemicals accelerate the decay of the silicone and rubber seals inside your brand-new fill valve kit, cutting its lifespan in half.
-
Check the Flapper Simultaneously: If you replace the fill valve and your toilet still cycles on and off randomly, your flapper (the rubber seal at the bottom of the tank) is warped. Most comprehensive kits include a new flapper for this exact reason—always replace both at the same time for total peace of mind.
Conclusion
Optimizing your home’s sanitary infrastructure doesn’t require a master’s degree in engineering or an expensive service call. By taking control of your maintenance with a high-quality fill valve kit, you can eliminate annoying noises, lower your monthly utility bills, and ensure your plumbing runs like a well-oiled machine. It is one of the most rewarding, high-ROI weekend projects a homeowner can tackle.
Have you noticed your toilet acting up lately, or have you ever tried replacing tank components yourself? Let’s troubleshoot together—drop your questions or project stories in the comments below!