


Monthly Archives: August 2023
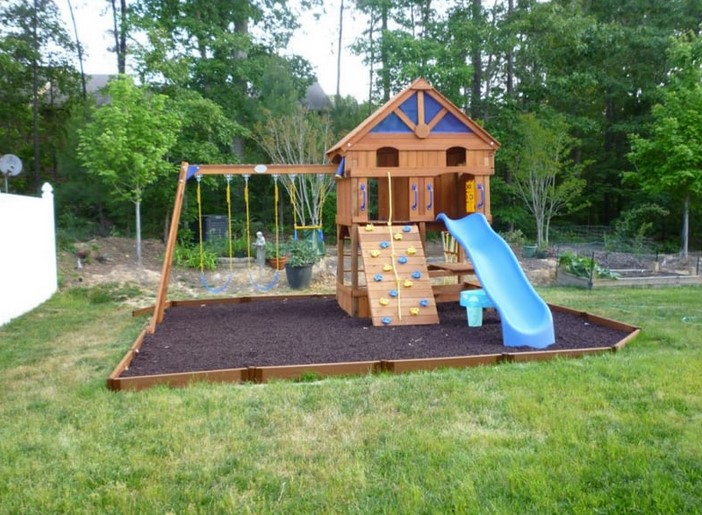
How to Build an Easy and Affordable DIY Swing for Kids
Source : https://cdn.designrulz.com
Introduction
Childhood is a time of boundless energy and imagination, and what better way to nurture both than with a simple and delightful backyard swing? A DIY swing for kids can provide hours of outdoor fun, helping them stay active, develop their motor skills, and foster creativity. Building a swing doesn’t have to be a complicated or expensive endeavor. In this article, we’ll guide you through the process of creating an easy and affordable DIY swing that will bring smiles to your children’s faces.
Materials You’ll Need
Before you dive into constructing the swing, gather the necessary materials. Most of these items can be found at your local hardware store or repurposed from items around the house.
1. Wooden Plank: A sturdy piece of wood, about 1-2 inches thick and 8-10 inches wide, will serve as the seat of the swing.
2. Rope or Chains: You’ll need a durable and weather-resistant rope or chain to hang the swing securely.
3. Drill and Screws: These tools are essential for attaching the swing seat to the ropes or chains.
4. Swing Hardware: Look for swing hooks or eye bolts designed to support the weight of the swing and ensure its safety.
5. Measuring Tape: Accurate measurements are crucial for a stable and comfortable swing.
6. Sandpaper: Smooth any rough edges on the wooden plank to prevent splinters.
7. Paint or Stain (Optional): Add a touch of personalization and weather protection by painting or staining the wooden seat.
Step-by-Step Guide
1. Select a Suitable Location
Find a suitable spot in your backyard where you can hang the swing. Choose an area with enough clearance to ensure the swing won’t hit any obstacles when in use.
2. Measure and Cut the Wooden Seat
Using your measuring tape, determine the desired length of the swing seat. Cut the wooden plank to the appropriate size, making sure it’s wide enough for comfortable seating.
3. Sand the Edges
Carefully sand the edges and surfaces of the wooden plank to remove any rough spots or splinters. This step is important to ensure the swing is safe for children to use.
4. Paint or Stain the Seat (Optional)
If you want to add a pop of color or protect the wood from the elements, consider painting or staining the swing seat. Opt for child-safe, outdoor-appropriate paint or stain, and allow it to dry completely before proceeding.
5. Drill Holes for Ropes/Chains
Measure and mark the points where you’ll attach the ropes or chains to the swing seat. Use a drill to create holes at these marks. Make sure the holes are evenly spaced and aligned.
6. Attach Ropes or Chains
Thread the ropes or chains through the holes in the swing seat. If you’re using ropes, tie secure knots underneath the seat to hold them in place. If you’re using chains, use the appropriate hardware to connect them securely.
7. Find a Sturdy Support Structure
Locate a strong and secure support structure to hang the swing from, such as a sturdy tree branch, a beam on a porch, or a swing set frame. Make sure the structure can bear the weight of the swing and the children using it.
8. Install Swing Hardware
Attach swing hooks or eye bolts to the support structure. Ensure they’re firmly anchored to provide a safe and stable foundation for the swing.
9. Hang the Swing
Connect the ropes or chains to the swing hooks or eye bolts. Double-check that the swing hangs evenly and doesn’t tilt to one side.
10. Test for Safety
Before letting the kids have their fun, test the swing yourself to ensure it’s stable and secure. Give it a few gentle pushes to make sure it can support the weight and movement.
11. Supervise and Enjoy
Once you’re satisfied with the safety and stability of the swing, invite your children to enjoy their new outdoor playtime haven. Always supervise them while they’re using the swing to ensure their safety.
Conclusion
Building an easy and affordable DIY swing for kids is a rewarding endeavor that can provide endless hours of entertainment and outdoor play. By following these simple steps and using readily available materials, you can create a charming and safe swing that encourages your children to explore their imagination, stay active, and develop essential motor skills. Remember, the joy and memories created on this swing will last a lifetime, making it a wonderful investment in your children’s happiness and well-being.
Creative DIY Swing Ideas to Transform Your Backyard
Indulge in the joy of creative craftsmanship with a DIY swing – a perfect blend of leisure and hands-on ingenuity. Crafting your own swing not only offers a rewarding experience but also invites you to relish the outdoors in a personalized and comfortable space. Whether suspended from a sturdy tree branch or a custom-built frame, a DIY swing embodies the spirit of simplicity and enjoyment, promising relaxation amidst nature’s embrace.
Source : https://www.usalovelist.com
Transforming your backyard into a captivating and serene oasis doesn’t require an extensive budget or a professional landscaper. With a touch of creativity and a few DIY skills, you can revamp your outdoor space into a haven of relaxation and fun. One fantastic way to achieve this is by incorporating swings into your backyard design. Swings not only evoke a sense of nostalgia but also offer a whimsical charm that can turn your outdoor area into a delightful retreat for both children and adults. In this article, we’ll explore a plethora of creative DIY swing ideas that can effortlessly transform your backyard.
1. Classic Rope Swing:
Embrace the simplicity and timelessness of a classic rope swing. All you need is a sturdy branch on a tree and a thick, durable rope. Make sure the branch is strong enough to support the weight of the swing and the person using it. Knot the rope securely and let the swinging fun begin. You can also add a cushion or padded seat to make it more comfortable.
2. Pallet Swing Bed:
Why settle for a conventional swing when you can have a swing bed? Repurpose wooden pallets to create a comfortable and stylish swing bed. Sand down the pallets to prevent splinters, then arrange them as a base and backrest. Add some cushions and pillows, and you’ll have a cozy spot to read, nap, or simply enjoy the outdoors.
3. Treehouse Swing:
Combine the thrill of a treehouse with the joy of swinging by building a treehouse swing. Construct a small platform with a sturdy railing in a tree, then attach a swing underneath. This idea not only offers a unique play space for children but also provides a serene spot for adults to unwind while gently swaying amidst the leaves.
4. Tire Swing:
Give new life to old tires by transforming them into playful tire swings. Paint the tires in vibrant colors, and attach strong ropes to the tire’s rim. Tire swings are not only eco-friendly but also incredibly durable and can accommodate multiple riders, making them a perfect addition for family gatherings.
5. Bench Swing:
For a touch of sophistication, consider building a bench swing. Craft a wooden bench and hang it securely using strong chains. Add a canopy for shade and toss on some cushions for comfort. This swing is perfect for enjoying leisurely conversations with friends or sharing a romantic moment with a loved one.
6. Skateboard Swing:
Upcycle an old skateboard into a creative swing for kids. Attach ropes to the skateboard’s trucks and suspend it from a tree branch. Kids will love the novelty of swinging on a skateboard while also engaging in imaginative play.
7. Hammock Swing:
Combine the relaxation of a hammock with the gentle motion of a swing by creating a hammock swing. Use a large piece of durable fabric or canvas, and knot it securely to a tree or a strong frame. This swing offers the perfect blend of comfort and tranquility.
8. Platform Swing:
Build a spacious platform swing using wooden planks and sturdy ropes. This swing is ideal for group play and can accommodate multiple people at once. Decorate the platform with cushions, blankets, and fairy lights to create a magical space for gatherings.
9. Canopy Swing:
Transform a standard porch swing into a luxurious canopy swing by adding a draped canopy. The canopy not only provides shade but also adds an elegant touch to your outdoor space. Choose fabric that complements your backyard’s aesthetics.
10. Upcycled Chair Swing:
Give an old chair a new purpose by converting it into a charming swing. Remove the legs and attach strong ropes to the chair’s frame. This swing idea combines comfort and visual appeal while offering a great conversation starter.
Conclusion:
Revamping your backyard with DIY swings can infuse your outdoor space with personality, charm, and functionality. From classic rope swings that evoke childhood memories to innovative treehouse swings that provide a whimsical escape, there’s no shortage of creative ideas to explore. Whether you’re looking to create a serene spot for relaxation or a playful area for family fun, these swing ideas are sure to transform your backyard into an inviting haven that everyone will enjoy. So gather your tools, unleash your creativity, and get ready to swing into a new level of backyard bliss.
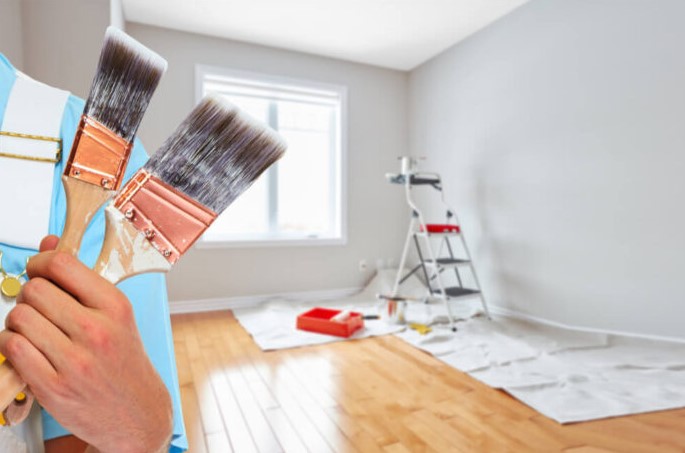
Transform Your Home with DIY Wall Painting: Inspiring Ideas and Color Schemes
Source : https://housing.com
When it comes to home improvement, few projects are as transformative and cost-effective as a DIY wall painting endeavor. Whether you’re looking to breathe new life into a dull room or simply want to add a personal touch to your living space, painting your walls can have a significant impact on the overall aesthetics of your home. With a little creativity and some basic tools, you can achieve remarkable results that reflect your style and personality. In this article, we’ll explore inspiring DIY wall painting ideas and color schemes that will help you revitalize your space.
The Power of Color:
Color is an essential aspect of interior design, and choosing the right color scheme can set the tone for your entire home. Before you begin your DIY painting project, take some time to consider the mood you want to create in each room. Do you want a cozy and inviting atmosphere, or a more vibrant and energetic space? Different colors can evoke different emotions, so it’s important to choose wisely.
Neutral Elegance:
Neutral color schemes are timeless and versatile. They create a sense of calm and sophistication, making them ideal for bedrooms, living rooms, and bathrooms. Shades like beige, gray, and soft pastels can help create an elegant backdrop that allows you to experiment with furniture and décor. Consider using a light gray for your living room walls, paired with white trim for a classic look that pairs well with both modern and traditional furniture.
Bold Accents:
If you’re hesitant to commit to a full room of vibrant color, consider adding bold accents to a single wall. This can create a focal point in the room and add a dynamic element without overwhelming the space. For instance, a deep navy accent wall in the dining room can add a touch of drama and sophistication. Complement it with gold or metallic accents for an extra touch of luxury.
Nature-Inspired Hues:
Bringing the outdoors inside is a popular trend in interior design, and nature-inspired color schemes can instantly create a refreshing and relaxing atmosphere. Earthy tones like greens, browns, and blues can mimic the beauty of the natural world. Imagine a serene bedroom painted in soft sage green, reminiscent of a lush forest, or a coastal-inspired living room with shades of blue and sandy beige that evoke the tranquility of the beach.
Monochromatic Magic:
Monochromatic color schemes involve using different shades of a single color. This approach can create a sense of harmony and cohesion in a room. To pull off a monochromatic look successfully, vary the shades from light to dark to add depth and interest. For example, consider a range of light to deep blues for a calming and visually pleasing bedroom. Incorporate different textures and patterns to prevent the room from feeling flat.
Ombre Elegance:
If you’re feeling adventurous and want to add a touch of artistic flair to your walls, ombre painting is a technique worth exploring. Ombre involves blending one color into another seamlessly, creating a gradient effect. This technique can be particularly striking in spaces like the foyer or a hallway. Imagine a wall that transitions from a soft coral at the bottom to a pale pink at the top. Ombre painting adds depth and dimension, giving your walls a unique and captivating look.
Creating Patterns:
For those who crave a more intricate and visually stimulating environment, patterned walls can be an excellent choice. Patterns can range from subtle and understated to bold and vibrant, depending on your personal style. Stripes, chevrons, and geometric shapes can all be achieved through DIY techniques like taping and stenciling. A playful idea is to create a striped accent wall in a child’s bedroom, using colors that match the room’s décor.
Stenciled Sophistication:
Stenciling is a versatile technique that allows you to introduce intricate designs and motifs to your walls. You can find a wide variety of pre-made stencils or create your own. Consider stenciling a floral pattern in soft pastels on a bedroom wall for a touch of elegance and femininity. Stencils can also be used to add texture to plain walls or mimic the look of expensive wallpaper at a fraction of the cost.
Preparation and Execution:
Before you embark on your DIY wall painting project, it’s essential to prepare properly to ensure a smooth and successful outcome. Here are some key steps to follow:
1. Clean and Repair: Clean your walls thoroughly to remove dirt and grease. Repair any cracks or holes and sand down any rough patches.
2. Prime the Surface: Applying a primer can help the paint adhere better and provide a consistent base for the new color.
3. Gather Supplies: Invest in high-quality paint, brushes, rollers, painter’s tape, and drop cloths. Having the right tools will make the process easier and yield better results.
4. Test Colors: Before committing to a color, test it on a small section of the wall to ensure it looks the way you envision in your space’s lighting.
5. Plan the Design: If you’re creating a pattern or using stencils, plan out the design in advance. Measure and mark any guidelines to ensure precision.
6. Take Your Time: DIY projects can be exciting, but rushing through the process can lead to mistakes. Take your time to ensure clean lines and an even application.
7. Finishing Touches: Once the paint is dry, remove any painter’s tape and touch up any imperfections. Consider adding decorative elements like wall art, shelves, or mirrors to complete the look.
In Conclusion:
DIY wall painting is a creative and fulfilling way to transform your home. From choosing the right color scheme to experimenting with patterns and techniques, the possibilities are endless. Whether you opt for a soothing monochromatic palette or an eye-catching ombre gradient, your walls can reflect your personal style and make a bold statement. With proper preparation, attention to detail, and a touch of artistic flair, you can turn your living spaces into inspiring and visually captivating environments that truly feel like home. So roll up your sleeves, grab your paintbrushes, and let your imagination run wild as you embark on a DIY wall painting journey that will leave your home looking more vibrant and inviting than ever before.
Beginner’s Guide to DIY Wall Painting: Tips and Techniques
Introduction
Embarking on a DIY wall painting project allows you to infuse your personal touch into your living space. Whether you’re looking to refresh a room with a new color scheme or add a creative accent wall, the canvas of your walls becomes a gateway to expressing your style and transforming your environment.
Source : https://www.fotolog.com
Painting your own walls can be a creative and fulfilling endeavor that transforms the look and feel of your living space. Whether you’re aiming to refresh a room or add a personal touch, DIY wall painting allows you to unleash your artistic side while also saving on professional costs. This beginner’s guide will walk you through essential tips and techniques to ensure your DIY wall painting project is a success.
Preparation: The Key to Success
Before you start wielding your paintbrush, thorough preparation is crucial to achieving a polished finish. Here’s what you need to do:
1. Choose Your Paint: Opt for high-quality paints that are durable and have a good coverage. Choose between different finishes like matte, satin, eggshell, or semi-gloss, depending on the look you want to achieve and the area you’re painting.
2. Gather Supplies: Make a checklist of supplies you’ll need, including paint, brushes, rollers, painter’s tape, drop cloths, a ladder, a paint tray, and a stirring stick.
3. Prep the Area: Remove furniture and cover floors with drop cloths to protect them from accidental paint spills. Remove nails, screws, and outlet covers, and apply painter’s tape to edges, baseboards, and window frames to ensure clean lines.
4. Clean and Repair: Clean the walls to remove dirt, dust, and grease that could affect paint adhesion. Repair any cracks, holes, or imperfections using spackling compound, and sand the patched areas smooth.
5. Prime if Necessary: If you’re painting over a dark or unevenly colored wall, consider using a primer to ensure better paint coverage and a consistent color result.
Choosing Colors and Patterns
Selecting the right colors and patterns for your walls is a creative process that can dramatically impact the overall look of your space. Here are some guidelines:
1. Consider the Space: Think about the size and function of the room. Lighter colors can make a room feel more spacious, while darker colors can add coziness. Bold accent walls can create a focal point, but be mindful of how they interact with the rest of the room’s decor.
2. Sample Swatches: Purchase small paint samples and apply them to a small section of the wall to see how they look under different lighting conditions. Observing how the color changes throughout the day can help you make an informed decision.
3. Harmonize with Decor: Coordinate your chosen color with the existing furniture, textiles, and decor items in the room. A cohesive color palette ties the room together and creates a harmonious atmosphere.
4. Experiment with Techniques: Beyond a single solid color, you can explore various painting techniques like color blocking, stenciling, ombre, or even creating a faux finish like distressed or textured effects.
Techniques for a Flawless Finish
When it’s time to pick up the paintbrush, these techniques will ensure a professional-looking finish:
1. Cutting In: Before using a roller, “cut in” with a brush along the edges of the wall, where the roller can’t reach easily. This creates clean lines and prevents the need to tape off everything.
2. Rolling: Load the roller with paint and apply in a “W” or “M” pattern to evenly distribute the paint. Start from the top and work your way down in sections, slightly overlapping each pass.
3. Maintain Wet Edges: To avoid visible lines where wet paint meets dry paint, maintain a wet edge by working in small sections and keeping a wet roller.
4. Blend Colors: If you’re working on a larger wall or using multiple cans of paint, mix them together in a larger container to ensure a consistent color across the entire surface.
Tips for Success
1. Patience is Key: Rushing through the process can lead to mistakes. Take your time, especially during the preparation and cutting-in stages.
2. Avoid Overloading the Brush or Roller: Excess paint can lead to drips and uneven application. Tap off excess paint before applying it to the wall.
3. Test the Color: Paint a small section of the wall and observe it under different lighting conditions before committing to the entire room.
4. Protect Yourself: Wear old clothes, gloves, and protective eyewear to prevent paint splatters from ruining your clothing and getting in your eyes.
5. Ventilate the Room: Ensure proper ventilation by opening windows or using fans, especially if you’re using paint with strong odors.
Conclusion
Embarking on a DIY wall painting project can be both rewarding and enjoyable. With careful preparation, color selection, and mastering a few essential techniques, you can achieve professional-looking results that enhance the ambiance of your living spaces. Remember, practice makes perfect, so don’t be discouraged by any initial hiccups. As you gain experience, you’ll find that DIY wall painting becomes a creative outlet that allows you to express your unique style throughout your home.
Laser Cut Clothing: Fashion Meets Precision Crafting

Source: goldenlaser.cc
Laser cut clothing is a unique and innovative way to create stylish and fashionable garments. It combines the precision of laser cutting technology with the creativity of fashion design. laser cut clothing is made by using a laser to cut intricate patterns and designs into fabric. This process allows for intricate details and complex shapes to be created with a high level of accuracy and precision. The result is clothing that is both fashionable and unique. laser cut clothing is a great way to express your individual style and stand out from the crowd.
Exploring the Possibilities of Laser Cut Clothing: How Technology is Revolutionizing the Fashion Industry
The fashion industry is constantly evolving, and the introduction of laser cut clothing is revolutionizing the way we dress. Laser cutting technology has been around for decades, but only recently has it been used to create clothing. This new technology is allowing fashion designers to create intricate and unique designs that would have been impossible to create with traditional methods.
Laser cutting technology works by using a high-powered laser beam to cut through fabric. The laser beam is directed by a computer, which allows for precise and intricate designs. This technology is being used to create clothing with intricate patterns, detailed designs, and unique shapes. It is also being used to create clothing with unique textures, such as velvet or leather.
The use of laser cut clothing is allowing fashion designers to create clothing that is both stylish and comfortable. laser cut clothing is lightweight and breathable, making it perfect for summer days. It is also durable and can withstand wear and tear, making it ideal for everyday wear.
The use of laser cut clothing is also allowing fashion designers to create clothing that is more sustainable. Laser cutting technology uses less fabric than traditional methods, which reduces waste and helps to conserve resources. Additionally, laser cut clothing is often made from recycled materials, which helps to reduce the environmental impact of the fashion industry.
The use of laser cut clothing is also allowing fashion designers to create clothing that is more affordable. Laser cutting technology is faster and more efficient than traditional methods, which reduces production costs. This allows fashion designers to create clothing that is more affordable for consumers.
The use of laser cut clothing is revolutionizing the fashion industry. This new technology is allowing fashion designers to create clothing that is stylish, comfortable, sustainable, and affordable. As this technology continues to evolve, it will open up new possibilities for fashion designers and consumers alike.
Crafting with Precision: The Benefits of Laser Cut Clothing for Designers and Consumers
The fashion industry is constantly evolving, and laser cut clothing is one of the latest trends to hit the market. Laser cutting technology has revolutionized the way clothing is designed and produced, offering a range of benefits for both designers and consumers.
For designers, laser cutting technology offers a level of precision that is difficult to achieve with traditional methods. laser cut clothing can be designed with intricate patterns and shapes that would be impossible to create with scissors or a sewing machine. This allows designers to create unique and eye-catching pieces that stand out from the crowd. Additionally, laser cutting technology is much faster than traditional methods, allowing designers to produce clothing quickly and efficiently.
For consumers, laser cut clothing offers a range of benefits. laser cut clothing is often more durable than traditional clothing, as the fabric is cut with a laser rather than scissors or a sewing machine. This means that the clothing is less likely to fray or tear, making it more long-lasting. Additionally, laser cut clothing is often more comfortable than traditional clothing, as the fabric is cut with a precise and even finish.
Overall, laser cut clothing offers a range of benefits for both designers and consumers. For designers, it offers a level of precision and speed that is difficult to achieve with traditional methods. For consumers, it offers a range of benefits, including durability and comfort. As the fashion industry continues to evolve, laser cut clothing is sure to remain a popular choice for both designers and consumers.
Conclusion
laser cut clothing is a unique and innovative way to create fashionable garments with precision and accuracy. It is a great way to add a modern and stylish touch to any wardrobe. With the help of laser cutting technology, designers can create intricate patterns and designs that are impossible to achieve with traditional methods. laser cut clothing is a great way to express your individual style and stand out from the crowd.