


Category Archives: Home Improvement
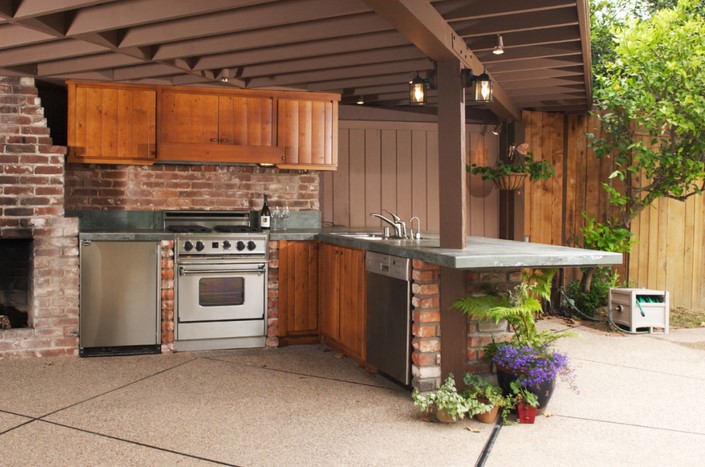
DIY Outdoor Kitchens: Building Your Dream Cooking Space
Source : https://www.happysprout.com
DIY Outdoor Kitchens: Building Your Dream Cooking Space is a comprehensive guide that provides step-by-step instructions on how to create your own outdoor kitchen. This guide covers everything from planning and design to construction and finishing touches. It is designed for homeowners who want to extend their living space outdoors and enjoy cooking and dining in the open air. With this guide, you can transform your backyard into a functional and stylish outdoor cooking space, tailored to your specific needs and preferences. Whether you’re a seasoned DIY enthusiast or a beginner, this guide will equip you with the knowledge and skills to build your dream outdoor kitchen.
Step-by-Step Guide to Building Your Dream DIY Outdoor Kitchen
Building your dream DIY outdoor kitchen can be an exciting and rewarding project. With careful planning, a bit of creativity, and some elbow grease, you can create a functional and aesthetically pleasing outdoor cooking space that will serve as a hub for family gatherings, parties, and casual dinners. This article provides a step-by-step guide to help you navigate the process of building your dream DIY outdoor kitchen.
The first step in building your outdoor kitchen is to design the layout. Consider the size of your backyard, the location of your house, and the natural elements such as trees and slopes. The design should be functional, with easy access to the grill, sink, and refrigerator. It should also be aesthetically pleasing, blending seamlessly with the rest of your outdoor space. You can sketch your design on paper or use a computer program to create a 3D model.
Once you have a design in mind, the next step is to choose the materials. The materials you choose should be durable and weather-resistant. Stainless steel is a popular choice for outdoor kitchens because it is rust-resistant and easy to clean. Other options include stone, brick, and concrete. The choice of materials will largely depend on your budget and the style of your outdoor kitchen.
After selecting the materials, the next step is to build the foundation. The foundation should be strong and stable to support the weight of the kitchen appliances and fixtures. You can build the foundation using concrete blocks or pavers. Make sure the foundation is level and secure before proceeding to the next step.
The fourth step is to install the appliances and fixtures. This includes the grill, sink, refrigerator, and any other appliances you want in your outdoor kitchen. It’s important to hire a professional to install the plumbing and electrical systems to ensure they are safe and up to code.
Once the appliances and fixtures are installed, the next step is to build the countertop and cabinets. The countertop should be durable and heat-resistant. Granite and concrete are popular choices for outdoor kitchen countertops. The cabinets should be weather-resistant and provide ample storage space for your cooking utensils and supplies.
The final step is to add the finishing touches. This includes painting or staining the cabinets, installing the backsplash, and adding lighting. You can also add accessories such as a bar, a pizza oven, or a fire pit to enhance the functionality and aesthetics of your outdoor kitchen.
Building your dream DIY outdoor kitchen is a big project, but with careful planning and execution, it can be a rewarding experience. Not only will you have a beautiful and functional outdoor cooking space, but you will also increase the value of your home. So roll up your sleeves, put on your DIY hat, and start building your dream outdoor kitchen.In conclusion, DIY Outdoor Kitchens allow homeowners to create their dream cooking space tailored to their specific needs and preferences. They offer a cost-effective solution compared to professional installations, and provide an opportunity for personal creativity and hands-on involvement. However, they require careful planning, time, effort, and basic construction skills. The end result is a functional, personalized outdoor cooking area that can enhance the home’s living space and potentially increase its value.
Water Bottle Art: Creative Recycling Projects

Source : https://www.treehugger.com
Water Bottle Art: Creative Recycling Projects is an innovative and eco-friendly approach to reusing plastic water bottles. This concept involves transforming discarded water bottles into beautiful and functional art pieces. It not only promotes recycling and reduces waste, but also encourages creativity and craftsmanship. From decorative items to practical tools, these projects offer a wide range of possibilities, making it an engaging activity for people of all ages.
Innovative Water Bottle Art: Transforming Trash into Creative Recycling Projects
Water Bottle Art is an innovative concept that has been gaining traction in recent years, transforming what was once considered trash into creative recycling projects. This practice not only promotes environmental sustainability but also fosters artistic expression and creativity. The idea is simple: instead of discarding used water bottles, they are repurposed into unique pieces of art. This not only reduces waste but also provides a platform for individuals to express their creativity and contribute to a more sustainable future.
The process of creating water bottle art begins with the collection of used water bottles. These bottles, which would otherwise end up in landfills or oceans, are cleaned and prepared for transformation. The versatility of plastic bottles makes them an ideal medium for a variety of artistic projects. They can be cut, painted, melted, and reshaped into a myriad of forms, from intricate sculptures to colorful wall hangings.
One popular method of water bottle art involves cutting the bottles into different shapes and sizes. These pieces can then be painted or decorated and assembled into a larger work of art. For instance, a collection of cut and painted bottle pieces can be arranged into a vibrant mosaic or a whimsical mobile. The possibilities are limited only by the artist’s imagination.
Another innovative approach to water bottle art is the creation of ‘eco-sculptures’. This involves melting and reshaping the plastic bottles into new forms. With careful manipulation, artists can create stunning sculptures that bear little resemblance to their original form. These eco-sculptures not only serve as a testament to the artist’s skill but also highlight the potential of recycling and repurposing waste materials.
In addition to these methods, water bottle art can also incorporate other recycled materials. For example, bottle caps can be used to create textured surfaces or add detail to a piece. Similarly, labels can be repurposed into collage elements, adding another layer of interest to the artwork. This integration of various materials further emphasizes the recycling ethos at the heart of water bottle art.
The beauty of water bottle art lies not only in the final product but also in the process. It encourages individuals to view waste materials in a new light, recognizing their potential for transformation rather than their destiny as trash. This shift in perspective is crucial in promoting a more sustainable future, as it encourages waste reduction and recycling.
Moreover, water bottle art serves as a powerful educational tool. It provides a tangible demonstration of the potential of recycling, making the concept more accessible and engaging. This can be particularly effective in educational settings, where students can participate in creating water bottle art, gaining hands-on experience with recycling and sustainability.
In conclusion, water bottle art represents a creative and innovative approach to recycling. By transforming discarded water bottles into unique pieces of art, individuals can express their creativity while contributing to environmental sustainability. Whether it’s a colorful mosaic, a whimsical mobile, or a stunning eco-sculpture, each piece of water bottle art serves as a testament to the potential of recycling and the power of creative expression. As such, water bottle art not only beautifies our surroundings but also serves as a reminder of our responsibility towards the environment.Water Bottle Art: Creative Recycling Projects are an innovative and eco-friendly way to repurpose used water bottles. These projects not only promote recycling and reduce waste, but also encourage creativity and artistic expression. They can be a fun and educational activity for people of all ages, providing a unique approach to environmental awareness.
Flooring Fantasia: Inexpensive Ideas for Stylish Flooring
Source : https://d7fcfvvxwoz9e.cloudfront.net
Welcome to Flooring Fantasia! We are here to provide you with stylish and affordable flooring ideas for your home. Whether you are looking for a classic hardwood floor, a modern tile, or something unique and creative, we have the perfect flooring solution for you. Our team of experienced professionals will help you find the perfect flooring for your home, while staying within your budget. We offer a wide selection of flooring materials, from traditional hardwood to modern vinyl, and everything in between. With our expertise and knowledge, we can help you create a beautiful and unique flooring design that will last for years to come.
Get Creative with Inexpensive Flooring Ideas: How to Transform Your Home with Budget-Friendly Flooring Fantasia
When it comes to transforming your home on a budget, flooring is one of the most important elements to consider. Fortunately, there are plenty of creative and inexpensive flooring ideas that can help you achieve the look you want without breaking the bank. Here are some of the best budget-friendly flooring options to consider for your next home renovation project.
Vinyl Flooring: Vinyl flooring is one of the most affordable and versatile flooring options available. It comes in a variety of colors and patterns, and is easy to install and maintain. Vinyl is also water-resistant, making it a great choice for bathrooms and kitchens.
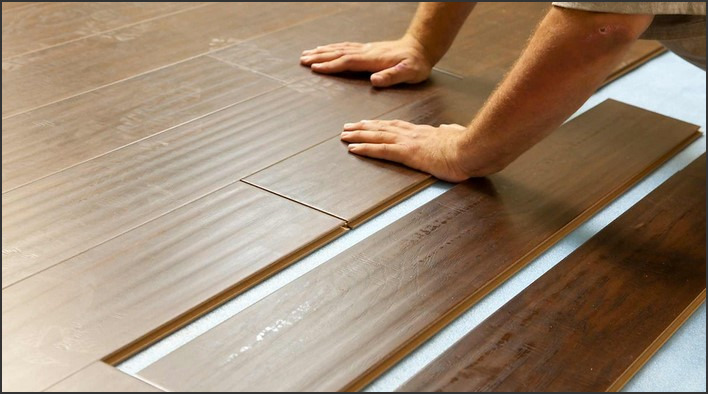
Laminate Flooring: Laminate flooring is another great option for those looking for an affordable flooring solution. It is durable, easy to install, and comes in a variety of colors and styles. Laminate is also resistant to scratches and stains, making it a great choice for high-traffic areas.
Cork Flooring: Cork flooring is a great option for those looking for a unique and eco-friendly flooring option. It is soft and comfortable underfoot, and is also resistant to mold and mildew. Cork is also easy to install and maintain, making it a great choice for DIYers.
Tile Flooring: Tile flooring is a great way to add a touch of elegance to any room. It is available in a variety of colors and styles, and is easy to install and maintain. Tile is also water-resistant, making it a great choice for bathrooms and kitchens.
These are just a few of the many creative and inexpensive flooring ideas that can help you transform your home on a budget. With a little bit of research and creativity, you can find the perfect flooring solution for your home that won’t break the bank.
DIY Flooring Fantasia: How to Create a Stylish Look on a Budget with Easy-to-Install Flooring Solutions
Are you looking for a way to give your home a stylish makeover without breaking the bank? DIY flooring is a great way to achieve a beautiful look without spending a fortune. With the right materials and a bit of creativity, you can create a unique and eye-catching floor that will be the envy of your friends and family.
DIY flooring solutions are becoming increasingly popular as they offer a cost-effective way to update your home. There are a variety of easy-to-install flooring options available, from vinyl tiles to laminate planks, so you can find something to suit your budget and style.
Vinyl tiles are a great choice for DIY flooring as they are easy to install and come in a range of colors and patterns. They are also very durable and can be used in high-traffic areas. Laminate planks are another popular option as they are easy to install and come in a variety of colors and textures. They are also very affordable and can be used to create a unique look.
If you’re looking for something a bit more unique, you can also consider using cork or bamboo flooring. Cork is a natural material that is both durable and stylish, while bamboo is a sustainable option that is becoming increasingly popular. Both of these materials are easy to install and come in a range of colors and textures.
When it comes to DIY flooring, it’s important to remember that the key to success is preparation. Make sure you measure the area you’re working with and buy the right amount of materials. It’s also important to make sure you have the right tools for the job, such as a saw, hammer, and level.
Once you’ve chosen your materials and gathered your tools, it’s time to get to work. Start by laying out the flooring and cutting it to size. Make sure you leave a gap between the pieces to allow for expansion and contraction. Once you’ve laid out the flooring, you can then start to install it. Depending on the type of flooring you’ve chosen, you may need to use adhesive or nails to secure it in place.
DIY flooring can be a great way to give your home a stylish makeover on a budget. With the right materials and a bit of creativity, you can create a unique and eye-catching floor that will be the envy of your friends and family. So why not give it a try?In conclusion, Flooring Fantasia offers a wide variety of stylish and affordable flooring options that can help you create the perfect look for your home. From hardwood to laminate, vinyl, and tile, there is something for everyone. With their helpful customer service and competitive prices, Flooring Fantasia is the perfect place to find the perfect flooring solution for your home.
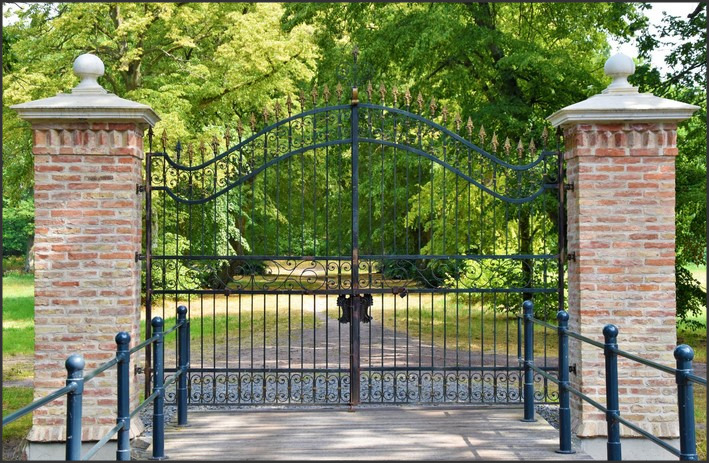
Gate Grandeur: Wrought Iron Garden Gate Ideas for Elegance
Source : https://www.dciron.co.uk
Welcome to Gate Grandeur, the premier source for wrought iron garden gate ideas for elegance. Our goal is to provide you with the highest quality wrought iron garden gates that will add a touch of sophistication and grandeur to your outdoor space. We offer a wide selection of designs, sizes, and finishes to suit any style and budget. Whether you are looking for a classic wrought iron gate to enhance your garden or a modern design to add a contemporary flair, we have the perfect gate for you. Our experienced team of professionals will work with you to create a custom design that will bring your vision to life. With our commitment to quality and customer service, you can be sure that your new gate will be a beautiful addition to your home for years to come.
How to Create an Elegant Entrance with a Wrought Iron Garden Gate
Creating an elegant entrance to your garden can be a great way to add a touch of sophistication to your outdoor space. Wrought iron garden gates are a popular choice for this purpose, as they offer a timeless, classic look that will never go out of style. Here are some tips for creating an elegant entrance with a wrought iron garden gate.
First, consider the size and shape of the gate. Wrought iron gates come in a variety of sizes and shapes, so you can choose one that fits the style of your garden. If you have a large garden, you may want to opt for a larger gate, while a smaller garden may be better suited to a more delicate design.
Next, think about the color of the gate. Wrought iron gates come in a range of colors, from black to bronze to white. Choose a color that complements the other elements in your garden, such as the plants and furniture.
Finally, consider the details. Wrought iron gates can be decorated with intricate designs, such as scrolls, leaves, and flowers. These details can add a touch of elegance to your entrance and make it stand out from the rest of your garden.
By following these tips, you can create an elegant entrance to your garden with a wrought iron garden gate. With the right design and color, your gate will be a beautiful addition to your outdoor space.
Enhancing Your Home’s Curb Appeal with a Wrought Iron Garden Gate
Enhancing your home’s curb appeal is a great way to make a good first impression and increase the value of your property. One of the most effective ways to do this is to install a wrought iron garden gate. Wrought iron is a timeless material that adds a classic, elegant touch to any home. It is also incredibly durable and can withstand the elements for many years.
A wrought iron garden gate can be a great way to add a touch of sophistication to your home’s exterior. It can also provide a sense of security and privacy, as it can be locked to keep unwanted visitors out. Additionally, it can be customized to fit the style of your home, with a variety of designs and finishes available.
When choosing a wrought iron garden gate, it is important to consider the size and shape of the gate. You should also consider the type of lock you want to use, as well as the type of finish you would like. Additionally, you should consider the type of maintenance you are willing to do on the gate. Wrought iron is a durable material, but it does require regular maintenance to keep it looking its best.
Installing a wrought iron garden gate is a relatively simple process. However, it is important to make sure that the gate is properly installed and secured. If you are not comfortable with the installation process, it is best to hire a professional to do the job for you.
Enhancing your home’s curb appeal with a wrought iron garden gate is a great way to make a good first impression and increase the value of your property. With a variety of designs and finishes available, you can find the perfect gate to fit the style of your home. Additionally, it is a durable material that can withstand the elements for many years. With proper installation and maintenance, your wrought iron garden gate will be a beautiful addition to your home for years to come.The Gate Grandeur wrought iron garden gate ideas provide a beautiful and elegant way to enhance the look of any outdoor space. With a variety of styles and designs to choose from, these gates can be customized to fit any home or garden. Whether you are looking for a classic look or something more modern, these gates are sure to add a touch of elegance to your outdoor area. With their timeless beauty and durability, these gates are sure to last for years to come.
Midcentury Marvel: Designing a Modern Desk with Vintage Vibes
Source : https://www.decorilla.com
Midcentury Marvel: Designing a Modern Desk with Vintage Vibes is a guide to creating a modern desk with a mid-century modern aesthetic. This guide will provide step-by-step instructions on how to build a desk that is both stylish and functional. It will also provide tips on how to choose the right materials and finishes to create a unique and timeless look. With this guide, you will be able to create a desk that is both stylish and practical, and that will last for years to come.
How to Incorporate Midcentury Modern Style into Your Home Office: A Guide to Designing a Desk with Vintage Vibes
Are you looking to add a touch of midcentury modern style to your home office? Incorporating vintage vibes into your workspace can be a great way to create a unique and inviting atmosphere. With the right design elements, you can create a desk that is both stylish and functional. Here is a guide to help you design a midcentury modern home office desk.
First, consider the size and shape of your desk. Midcentury modern style is characterized by clean lines and minimalistic shapes. Look for a desk with a rectangular or oval top and tapered legs. This will give your desk a classic midcentury look.
Next, choose a material for your desk. Wood is the most popular choice for midcentury modern furniture, but you can also find desks made of metal, glass, and even plastic. Choose a material that complements the other elements in your home office.
When it comes to color, midcentury modern style is all about neutral tones. Look for a desk in a light wood finish, such as walnut or oak, or opt for a white or black desk for a more modern look.
Finally, accessorize your desk with vintage-inspired pieces. Look for items such as a vintage typewriter, a retro telephone, or a vintage lamp. These pieces will add a unique touch to your desk and will help to create a midcentury modern atmosphere.
By following these tips, you can easily create a midcentury modern home office desk that is both stylish and functional. With the right design elements, you can create a workspace that is both inviting and inspiring.
The Benefits of Investing in a Midcentury Modern Desk: Why You Should Consider Adding a Vintage Piece to Your Home Office
Are you looking to add a touch of style and sophistication to your home office? Investing in a midcentury modern desk is a great way to do just that. Midcentury modern furniture is known for its timeless design, quality craftsmanship, and unique aesthetic. Not only will a midcentury modern desk add a touch of class to your home office, but it can also provide a number of practical benefits. Here are just a few reasons why you should consider adding a vintage piece to your home office.
First, midcentury modern desks are incredibly durable. Many of these pieces are made from solid wood, which is known for its strength and longevity. This means that your midcentury modern desk will be able to withstand the wear and tear of everyday use for many years to come.
Second, midcentury modern desks are incredibly versatile. Many of these pieces feature multiple drawers and compartments, allowing you to store all of your office supplies and documents in one convenient place. Additionally, many midcentury modern desks feature adjustable heights, allowing you to customize the desk to your own individual needs.
Third, midcentury modern desks are incredibly stylish. These pieces feature sleek lines and minimalistic designs, making them perfect for any modern home office. Additionally, many of these pieces feature unique details, such as tapered legs or curved edges, which can add a touch of personality to your space.
Finally, investing in a midcentury modern desk is a great way to add value to your home. These pieces are highly sought after by collectors and interior designers, meaning that they can be a great investment for the future.
As you can see, there are many benefits to investing in a midcentury modern desk. Not only will it add a touch of style and sophistication to your home office, but it can also provide a number of practical benefits. So, if you’re looking to upgrade your home office, consider investing in a vintage midcentury modern desk today.The Midcentury Marvel desk is a great way to bring a vintage vibe to any modern home. Its sleek lines and classic design make it a timeless piece that will never go out of style. With its sturdy construction and beautiful finish, this desk is sure to be a conversation starter for years to come. Whether you’re looking for a statement piece or a functional workspace, the Midcentury Marvel desk is the perfect choice.