


Category Archives: Home Improvement
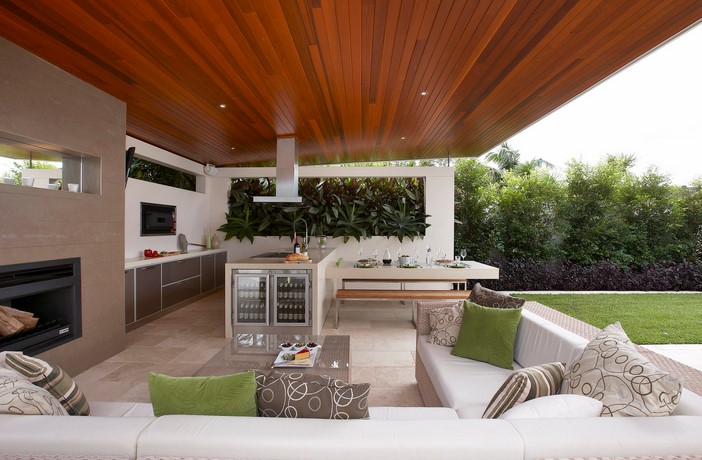
Outdoor Kitchen Setups for Entertaining
Source:https://st.hzcdn.com
As outdoor living spaces continue to gain popularity, more homeowners are transforming their backyards into functional and stylish entertaining areas. One of the most sought-after additions is an outdoor kitchen. Outdoor kitchen setups not only enhance the aesthetic appeal of your backyard but also offer a practical space for cooking, dining, and socializing. Whether you’re hosting a family barbecue, a dinner party, or a casual get-together with friends, having an outdoor kitchen can elevate the experience. In this article, we will explore various outdoor kitchen setups, highlighting design ideas, essential features, and tips for creating a perfect space for entertaining.
The Essentials of an Outdoor Kitchen Setup
Creating an outdoor kitchen that is both functional and enjoyable requires careful planning and consideration of essential elements. The right setup will make cooking and entertaining outdoors a seamless experience, allowing you to enjoy your space to the fullest.
1. Cooking Area: The Heart of the Outdoor Kitchen
The cooking area is the core of any outdoor kitchen setup. Depending on your needs and preferences, this could include a range of appliances such as a built-in grill, a pizza oven, a smoker, or even a side burner for preparing sauces and sides. Gas and charcoal grills are the most common choices, but for a more versatile setup, consider a hybrid model that combines both.
- Grill: A high-quality grill is a must-have for an outdoor kitchen. A built-in grill provides a sleek, permanent solution and allows for a customized design. If you prefer more flexibility, a portable grill might be a good option.
- Pizza Oven: For those who enjoy making homemade pizzas or roasting other dishes, a pizza oven is a great addition. It brings a touch of authenticity to your outdoor cooking and can be a conversation starter at gatherings.
- Side Burner: A side burner is ideal for preparing smaller dishes that require a pot or pan, such as sauces, soups, or side dishes. This extra burner can prevent your main grill from being overcrowded during large meals.
2. Counter Space and Storage
An outdoor kitchen setup isn’t complete without sufficient counter space for food preparation and storage. You’ll need space to chop vegetables, season meat, and assemble meals before grilling. Incorporating ample counter space can make the cooking process more efficient and enjoyable.
- Countertops: Materials like granite, marble, or concrete are durable and weather-resistant, making them perfect for outdoor kitchen countertops. They also offer a sleek and modern look that complements the outdoor environment.
- Storage Solutions: Cabinets, drawers, and shelves are essential for storing cooking utensils, spices, and other kitchen essentials. Weatherproof storage solutions are critical to protecting your equipment from the elements, especially if you live in areas with extreme weather conditions.
3. Seating and Dining Area
The goal of any outdoor kitchen setup is to create a space that promotes social interaction. A comfortable seating and dining area is key to this. Whether you opt for a casual bar-style seating arrangement or a more formal dining table, the seating should be both functional and inviting.
- Bar Seating: Installing a bar counter near the cooking area can provide casual seating for guests to enjoy appetizers or drinks while you cook. It also creates a social atmosphere, as guests can easily converse with the chef.
- Dining Table: A larger dining table is perfect for sit-down meals and family gatherings. Choose a table made from weather-resistant materials, such as teak, aluminum, or wrought iron, to ensure durability over time.
- Lounge Seating: For a more relaxed vibe, consider incorporating lounge seating with comfortable chairs, sofas, or sectionals. These spaces allow guests to relax before or after a meal and enjoy the outdoor ambiance.
Design Considerations for an Outdoor Kitchen Setup
When designing your outdoor kitchen, it’s essential to blend functionality with aesthetic appeal. The right design can make your outdoor kitchen not only a place to cook but also a beautiful focal point in your backyard. Below are some key design considerations to keep in mind:
1. Weather Resistance and Durability
Outdoor kitchens are exposed to the elements, so durability is a top priority. Materials used for countertops, cabinetry, and flooring should be weather-resistant, heatproof, and easy to maintain. For example, stainless steel appliances are resistant to rust, while stone countertops can handle high temperatures and are easy to clean.
- Protective Covers: Investing in protective covers for appliances, furniture, and grills can extend their lifespan and keep them looking great year-round.
2. Lighting and Ambiance
Outdoor kitchens are often used in the evening, so proper lighting is essential for both functionality and ambiance. Installing task lighting above cooking areas will ensure you can prepare meals safely at night. In addition, accent lighting can create a warm, inviting atmosphere for evening gatherings.
- Task Lighting: Place overhead lights or spotlights near the grill or cooking stations to illuminate the space while cooking.
- Ambient Lighting: String lights, lanterns, or LED candles can help set the mood, making the outdoor kitchen more welcoming for guests.
3. Integrating Nature
The beauty of an outdoor kitchen is the connection it creates between the indoors and outdoors. Integrating natural elements into your design can enhance the ambiance and make the kitchen feel like an extension of your garden or patio.
- Greenery: Consider incorporating plants, flowers, or even a small herb garden into your setup. This not only adds visual appeal but also provides fresh ingredients for cooking.
- Natural Materials: Using wood, stone, or other natural materials in your kitchen’s design helps to seamlessly blend the space with its surroundings, making the outdoor kitchen feel like a part of nature.
Tips for Creating the Perfect Outdoor Kitchen Setup
Creating the ideal outdoor kitchen setup requires thoughtful planning and design. Below are some expert tips to ensure your setup is both functional and stylish:
1. Plan for Flow and Functionality
Design your outdoor kitchen with the flow of cooking and entertaining in mind. Ensure that your cooking area, dining area, and seating are arranged in a way that promotes easy movement. The cook should have a clear line of sight to the dining area and guests, making it easy to interact while preparing meals.
2. Incorporate a Beverage Station
A beverage station or mini bar is a great addition to any outdoor kitchen setup. Stock it with your favorite drinks, glasses, and accessories, so guests can help themselves while you focus on the food. This adds convenience and encourages guests to mingle in the outdoor space.
3. Consider an Outdoor Refrigerator
An outdoor refrigerator is an excellent investment for an outdoor kitchen setup, allowing you to store ingredients, beverages, and leftovers close to your cooking area. This minimizes trips inside and keeps everything you need at arm’s reach while entertaining.
Conclusion: Elevate Your Entertaining with the Right Outdoor Kitchen Setups
In conclusion, outdoor kitchen setups are an incredible way to elevate your outdoor living space and enhance your entertaining experience. By carefully selecting the right appliances, design elements, and features, you can create a functional and stylish outdoor kitchen that is perfect for hosting gatherings, cooking delicious meals, and enjoying time with loved ones. Whether you prefer a minimalist design or a fully equipped cooking station, the possibilities for your outdoor kitchen are endless. Take the time to discover the perfect setup for your needs, and you’ll be well on your way to creating a space that brings people together and makes outdoor entertaining effortless and enjoyable.
Whole-Body Horse Vibration Therapy For Horse Backed By Science

One of the most effective healing techniques in the equestrian’s “toolbox” is whole-body vibration (WBV) therapy. According to research, a vibration plate with stand works to improve circulation and muscle contraction, which strengthens the body’s self-healing capacity. Regular vibration treatment sessions also improve performance and reduce the risk of injury in horses.
What Is Whole Body Vibration Therapy?
Whole-body vibration therapy uses a large vibrating platform. The platform, on which the horse is standing, vibrates at different frequencies (cycles per second) and magnitudes (up and down motion). A normal session would last 20 minutes at frequencies between 30 and 50 Hz, with the user controlling the frequency and setting a timer.
History of Whole-Body Vibration Therapy
Vibration therapy’s advantages have been recognised for decades. More than a century ago, breakfast cereal inventor Dr. John Harvey Kellogg created the first standing vibration plate for people. He thought vibration treatment could help with issues like headaches, constipation, and back discomfort by promoting the body’s natural healing processes.
The 1960s saw a significant increase in the use of vibration therapy. At that point, NASA researchers started looking into how well it worked to prevent muscular weakening and bone loss in astronauts living in zero gravity.
Whole-body vibration therapy has been shown in human trials to enhance muscle mass, improve circulation, reduce back and joint pain, reduce stress, improve bone density, and raise metabolism. Although there isn’t as much research on horses, there is strong evidence that vibration therapy benefits them as well.
Benefits of Horse Vibration Plates:
Horse vibration plates have the following known benefits:
- 1. Growth of the back muscles
In one study, nine horses between the ages of nine and eighteen received whole-body vibration therapy twice daily for thirty minutes, five days a week, for sixty days. Significant increases in the multifidus muscle’s size and symmetry were visible on ultrasounds. This crucial deep back muscle supports healthy posture, mobility, and balance by stabilising the spine. Maintaining a robust multifidus can reduce back pain and avoid or postpone lameness.
- Development of the hoof
In research with 10 horses, horses that received whole-body vibration (WBV) twice daily for 30 minutes every day for 60 days showed notable increases in hoof development rates in the first 30 days of treatment.
- Healing of the ligaments
Injuries to the ligaments and tendons must be treated carefully. The majority of horses with these injuries receive very little activity. WBV therapy speeds up the healing process, improves the quality of the repaired tissue, and stimulates tendons and ligaments without the negative effects of trotting or cantering.
- Pain and stress alleviation
A study says horses may experience pain relief and a relaxing impact from vibration therapy. According to a Michigan State University study, horses receiving whole-body vibration therapy seemed to calm down after each session, whereas control horses showed signs of restlessness. Similarly, a Middle Tennessee State University study discovered that horses receiving WBV therapy had lower heart rates, which may indicate that the treatment eased the animals’ discomfort.
- Chronic immobility
Eight horses with both chronic and current lameness participated in a study at the Peninsula Equine Medical Centre in Menlo Park, California. For 30 days, each horse received WBV twice daily for 30 minutes each time on a vibrating platform. During the first 30 days of WBV therapy, horses’ stride length and chronic lameness improved.
- Reduced amounts of cortisol
When compared to six stalled horses, six horses that received equine vibration treatment for 45 minutes, five days a week, at 50 Hz, had lower cortisol levels and a lower heart rate.
Easy tips to install a bathtub surround without help

Tired of that outdated or grimy bathtub surrounds? Dreaming of a fresh, clean look in your bathroom? The good news is, you don’t necessarily need to call in a professional and empty your wallet. Installing a bathtub surround yourself is a totally achievable DIY project! While having an extra pair of hands can be helpful, with a little patience and the right approach, you can absolutely tackle this solo.
This guide will walk you through some easy tips to install a bathtub surround without help, transforming your bathroom into the oasis you deserve. Let’s dive in!
- Gather Your Arsenal:
Before you even think about lifting a panel, make sure you have all your tools and materials ready. This will save you countless trips back and forth and keep your momentum going. Here’s what you’ll likely need:
- Your new bathtub surround kit: Carefully unpack it and familiarize yourself with the different panels and any included hardware.
- Measuring tape: Accuracy is key!
- Pencil or marker: For marking measurements.
- Level: To ensure everything is straight.
- Construction adhesive: Choose one specifically designed for bathroom applications to resist moisture.
- Caulk gun and silicone caulk: For sealing edges and preventing water damage. Look for mildew-resistant varieties.
- Gloves: Keep your hands clean and protected.
- Painter’s tape: To temporarily hold panels in place while the adhesive sets.
- Clean rags or sponges: For wiping away excess adhesive or caulk.
- Optional but helpful: A helper bar or temporary support to hold panels while the adhesive dries.
- Prep is Paramount:
A smooth, clean surface is important for a successful installation. Take the time to properly prepare the area:
- Remove the old surround (if applicable): This might involve scoring caulk lines and carefully prying off the old panels. Be soft to avoid damaging the underlying wall.
- Clean the walls thoroughly: Remove any soap scum, mildew, or loose debris. A good scrub with a bathroom cleaner will do the trick..
- Repair any wall damage: Fill any holes or cracks with appropriate patching compound and sand it smooth.
- Measure Twice, Cut Once (If Necessary):
Carefully measure the dimensions of your bathtub area. Compare these measurements to your surround panels. Most kits are designed to fit standard-sized tubs, but you might need to make some minor adjustments.
- Score the panel: Instead of trying to cut all the way through, use your utility knife or scoring tool to make several passes along the marked line. This will create a clean break.
- Snap the panel: Properly bend the panel with the scored line until it snaps cleanly.
- Dry Fit First:
Before applying any adhesive, do a dry run. This step allows you to identify any potential issues or the need for further trimming without making a sticky mess. Pay attention to how the panels interlock or overlap.
- Adhesive Application: The Sticky Situation:
Now for the main event! Follow the makers instructions for the recommended pattern and amount. Avoid getting adhesive too close to the edges, as it will squeeze out when you press the panel against the wall.
- Position and Secure:
Carefully align the first panel with the wall, starting in a corner. Press it properly into place, ensuring it’s level. Position it to hold the panel securely against the wall while the adhesive begins to grab.
Repeat this process for the remaining panels, making sure they interlock or overlap correctly. Use painter’s tape along the edges to further secure the panels and prevent them from shifting while the adhesive dries completely. Follow the adhesive manufacturer’s recommended drying time – usually several hours or overnight.
Wrapping up
You’ve successfully installed a new bathtub surround without any outside help. Take a back seat and admire your handiwork. Your bathroom has a fresh, new look, and you can bask in the satisfaction of a job well done – all on your own!
Top Signs You Need Mold Removal Services in Tulsa, OK
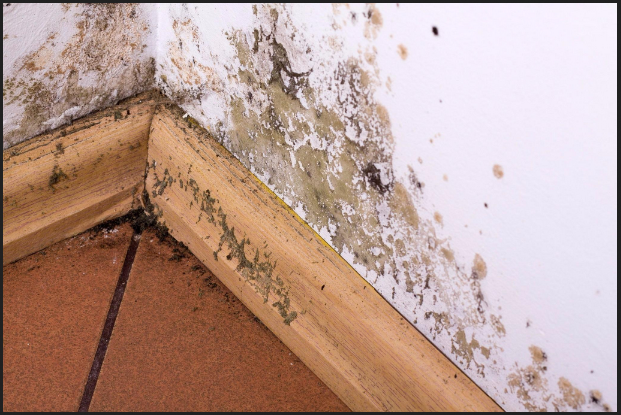
Mold can be a serious problem in homes and buildings, especially in areas with high humidity like Tulsa, OK. Mold can cause damage to your property and may also have a negative impact on your health. If you notice any signs of mold, it’s crucial to act fast and consider professional help. Below are the top signs that you need mold removal services in Tulsa, OK.
-
Visible Mold Growth
One of the most obvious signs you need mold remediation services in Tulsa, OK, is when you can see mold growing on walls, ceilings, or other surfaces. Mold can show up in different colors, including black, green, or white. Even small patches of mold can grow rapidly and spread to other parts of your home if not treated. Ignoring visible mold can lead to bigger problems down the road.
-
Musty Odors
A musty or damp smell is often a sign of hidden mold. Mold can grow in places that are out of sight, like behind walls, under carpets, or inside air vents. Even if you can’t see mold, the smell is a warning that mold is likely present. If the odor doesn’t go away after cleaning, it’s time to contact mold removal services in Tulsa, OK.
-
Water Damage
Mold thrives in areas with water damage. If your home has recently experienced flooding, leaking pipes, or a roof leak, it’s important to inspect for mold. Water-damaged areas are breeding grounds for mold, and it can start growing within 24-48 hours after water exposure. Professional disaster removal services in Tulsa, OK, can help detect mold in hard-to-reach areas and prevent it from spreading.
-
Allergic Reactions
Mold can cause allergic reactions, even if you’re not typically allergic to other things. Symptoms include sneezing, runny nose, red or itchy eyes, and skin rashes. If you or your family experience these symptoms at home but feel better when you leave, mold could be the cause. In this case, mold removal services in Tulsa, OK, can help improve your indoor air quality and reduce health risks.
-
Discoloration on Walls or Ceilings
Stains or discoloration on walls or ceilings, especially after water damage, are signs that mold may be growing underneath. These marks can range from brown to black and are often accompanied by a damp feeling. If you notice these signs, it’s important to call professionals for removal services to properly assess the damage and treat the affected areas.
-
High Humidity Levels
Tulsa’s humid climate makes homes more vulnerable to mold growth. If your home consistently feels damp or has high humidity levels, mold could easily grow in areas like the basement, bathrooms, or kitchen. Using a dehumidifier can help, but if mold has already started growing, you’ll need expert help from mold removal services in Tulsa, OK.
-
Previous Mold Problems
If you’ve dealt with mold problems in the past, there’s a good chance it can return if not completely removed. Mold spores can remain in the air or hidden areas of your home and spread when the conditions are right. It’s essential to get professional mold remediation services in Tulsa, OK, to thoroughly clean and treat any mold-prone areas to avoid future issues.
Conclusion
Mold can be harmful to both your home and your health, and it’s important to recognize the warning signs early. If you notice visible mold, musty odors, or water damage, it’s crucial to take action. Mold removal services in Tulsa, OK, offer expert solutions to safely remove mold and prevent it from returning. Don’t wait for the problem to get worse—addressing mold quickly can save you time, money, and help keep your home safe and healthy.
Painted Concrete Floor Ideas: Stylish and Durable Designs

Source : https://www.thespruce.com
Painted Concrete Floor Ideas: Stylish and Durable Designs is a comprehensive guide that explores the aesthetic and functional benefits of painted concrete floors. It provides a variety of design ideas, from simple, minimalist styles to more intricate and artistic patterns. The guide emphasizes the durability and low maintenance of painted concrete, making it an ideal choice for both residential and commercial spaces. It also offers practical tips on how to choose the right paint and techniques for a long-lasting finish. This guide is a valuable resource for homeowners, interior designers, and architects looking to incorporate painted concrete floors into their design projects.
Exploring Painted Concrete Floor Ideas: A Guide to Stylish and Durable Designs
Painted concrete floors are gaining popularity in both residential and commercial settings due to their stylish appeal and durability. This trend is not only cost-effective but also offers a wide range of design possibilities that can transform any space into a unique and aesthetically pleasing environment.
One of the most appealing aspects of painted concrete floors is their versatility. They can be customized to suit any design style, from modern and minimalist to rustic and traditional. For instance, a simple coat of white or grey paint can create a sleek, modern look, while a faux-stone or brick finish can lend a rustic charm to a space. Moreover, with the use of stencils, one can create intricate patterns or designs, such as geometric shapes, floral motifs, or even a faux rug effect.
Another significant advantage of painted concrete floors is their durability. Concrete is a robust material that can withstand heavy foot traffic, making it an ideal choice for high-traffic areas such as kitchens, living rooms, and commercial spaces. When properly sealed, painted concrete floors are resistant to stains, spills, and scratches, ensuring that the design remains intact for a long time.
However, the durability of painted concrete floors also depends on the quality of the paint used. Epoxy paint is often recommended for concrete floors due to its superior durability and resistance to moisture, chemicals, and abrasion. It also provides a glossy finish that can enhance the overall look of the floor. On the other hand, concrete stain can be used to achieve a more natural, matte finish. It penetrates the concrete surface, creating a permanent color that won’t peel or fade.
Despite their durability, painted concrete floors require proper maintenance to keep them looking their best. Regular sweeping and mopping can help remove dirt and dust that can scratch the surface. It’s also advisable to reseal the floor every few years to protect the paint and maintain its shine.
One of the challenges of painting concrete floors is the preparation process. The concrete surface must be thoroughly cleaned and repaired before painting to ensure a smooth, even finish. Any cracks or holes should be filled, and the surface should be sanded to remove any rough spots. Additionally, a primer should be applied before the paint to improve adhesion and durability.
In conclusion, painted concrete floors offer a stylish and durable flooring option that can be customized to suit any design style. With the right preparation, quality paint, and proper maintenance, they can transform any space into a unique and aesthetically pleasing environment. Whether you prefer a sleek, modern look or a rustic, traditional style, painted concrete floors can provide the perfect solution for your flooring needs.Painted concrete floor ideas offer a stylish and durable design solution for various spaces. They provide an opportunity for creativity and personalization, allowing for a range of colors, patterns, and finishes. Not only do they enhance the aesthetic appeal of a room, but they also offer durability and longevity, making them a practical choice for high-traffic areas. Therefore, painted concrete floors are a versatile and resilient design option that can significantly enhance the look and feel of a space.