


Category Archives: Home Improvement
Top Signs You Need Mold Removal Services in Tulsa, OK

Mold can be a serious problem in homes and buildings, especially in areas with high humidity like Tulsa, OK. Mold can cause damage to your property and may also have a negative impact on your health. If you notice any signs of mold, it’s crucial to act fast and consider professional help. Below are the top signs that you need mold removal services in Tulsa, OK.
-
Visible Mold Growth
One of the most obvious signs you need mold remediation services in Tulsa, OK, is when you can see mold growing on walls, ceilings, or other surfaces. Mold can show up in different colors, including black, green, or white. Even small patches of mold can grow rapidly and spread to other parts of your home if not treated. Ignoring visible mold can lead to bigger problems down the road.
-
Musty Odors
A musty or damp smell is often a sign of hidden mold. Mold can grow in places that are out of sight, like behind walls, under carpets, or inside air vents. Even if you can’t see mold, the smell is a warning that mold is likely present. If the odor doesn’t go away after cleaning, it’s time to contact mold removal services in Tulsa, OK.
-
Water Damage
Mold thrives in areas with water damage. If your home has recently experienced flooding, leaking pipes, or a roof leak, it’s important to inspect for mold. Water-damaged areas are breeding grounds for mold, and it can start growing within 24-48 hours after water exposure. Professional disaster removal services in Tulsa, OK, can help detect mold in hard-to-reach areas and prevent it from spreading.
-
Allergic Reactions
Mold can cause allergic reactions, even if you’re not typically allergic to other things. Symptoms include sneezing, runny nose, red or itchy eyes, and skin rashes. If you or your family experience these symptoms at home but feel better when you leave, mold could be the cause. In this case, mold removal services in Tulsa, OK, can help improve your indoor air quality and reduce health risks.
-
Discoloration on Walls or Ceilings
Stains or discoloration on walls or ceilings, especially after water damage, are signs that mold may be growing underneath. These marks can range from brown to black and are often accompanied by a damp feeling. If you notice these signs, it’s important to call professionals for removal services to properly assess the damage and treat the affected areas.
-
High Humidity Levels
Tulsa’s humid climate makes homes more vulnerable to mold growth. If your home consistently feels damp or has high humidity levels, mold could easily grow in areas like the basement, bathrooms, or kitchen. Using a dehumidifier can help, but if mold has already started growing, you’ll need expert help from mold removal services in Tulsa, OK.
-
Previous Mold Problems
If you’ve dealt with mold problems in the past, there’s a good chance it can return if not completely removed. Mold spores can remain in the air or hidden areas of your home and spread when the conditions are right. It’s essential to get professional mold remediation services in Tulsa, OK, to thoroughly clean and treat any mold-prone areas to avoid future issues.
Conclusion
Mold can be harmful to both your home and your health, and it’s important to recognize the warning signs early. If you notice visible mold, musty odors, or water damage, it’s crucial to take action. Mold removal services in Tulsa, OK, offer expert solutions to safely remove mold and prevent it from returning. Don’t wait for the problem to get worse—addressing mold quickly can save you time, money, and help keep your home safe and healthy.
Painted Concrete Floor Ideas: Stylish and Durable Designs
Source : https://www.thespruce.com
Painted Concrete Floor Ideas: Stylish and Durable Designs is a comprehensive guide that explores the aesthetic and functional benefits of painted concrete floors. It provides a variety of design ideas, from simple, minimalist styles to more intricate and artistic patterns. The guide emphasizes the durability and low maintenance of painted concrete, making it an ideal choice for both residential and commercial spaces. It also offers practical tips on how to choose the right paint and techniques for a long-lasting finish. This guide is a valuable resource for homeowners, interior designers, and architects looking to incorporate painted concrete floors into their design projects.
Exploring Painted Concrete Floor Ideas: A Guide to Stylish and Durable Designs
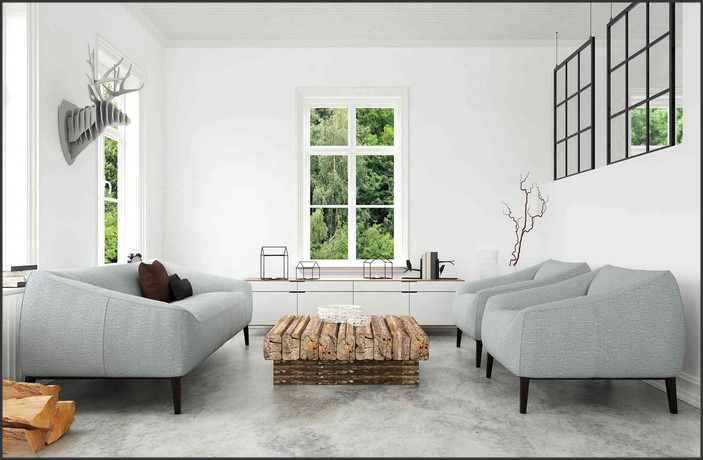
Painted concrete floors are gaining popularity in both residential and commercial settings due to their stylish appeal and durability. This trend is not only cost-effective but also offers a wide range of design possibilities that can transform any space into a unique and aesthetically pleasing environment.
One of the most appealing aspects of painted concrete floors is their versatility. They can be customized to suit any design style, from modern and minimalist to rustic and traditional. For instance, a simple coat of white or grey paint can create a sleek, modern look, while a faux-stone or brick finish can lend a rustic charm to a space. Moreover, with the use of stencils, one can create intricate patterns or designs, such as geometric shapes, floral motifs, or even a faux rug effect.
Another significant advantage of painted concrete floors is their durability. Concrete is a robust material that can withstand heavy foot traffic, making it an ideal choice for high-traffic areas such as kitchens, living rooms, and commercial spaces. When properly sealed, painted concrete floors are resistant to stains, spills, and scratches, ensuring that the design remains intact for a long time.
However, the durability of painted concrete floors also depends on the quality of the paint used. Epoxy paint is often recommended for concrete floors due to its superior durability and resistance to moisture, chemicals, and abrasion. It also provides a glossy finish that can enhance the overall look of the floor. On the other hand, concrete stain can be used to achieve a more natural, matte finish. It penetrates the concrete surface, creating a permanent color that won’t peel or fade.
Despite their durability, painted concrete floors require proper maintenance to keep them looking their best. Regular sweeping and mopping can help remove dirt and dust that can scratch the surface. It’s also advisable to reseal the floor every few years to protect the paint and maintain its shine.
One of the challenges of painting concrete floors is the preparation process. The concrete surface must be thoroughly cleaned and repaired before painting to ensure a smooth, even finish. Any cracks or holes should be filled, and the surface should be sanded to remove any rough spots. Additionally, a primer should be applied before the paint to improve adhesion and durability.
In conclusion, painted concrete floors offer a stylish and durable flooring option that can be customized to suit any design style. With the right preparation, quality paint, and proper maintenance, they can transform any space into a unique and aesthetically pleasing environment. Whether you prefer a sleek, modern look or a rustic, traditional style, painted concrete floors can provide the perfect solution for your flooring needs.Painted concrete floor ideas offer a stylish and durable design solution for various spaces. They provide an opportunity for creativity and personalization, allowing for a range of colors, patterns, and finishes. Not only do they enhance the aesthetic appeal of a room, but they also offer durability and longevity, making them a practical choice for high-traffic areas. Therefore, painted concrete floors are a versatile and resilient design option that can significantly enhance the look and feel of a space.
Unique Shelves: Creative Storage Solutions for Every Room
Source : https://cdn.apartmenttherapy.info
Unique Shelves: Creative Storage Solutions for Every Room is a comprehensive guide that explores innovative and artistic shelving solutions for various spaces in your home. It provides a plethora of ideas, from minimalist designs to extravagant structures, to help you maximize your storage space while adding a touch of creativity and style. This guide is perfect for those who want to transform their living spaces into functional yet aesthetically pleasing environments. Whether you’re dealing with a small apartment or a spacious house, this guide offers a variety of unique shelving ideas to suit every room and every need.
Innovative Design: Unique Shelves and Creative Storage Solutions for Every Room
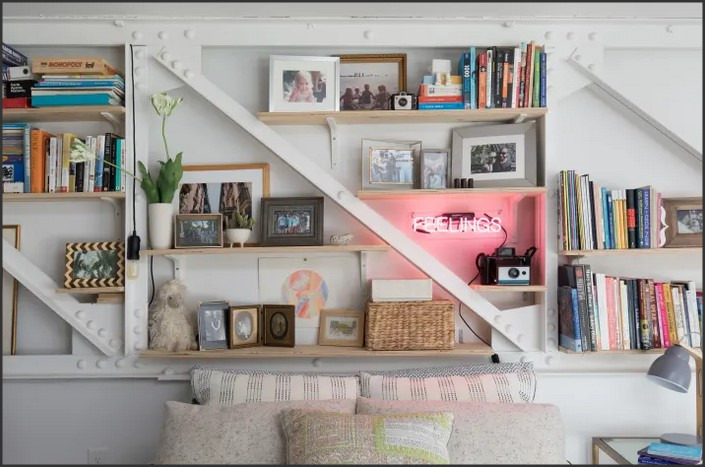
Unique shelves and creative storage solutions are not only practical necessities in every room but also an opportunity to showcase innovative design and personal style. These storage solutions can transform a cluttered space into an organized, aesthetically pleasing environment. The beauty of unique shelves lies in their versatility and adaptability, making them suitable for every room, from the kitchen to the bedroom, the living room to the bathroom.
In the realm of innovative design, unique shelves are a testament to the fusion of functionality and aesthetics. They come in a variety of shapes, sizes, and materials, each with its own charm and utility. For instance, floating shelves, with their sleek design and minimalistic appeal, are perfect for displaying decorative items in the living room or storing spices and condiments in the kitchen. They create an illusion of space, making them ideal for small apartments or rooms.
On the other hand, corner shelves make excellent use of often overlooked spaces. They can be used to store books in the study, toiletries in the bathroom, or even potted plants in the living room. Their unique positioning allows for easy access and adds a distinctive touch to the room’s decor.
Ladder shelves, another innovative design, offer a rustic yet modern look. They provide ample storage space without taking up too much room, making them a popular choice for bedrooms and living rooms. Their step-like design allows for a variety of items to be stored, from books and photo frames to decorative pieces and indoor plants.
In addition to these, there are also more unconventional designs like honeycomb shelves, which add a geometric element to the room, or tree-shaped shelves, which bring a touch of nature indoors. These creative storage solutions not only serve a practical purpose but also act as conversation starters, adding character and personality to the room.
The choice of material for these shelves also plays a significant role in their appeal. While wooden shelves offer a classic, timeless look, metal shelves provide a more industrial, modern vibe. Glass shelves, on the other hand, add a touch of elegance and sophistication. The choice of material can significantly influence the overall look and feel of the room, making it an important consideration in the selection process.
Moreover, unique shelves are not just about innovative design and aesthetic appeal. They also offer a practical, space-saving solution, especially in smaller homes or apartments where space is at a premium. By utilizing vertical space, these shelves provide additional storage without taking up floor space, making the room appear larger and more spacious.
In conclusion, unique shelves and creative storage solutions offer a perfect blend of functionality and design. They provide an opportunity to declutter and organize while adding a touch of personal style to the room. Whether it’s a floating shelf in the kitchen, a ladder shelf in the living room, or a corner shelf in the bathroom, these innovative designs can transform any room into a stylish, organized space.Unique shelves offer innovative and creative storage solutions for every room, enhancing not only the functionality but also the aesthetic appeal of the space. They provide an opportunity to organize and display items in a stylish way, making them an essential element for modern interior design.
DIY Mirror Frame Ideas: Stylish and Easy Projects
Source : https://cdn.homedit.com
DIY Mirror Frame Ideas: Stylish and Easy Projects is a comprehensive guide that provides a plethora of innovative and simple projects for those who wish to add a personal touch to their mirrors. This guide is perfect for individuals who enjoy do-it-yourself projects and are looking to enhance their interior decor. It offers a variety of mirror frame ideas, ranging from rustic to modern designs, that can be easily created with basic tools and materials. Each project is designed to be not only aesthetically pleasing but also functional, transforming a simple mirror into a statement piece for any room.
10 DIY Mirror Frame Ideas: Stylish and Easy Projects to Transform Your Home Decor
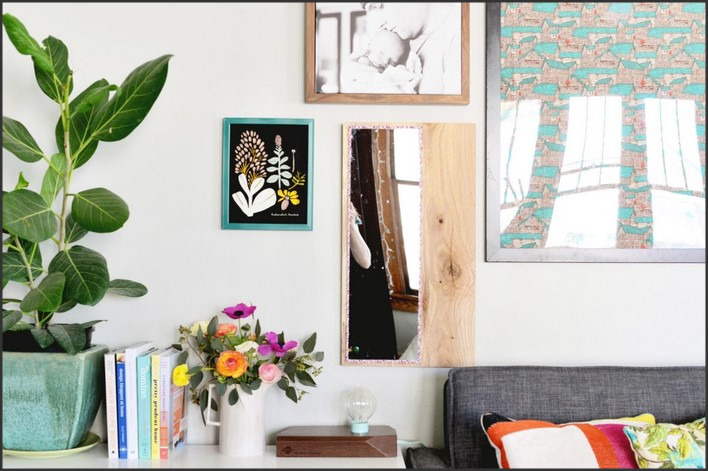
Mirrors are not just functional items in our homes; they can also serve as stunning pieces of decor. With a little creativity and some DIY skills, you can transform a plain mirror into a stylish centerpiece. Here are ten DIY mirror frame ideas that are not only stylish but also easy to execute, promising to transform your home decor.
Firstly, consider a rustic wood frame. This design is perfect for those who love the farmhouse or country style. You can use reclaimed wood or pallets, which are often free or very cheap. Simply cut the wood to the size of your mirror, sand it down, and then stain or paint it to your liking.
Secondly, a mosaic tile frame can add a touch of elegance to any room. You can use broken pieces of ceramic or glass tiles, which can be found at most home improvement stores. Arrange the pieces around the mirror in a pattern that suits your taste, then use grout to secure them in place.
Thirdly, a rope frame is a great option for a coastal or nautical theme. All you need is a thick rope, which you can wrap around the mirror and secure with hot glue. This design is particularly effective with round mirrors.
Fourthly, a sunburst frame can make a dramatic statement. This design involves arranging wooden dowels or metal rods around the mirror in a sunburst pattern. You can paint or stain the dowels or rods to match your decor.
Fifthly, a floral frame can add a touch of femininity and romance. You can use artificial flowers, which are available in a wide range of colors and styles. Simply glue the flowers around the mirror for a beautiful, blooming effect.
Sixthly, a chalkboard frame is a fun and functional idea. Paint the frame with chalkboard paint, then you can write messages or draw pictures on it. This design is perfect for a kitchen or a child’s room.
Seventhly, a vintage frame can add a touch of nostalgia. You can find old frames at thrift stores or flea markets. Simply clean the frame, paint it if necessary, and then attach the mirror.
Eighthly, a leather frame can add a touch of sophistication. You can use a leather belt or strips of leather, which you can wrap around the mirror and secure with glue. This design is perfect for a masculine or industrial style.
Ninthly, a fabric frame can add a touch of softness. You can use any fabric that matches your decor, from burlap to velvet. Simply cut the fabric to size, wrap it around the mirror, and secure it with glue.
Lastly, a metal frame can add a touch of modernity. You can use metal strips or wire, which you can bend into a shape that suits your taste. This design is perfect for a minimalist or industrial style.
In conclusion, these DIY mirror frame ideas are not only stylish but also easy to execute. With a little creativity and some DIY skills, you can transform a plain mirror into a stunning centerpiece. So why not give one of these ideas a try? You might be surprised at how much it can transform your home decor.DIY mirror frame ideas offer a creative, stylish, and cost-effective solution for enhancing the aesthetic appeal of mirrors. These easy projects allow individuals to personalize their decor, adding a unique touch to their living spaces. Whether it’s a rustic, modern, or vintage design, DIY mirror frames can significantly transform and elevate the overall look of a room.
Bright Ideas: Affordable Custom Neon Signs with Eco-Friendly LED Technology
Welcome to a world where your creative vision meets sustainability and savings! At Bright Ideas, we specialize in bringing your personalized neon sign dreams to life with our cutting-edge, eco-friendly LED technology. Our commitment to affordability ensures that you don’t have to compromise on style or quality.
Discover how Bright Ideas can transform your space with custom neon signs that are not only eye-catching but also eco-friendly and budget-conscious. Let’s light up your world with a touch of creativity and a commitment to sustainability!

Affordable Custom Neon Signs: Light Up Your Space for Less
The world of vibrant and budget-friendly illumination! At Affordable Custom Neon Signs, we believe that adding a touch of neon to your environment shouldn’t cost a fortune. Our mission is to make it easy and affordable for you to create personalized neon signs that transform your space with a unique, eye-catching glow.
The Benefits of Affordable Custom Neon Signs: Illuminate Your Space Without Breaking the Bank
In the world of interior and exterior design, few elements capture attention and set the mood quite like neon signs. But who says you have to spend a fortune to enjoy their vibrant glow? Affordable custom neon signs offer a unique blend of personalization, style, and savings. Here’s why they’re a fantastic choice for transforming your space.
- Cost-Effective Customization :
One of the greatest advantages of affordable custom neon signs is the ability to tailor them to your exact preferences without spending a fortune. Unlike traditional neon, which can be costly to design and install, modern LED technology makes it possible to create stunning, customized signs at a fraction of the price.
With custom neon signs, you can choose from various colors, fonts, and sizes to match your personal style or business branding. Affordable custom neon signs provide a cost-effective solution for adding a personal touch to your home decor, office, or event. From playful phrases and inspiring quotes to intricate designs and logos, the possibilities are endless without the hefty price tag.
- Versatile Applications :
Another benefit of custom neon signs is their versatility. Whether you’re looking to brighten up a living room, enhance your storefront, or create a memorable backdrop for an event, these signs can adapt to any setting.
Affordable neon signs are perfect for various applications:
– Home Decor:
Add a touch of personality to your living space with a custom sign that complements your interior design. From a cozy bedroom quote to a fun bar sign, the options are endless.
– Business Branding:
Stand out from the competition with a custom sign that highlights your brand’s identity. Affordable options allow you to create eye-catching displays without exceeding your marketing budget.
– Event Enhancement:
Make your events unforgettable with custom neon signs that add a dynamic and memorable element. Whether it’s a wedding, birthday, or corporate event, a neon sign can set the perfect tone.
The versatility of custom neon signs means you can use them in a variety of ways to suit your needs, all while keeping your budget intact.
- Energy Efficiency and Durability :
One of the standout features of modern affordable neon signs is their energy efficiency. Unlike traditional neon lights, which can be power-hungry and fragile, LED neon signs are both eco-friendly and durable.
LED technology not only reduces energy consumption but also extends the lifespan of your sign. This means you get a bright, vibrant display with minimal energy usage and long-lasting performance. Whether you choose a custom neon sign for your home or business, you’ll benefit from lower energy bills and reduced maintenance costs.
Moreover, affordable custom neon signs made with LED technology are less prone to breakage compared to their traditional counterparts. This durability ensures that your sign remains in top condition for years, providing consistent quality and value.
Eco-Elegant: Energy-Efficient LED Neon Signs That Shine Bright :
Our LED neon signs combine cutting-edge technology with eco-friendly practices to deliver stunning, energy-efficient lighting solutions.
Imagine a sign that not only illuminates your space with a vibrant, eye-catching glow but also aligns with your commitment to a greener planet. With our eco-friendly LED neon signs, you can achieve just that.
Whether you’re looking to enhance your home decor, elevate your business branding, or create a memorable event backdrop, our energy-efficient LED neon signs provide a brilliant, sustainable solution. Discover how Eco-Elegant can brighten your world responsibly and stylishly.
The Benefits of Eco-Friendly LED Neon Signs: Brightening Your Space Sustainably
In an age where environmental consciousness is more important than ever, finding ways to integrate sustainability into our daily lives is crucial. Eco-friendly LED neon signs offer a perfect blend of style and sustainability, providing a modern solution that meets both aesthetic and environmental needs. Here’s why opting for LED neon signs is a smart choice for anyone looking to illuminate their space responsibly.
- Energy Efficiency and Cost Savings :
One of the primary benefits of eco-friendly LED neon signs is their exceptional energy efficiency. Unlike traditional neon lights, which consume a significant amount of electricity and generate heat, LED neon signs use a fraction of the power to produce the same level of brightness. This not only reduces your energy consumption but also lowers your electricity bills.
LED neon signs convert a higher percentage of energy into light rather than heat, making them an energy-efficient choice. This efficiency translates into substantial long-term savings, as you’ll spend less on energy and maintenance. Plus, many eco-friendly LED neon signs are designed to last significantly longer than traditional neon, reducing the frequency of replacements and further minimizing waste.
- Reduced Environmental Impact :
Traditional neon signs contain hazardous gases like neon and argon, which require careful handling and disposal. In contrast, LED neon signs are free from these harmful substances, making them a safer and more environmentally friendly option.
Additionally, the longer lifespan of LED neon signs means fewer replacements and less waste. By choosing eco-friendly LED neon signs, you’re contributing to a reduction in electronic waste and supporting a more sustainable approach to signage. This commitment to reducing environmental impact aligns with a growing trend towards greener choices in all aspects of life.
- Versatility and Design Flexibility :
Eco-friendly LED neon signs offer remarkable versatility and design flexibility, making them suitable for a wide range of applications. Whether you’re looking to enhance your home decor, create a standout business sign, or add a unique touch to an event, LED neon signs can be customized to fit your needs.
With options to choose various colors, shapes, and sizes, LED neon signs can be tailored to reflect your personal style or brand identity. Their flexibility allows for intricate designs and vibrant displays that can mimic the look of traditional neon while offering the benefits of modern technology.
Making the right choice between affordable custom neon signs and eco-friendly LED neon signs:
Deciding between affordable custom neon signs and eco-friendly LED neon signs depends on your specific needs and priorities. If budget is your primary concern and you are looking for an immediate, cost-effective solution, affordable custom neon signs might be the way to go. However, if you’re interested in long-term savings, sustainability, and a modern, durable option, eco-friendly LED neon signs offer significant advantages.
Consider your design preferences, environmental values, and budget constraints to make the best choice for your situation. Both options can provide beautiful, personalized lighting, but understanding their differences will help you select the option that best aligns with your needs and values.
Conclusion :
By choosing LED neon signs, you’re not only enhancing your environment with a bright and modern touch but also supporting a greener planet. Illuminate your world sustainably with eco-friendly LED neon signs and enjoy the perfect blend of elegance and environmental consciousness. Affordable custom neon signs offer a fantastic way to enhance your space with style and personality without overspending. Their cost-effective customization options, versatile applications, and energy-efficient features make them an ideal choice for
anyone looking to add a vibrant touch to their environment. Whether you’re decorating your home, branding your business, or planning a special event, consider investing in a custom neon sign to enjoy a brilliant and budget-friendly lighting solution. Illuminate your space with creativity and savings—explore the world of affordable neon signs today!