


Category Archives: Home Improvement
Energy-Efficient Roofing Options for Your Home
Source:https://roof-troopers.com
When it comes to maintaining a comfortable and cost-effective home, energy-efficient roofing plays a crucial role. With the rising concern about environmental sustainability and increasing energy costs, more homeowners are turning to energy-efficient roofing options to improve the performance of their homes. These roofing systems are designed to reduce energy consumption, enhance insulation, and create a more comfortable living environment. In this article, we will explore various energy-efficient roofing materials and strategies that can help you save on energy bills while contributing to a more sustainable future.
Why Choose Energy-Efficient Roofing?
Choosing energy-efficient roofing is an investment that pays off in both the short and long term. Traditional roofing materials can absorb heat, which makes your air conditioning system work harder during the hot months, resulting in higher energy bills. On the other hand, energy-efficient roofing systems reflect sunlight, keep homes cooler in the summer, and provide better insulation during the winter. These benefits not only reduce your overall energy consumption but also improve the longevity of your roof and home.
Additionally, many energy-efficient roofing materials are environmentally friendly, helping homeowners reduce their carbon footprint. With the growing trend towards sustainability, energy-efficient roofing options are becoming increasingly popular for those looking to make eco-conscious choices without compromising on aesthetics or functionality.
Popular Energy-Efficient Roofing Materials
There are several roofing materials available that can help reduce your home’s energy consumption. Each option offers its own set of benefits depending on your climate, budget, and design preferences. Let’s take a closer look at some of the most popular energy-efficient roofing materials.
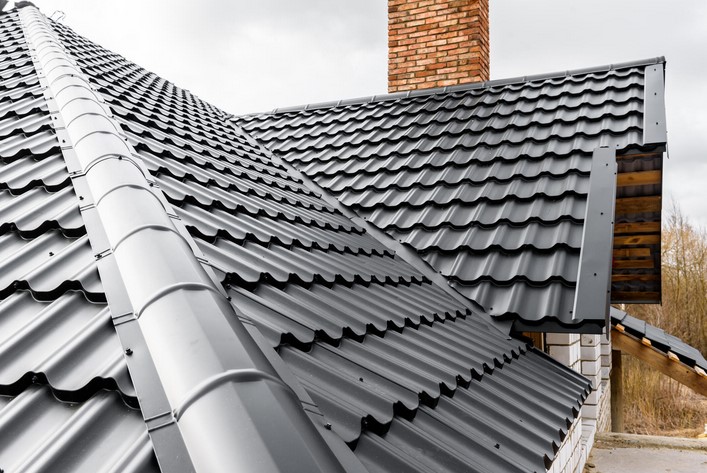
1. Cool Roofing (Reflective Roofing)
Cool roofing is one of the most effective energy-efficient roofing options for homes in warm climates. This type of roofing reflects more sunlight and absorbs less heat than traditional roofing materials. Cool roofing materials are typically made from reflective coatings, such as white, silver, or light-colored shingles, tiles, or membranes. These roofs help reduce the urban heat island effect, where cities are hotter than surrounding rural areas due to the abundance of heat-absorbing materials like asphalt and concrete.
- Benefits:
- Reduces cooling costs by reflecting solar heat away from the building.
- Keeps the interior of your home cooler, improving comfort during hot months.
- Extends the lifespan of your roof by reducing thermal expansion and contraction.
- Ideal For: Homes in hot climates or areas with long summers where cooling costs are a concern.
2. Metal Roofing
Metal roofing is another popular energy-efficient option due to its reflective properties and durability. Unlike traditional asphalt shingles, metal roofs reflect more sunlight, keeping your home cooler in the summer. They also have excellent insulation properties, preventing heat loss in the winter.
- Benefits:
- Long-lasting, with a lifespan of 40 to 70 years.
- Highly reflective, helping to lower energy costs.
- Available in various styles, including standing seam and metal tiles, allowing homeowners to choose a look that suits their home’s aesthetic.
- Ideal For: Homeowners who are looking for a long-lasting, energy-efficient roofing option that also provides excellent insulation.
3. Solar Roofs
A solar roof combines the advantages of traditional roofing with solar panel technology. Solar roofing systems are designed to convert sunlight into electricity, which can be used to power your home. These roofs are composed of solar shingles or panels that are integrated into the roof structure, providing both energy generation and protection from the elements.
- Benefits:
- Reduces electricity bills by generating your own energy.
- Can qualify for tax incentives and rebates in many regions.
- Provides a clean, renewable energy source for your home.
- Ideal For: Homeowners looking for a long-term solution that generates electricity while reducing energy consumption.
4. Clay and Concrete Tiles
Clay and concrete tiles are known for their excellent insulation properties. These materials are naturally energy-efficient, as they absorb less heat than other roofing materials, like asphalt shingles. Additionally, they are highly durable and resistant to extreme weather conditions, making them a smart choice for homes in areas prone to heat or storms.
- Benefits:
- Exceptional insulation properties that keep your home cool in summer and warm in winter.
- Durable and resistant to fire, storms, and hail.
- Available in various colors and styles to suit different architectural designs.
- Ideal For: Homes in hot climates or areas with high humidity, where insulation and durability are key.
Additional Ways to Improve Roofing Efficiency
While selecting energy-efficient roofing materials is a great starting point, there are additional ways to enhance the overall performance of your roof and reduce energy consumption.
1. Proper Insulation and Ventilation
Proper insulation and ventilation are key factors in maintaining an energy-efficient roof. Even the most energy-efficient roofing materials will not perform at their best if your attic or roof space is not well-insulated. Adequate insulation prevents heat from escaping during the winter and reduces the amount of heat that enters your home in the summer. Ventilation also helps to regulate the temperature of the roof and attic, preventing excess heat buildup and moisture damage.
- Benefits:
- Helps to maintain a stable indoor temperature year-round.
- Reduces energy consumption by reducing the reliance on heating and cooling systems.
- Prevents moisture buildup, which can lead to mold and mildew.
2. Green Roofs
A green roof, or living roof, is another option for homeowners interested in sustainability and energy efficiency. These roofs are covered with vegetation, which provides natural insulation and reduces the heat absorbed by the building. Green roofs also improve air quality and provide a habitat for wildlife, making them an eco-friendly option for environmentally conscious homeowners.
- Benefits:
- Reduces energy consumption by providing natural insulation.
- Absorbs rainwater, reducing runoff and improving water management.
- Improves air quality and enhances the aesthetic appeal of your home.
- Ideal For: Homeowners who live in urban areas and want to add greenery to their roofs while benefiting from energy efficiency.
In conclusion, energy-efficient roofing offers a wide range of options for homeowners looking to reduce their energy bills, increase comfort, and contribute to environmental sustainability. Whether you opt for cool roofing, metal roofing, solar panels, or clay and concrete tiles, each material provides unique benefits that can enhance your home’s energy performance. Additionally, considering other factors like insulation, ventilation, and the possibility of a green roof can further improve your home’s overall energy efficiency.
As energy costs continue to rise and the demand for sustainable solutions grows, investing in an energy-efficient roof is one of the most effective ways to improve your home’s performance. By selecting the right roofing material for your climate and needs, you can enjoy long-term savings, comfort, and peace of mind knowing that you’re making an environmentally responsible choice.
Wooden Window Shutters: Style and Privacy Combined
Source:https://madeintheshadelr.com
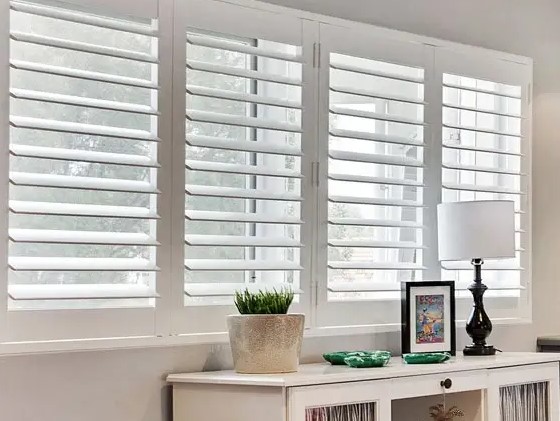
When it comes to enhancing the aesthetic appeal and functionality of your home, few additions can match the elegance and practicality of wooden window shutters. These classic window treatments not only offer a stylish solution to managing light and privacy but also add a timeless charm to any room. Whether you’re updating a modern home or restoring a period property, wooden window shutters blend beautifully with various décor styles. In this article, we’ll explore the benefits of wooden window shutters, how to choose the right style for your space, and how they can elevate both your home’s appearance and its functionality.
The Appeal of Wooden Window Shutters
Wooden window shutters have a rich history that dates back centuries. Initially designed for functional purposes such as protecting homes from the elements and ensuring privacy, they have evolved into a decorative and practical choice for contemporary homeowners. Unlike traditional curtains or blinds, wooden shutters offer a more structured, tailored look, which can make your windows stand out. They provide a timeless appeal that complements both traditional and modern interiors, creating an inviting atmosphere in any room.
1. Aesthetic Value
Wooden shutters are incredibly versatile and come in a range of styles, from traditional plantation shutters with wide slats to the more contemporary café style shutters that cover only the lower half of the window. The natural grain and rich color variations of wood add warmth and texture to your space. Whether you prefer a polished finish or a distressed, rustic look, wooden shutters bring character to any room.
- Customizable Finishes: The flexibility to paint or stain wooden shutters to match the room’s color palette allows for complete customization. They can be painted in neutral tones for a sleek, modern look, or stained in deeper hues like mahogany for a more traditional, opulent feel.
- Timeless Charm: Unlike trendy window treatments that can quickly become dated, wooden shutters have remained a beloved choice for decades due to their enduring elegance and timeless appeal.
2. Increased Privacy and Light Control
One of the primary reasons people choose wooden window shutters is the level of privacy and light control they offer. With adjustable slats, you can easily control the amount of natural light entering your home, allowing you to create a bright, airy space or a more subdued, cozy environment depending on your mood or time of day.
- Adjustable Slats: The ability to adjust the slats to various angles gives you complete control over the amount of light and privacy in your home. By angling the slats, you can ensure that no one can see into your home while still allowing natural light to flood the room.
- Insulation Benefits: Wooden shutters also provide an additional layer of insulation. They can help keep your home cooler in the summer and warmer in the winter, contributing to energy efficiency and potentially reducing heating and cooling costs.
Different Styles of Wooden Window Shutters
When it comes to choosing the right wooden window shutters for your space, there are several styles to consider, each offering its own unique aesthetic and functionality. Understanding the various options available can help you find the perfect match for your home.
1. Plantation Shutters
Plantation shutters are perhaps the most popular style of wooden window shutters. Characterized by wide, adjustable slats, these shutters offer both a modern and classic look. They are perfect for larger windows and provide excellent light control and ventilation.
- Ideal for: Large windows, sliding doors, and homes with a more traditional or modern design aesthetic.
- Customization: Plantation shutters are available in a variety of materials, including solid wood, composite, or vinyl. Wood is often the most sought-after option for its durability and timeless beauty.
2. Cafe Style Shutters
If you’re looking for a more casual, less traditional style, café shutters may be the right choice. These shutters cover only the bottom half of the window, allowing natural light to flood the top half while still maintaining privacy at eye level. Café shutters are particularly popular in kitchens and dining areas.
- Ideal for: Kitchens, breakfast nooks, and smaller windows where full window coverage is not necessary.
- Customization: Café shutters are typically available in either narrow or wide slat sizes, allowing for customization based on the space’s needs and design preferences.
3. Full-Height Shutters
For those looking for a more dramatic and formal option, full-height shutters provide complete coverage for the entire window. These shutters offer maximum privacy and light control, making them an excellent choice for bedrooms or living rooms.
- Ideal for: Bedrooms, living rooms, and larger windows where privacy and light control are crucial.
- Customization: Full-height shutters can be designed with either fixed or adjustable slats, allowing for flexibility in light and privacy control. Additionally, these shutters can be made from various types of wood to suit your aesthetic preferences.
4. Tier-on-Tier Shutters
Tier-on-tier shutters consist of two sets of shutters that operate independently of each other, allowing for flexible control over both the top and bottom portions of the window. This style is perfect for rooms where you want to control privacy and light in different sections of the window simultaneously.
- Ideal for: Rooms where privacy and light control are essential, such as bathrooms or bedrooms with large windows.
- Customization: The tier-on-tier design can be tailored with different finishes and slat sizes to suit your space’s needs and décor.
Benefits of Choosing Wooden Window Shutters
There are numerous advantages to installing wooden window shutters in your home. From improving the aesthetics of a room to providing better control over light and privacy, the benefits are significant. Let’s take a closer look at some of these advantages.
1. Durability and Longevity
Wooden window shutters are incredibly durable and built to last for many years. Unlike curtains or blinds that can wear out, fade, or become damaged over time, wooden shutters remain sturdy and functional, maintaining their beauty for decades. With proper care, they can even become more attractive as the wood ages, developing a patina that adds character.
- Long-term investment: Although the initial cost of wooden shutters may be higher than other window treatments, their longevity makes them a smart long-term investment.
2. Increased Home Value
The addition of wooden window shutters can increase the resale value of your home. Potential buyers often appreciate the added elegance and functionality that shutters bring, making your home stand out in a competitive market. In fact, some real estate agents claim that homes with high-quality window shutters tend to sell faster and at higher prices.
3. Low Maintenance
Wooden shutters require minimal maintenance compared to other window coverings. Regular dusting and occasional cleaning with a wood-friendly polish are typically all that’s needed to keep them looking pristine. Unlike fabric blinds or curtains, wooden shutters do not need frequent washing, which makes them a more convenient option for busy households.
In conclusion, wooden window shutters are a perfect way to combine style, privacy, and functionality in your home. With their timeless elegance, versatility, and numerous benefits, they provide both aesthetic appeal and practical solutions for light control and privacy. Whether you’re looking to enhance your home’s interior design, increase energy efficiency, or simply add a touch of sophistication, wooden shutters can seamlessly elevate any space. With a wide variety of styles and finishes available, there’s a wooden window shutter to suit every taste and home décor.
Mid-Century Modern Furniture for Timeless Elegance
Source:https://images.squarespace-cdn.com
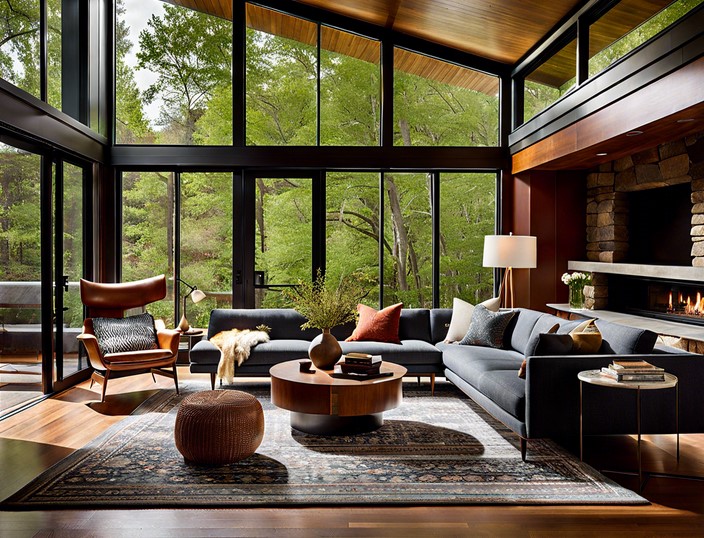
In the world of interior design, some styles come and go, but mid-century modern furniture remains a timeless choice for those seeking elegance, functionality, and sophistication in their living spaces. Originating in the mid-20th century, this design style is characterized by clean lines, organic shapes, and a focus on form and function. Mid-century modern furniture is not only practical but also offers a stylish aesthetic that has stood the test of time. Whether you’re outfitting a new home or updating your current décor, incorporating mid-century modern pieces can instantly elevate your space. This article will explore the history of mid-century modern furniture, key characteristics of the style, and how to incorporate it into your own home.
The History and Evolution of Mid-Century Modern Furniture
To fully appreciate mid-century modern furniture, it’s essential to understand its roots and how it evolved over time. The mid-century modern movement emerged in the 1940s and reached its peak in the 1950s and 1960s, with key designers like Charles and Ray Eames, Eero Saarinen, and George Nelson shaping the style. The movement was influenced by both the technological advancements of the time and a desire for a more streamlined, less ornate approach to design. After the chaos of World War II, there was a push for designs that reflected optimism and progress.
The style drew inspiration from a variety of sources, including Scandinavian design, Bauhaus principles, and the Arts and Crafts movement. However, mid-century modern furniture was unique in its ability to marry functional, minimalist designs with beauty and comfort. Furniture was often designed with functionality in mind, with an emphasis on using new materials like molded plywood, fiberglass, and stainless steel, which allowed designers to create innovative shapes and structures.
Today, mid-century modern furniture remains as relevant as ever. While many contemporary furniture styles come and go, the appeal of mid-century modern design lies in its versatility and timelessness. The clean lines and emphasis on simplicity make it easy to integrate into various interior design themes, from retro to minimalist, and it pairs well with different color palettes and décor styles.
Key Characteristics of Mid-Century Modern Furniture
The charm of mid-century modern furniture is in its simplicity and functionality. Several key characteristics define this style, making it instantly recognizable and sought after by design enthusiasts.
1. Clean Lines and Simple Silhouettes
One of the most defining features of mid-century modern furniture is its sleek, clean lines. Gone are the intricate carvings and embellishments that were common in earlier furniture styles. Instead, mid-century modern designs embrace simplicity, with smooth surfaces, angular lines, and geometric shapes. Sofas, chairs, tables, and other furniture pieces typically have a minimalistic design, often with tapered legs and a low profile.
- Furniture Examples: Think of a classic Eames lounge chair with its curved plywood frame and comfortable leather cushions or a minimalist coffee table with a simple, rectangular shape and slim legs.
2. Organic Shapes and Forms
Mid-century modern furniture is not only about straight lines but also embraces organic and fluid shapes. Furniture pieces often feature rounded edges, curved backs, and flowing forms that evoke a sense of comfort and natural beauty. This combination of geometric and organic shapes creates a harmonious balance that appeals to both the eyes and the body.
- Furniture Examples: Chairs with rounded backs, like the iconic Saarinen Tulip Chair, or tables with soft, oval shapes are perfect examples of organic design in mid-century modern furniture.
3. Innovative Use of Materials
Mid-century modern furniture designers were pioneers in using new materials that were previously not seen in traditional furniture designs. This included molded plywood, fiberglass, stainless steel, and plastic. These materials allowed for innovative, functional designs while keeping costs lower than more traditional materials like solid wood or leather.
- Furniture Examples: The Eames Lounge Chair features molded plywood, while Saarinen’s Tulip Chair uses cast aluminum and fiberglass to create a sleek, futuristic look. The innovative use of these materials contributed to the distinctive look and feel of mid-century modern furniture.
4. Functionality Meets Style
Mid-century modern furniture was designed with function in mind, but it never sacrificed style. Each piece was carefully crafted to serve a practical purpose while also enhancing the overall aesthetic of the space. This focus on both form and function makes mid-century modern furniture highly versatile, as it can fit into various room types and be used for different purposes, from relaxation to entertaining.
- Furniture Examples: The low-profile sideboard, designed to store items efficiently, or a compact dining table designed for both casual and formal meals, are excellent representations of the functionality of mid-century modern furniture.
Incorporating Mid-Century Modern Furniture Into Your Home
Bringing mid-century modern furniture into your home can be an exciting way to refresh your décor while maintaining an air of timeless elegance. The versatility of this design style makes it easy to incorporate into a variety of interior spaces, whether you live in a spacious modern home or a smaller apartment.
1. Start with Statement Pieces
To introduce mid-century modern furniture into your home, start by incorporating a few statement pieces. These might include a sleek, low-profile sofa with tapered legs or a sculptural lounge chair that serves as a focal point in your living room. A statement piece will set the tone for the rest of the room and can be paired with more neutral or contemporary accessories.
- Example: A classic Eames lounge chair paired with a minimalist coffee table creates an instantly recognizable mid-century modern living room setup.
2. Mix and Match with Modern Elements
While mid-century modern furniture pairs well with many different interior design styles, it works especially well when mixed with modern elements. Pairing a mid-century modern sofa with contemporary artwork, for instance, creates a balanced and eclectic look. The simple lines of mid-century modern furniture will allow more vibrant or textured modern elements to stand out.
- Example: Place a mid-century modern dining table with minimalist chairs in a room that also features contemporary lighting fixtures or abstract wall art.
3. Focus on Natural Wood and Earthy Tones
One hallmark of mid-century modern design is the use of natural wood, often in warm, rich tones like walnut, teak, or oak. Incorporating furniture pieces made from these materials brings warmth to your space, which can help balance the often cool, sleek lines of other modern décor.
- Example: A wooden sideboard or media console is a great way to add natural warmth to a room that’s otherwise filled with more industrial materials like glass or metal.
4. Use Color Accents for Interest
While mid-century modern furniture is typically known for its neutral and muted color palette, adding colorful accents can breathe life into the space. Bold colors such as mustard yellow, teal, and burnt orange were common in mid-century modern décor, and incorporating these hues through throw pillows, rugs, or art can bring energy to the room.
- Example: Pair a neutral-colored mid-century modern sofa with colorful throw pillows in shades of mustard and teal to inject vibrancy into your living area.
In conclusion, mid-century modern furniture is not just a fleeting trend; it is a timeless style that continues to influence design today. With its clean lines, innovative use of materials, and focus on both functionality and aesthetics, mid-century modern furniture has proven itself to be a lasting investment in both style and practicality. Whether you are updating a single room or completely transforming your space, incorporating mid-century modern pieces will add an element of sophistication and elegance that is as relevant today as it was decades ago.
Outdoor Kitchen Setups for Entertaining
Source:https://st.hzcdn.com
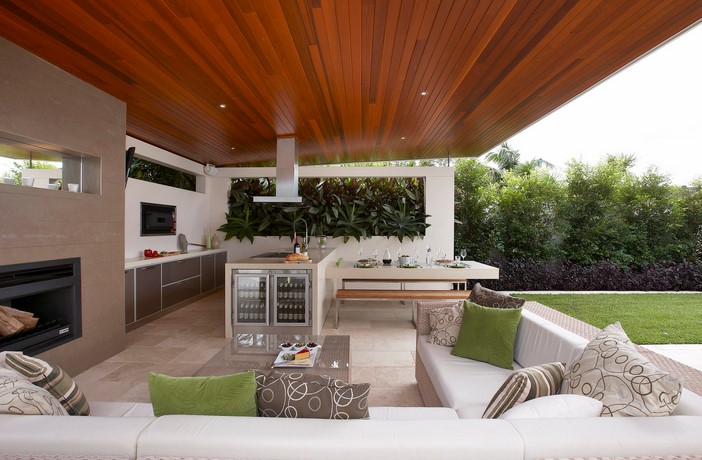
As outdoor living spaces continue to gain popularity, more homeowners are transforming their backyards into functional and stylish entertaining areas. One of the most sought-after additions is an outdoor kitchen. Outdoor kitchen setups not only enhance the aesthetic appeal of your backyard but also offer a practical space for cooking, dining, and socializing. Whether you’re hosting a family barbecue, a dinner party, or a casual get-together with friends, having an outdoor kitchen can elevate the experience. In this article, we will explore various outdoor kitchen setups, highlighting design ideas, essential features, and tips for creating a perfect space for entertaining.
The Essentials of an Outdoor Kitchen Setup
Creating an outdoor kitchen that is both functional and enjoyable requires careful planning and consideration of essential elements. The right setup will make cooking and entertaining outdoors a seamless experience, allowing you to enjoy your space to the fullest.
1. Cooking Area: The Heart of the Outdoor Kitchen
The cooking area is the core of any outdoor kitchen setup. Depending on your needs and preferences, this could include a range of appliances such as a built-in grill, a pizza oven, a smoker, or even a side burner for preparing sauces and sides. Gas and charcoal grills are the most common choices, but for a more versatile setup, consider a hybrid model that combines both.
- Grill: A high-quality grill is a must-have for an outdoor kitchen. A built-in grill provides a sleek, permanent solution and allows for a customized design. If you prefer more flexibility, a portable grill might be a good option.
- Pizza Oven: For those who enjoy making homemade pizzas or roasting other dishes, a pizza oven is a great addition. It brings a touch of authenticity to your outdoor cooking and can be a conversation starter at gatherings.
- Side Burner: A side burner is ideal for preparing smaller dishes that require a pot or pan, such as sauces, soups, or side dishes. This extra burner can prevent your main grill from being overcrowded during large meals.
2. Counter Space and Storage
An outdoor kitchen setup isn’t complete without sufficient counter space for food preparation and storage. You’ll need space to chop vegetables, season meat, and assemble meals before grilling. Incorporating ample counter space can make the cooking process more efficient and enjoyable.
- Countertops: Materials like granite, marble, or concrete are durable and weather-resistant, making them perfect for outdoor kitchen countertops. They also offer a sleek and modern look that complements the outdoor environment.
- Storage Solutions: Cabinets, drawers, and shelves are essential for storing cooking utensils, spices, and other kitchen essentials. Weatherproof storage solutions are critical to protecting your equipment from the elements, especially if you live in areas with extreme weather conditions.
3. Seating and Dining Area
The goal of any outdoor kitchen setup is to create a space that promotes social interaction. A comfortable seating and dining area is key to this. Whether you opt for a casual bar-style seating arrangement or a more formal dining table, the seating should be both functional and inviting.
- Bar Seating: Installing a bar counter near the cooking area can provide casual seating for guests to enjoy appetizers or drinks while you cook. It also creates a social atmosphere, as guests can easily converse with the chef.
- Dining Table: A larger dining table is perfect for sit-down meals and family gatherings. Choose a table made from weather-resistant materials, such as teak, aluminum, or wrought iron, to ensure durability over time.
- Lounge Seating: For a more relaxed vibe, consider incorporating lounge seating with comfortable chairs, sofas, or sectionals. These spaces allow guests to relax before or after a meal and enjoy the outdoor ambiance.
Design Considerations for an Outdoor Kitchen Setup
When designing your outdoor kitchen, it’s essential to blend functionality with aesthetic appeal. The right design can make your outdoor kitchen not only a place to cook but also a beautiful focal point in your backyard. Below are some key design considerations to keep in mind:
1. Weather Resistance and Durability
Outdoor kitchens are exposed to the elements, so durability is a top priority. Materials used for countertops, cabinetry, and flooring should be weather-resistant, heatproof, and easy to maintain. For example, stainless steel appliances are resistant to rust, while stone countertops can handle high temperatures and are easy to clean.
- Protective Covers: Investing in protective covers for appliances, furniture, and grills can extend their lifespan and keep them looking great year-round.
2. Lighting and Ambiance
Outdoor kitchens are often used in the evening, so proper lighting is essential for both functionality and ambiance. Installing task lighting above cooking areas will ensure you can prepare meals safely at night. In addition, accent lighting can create a warm, inviting atmosphere for evening gatherings.
- Task Lighting: Place overhead lights or spotlights near the grill or cooking stations to illuminate the space while cooking.
- Ambient Lighting: String lights, lanterns, or LED candles can help set the mood, making the outdoor kitchen more welcoming for guests.
3. Integrating Nature
The beauty of an outdoor kitchen is the connection it creates between the indoors and outdoors. Integrating natural elements into your design can enhance the ambiance and make the kitchen feel like an extension of your garden or patio.
- Greenery: Consider incorporating plants, flowers, or even a small herb garden into your setup. This not only adds visual appeal but also provides fresh ingredients for cooking.
- Natural Materials: Using wood, stone, or other natural materials in your kitchen’s design helps to seamlessly blend the space with its surroundings, making the outdoor kitchen feel like a part of nature.
Tips for Creating the Perfect Outdoor Kitchen Setup
Creating the ideal outdoor kitchen setup requires thoughtful planning and design. Below are some expert tips to ensure your setup is both functional and stylish:
1. Plan for Flow and Functionality
Design your outdoor kitchen with the flow of cooking and entertaining in mind. Ensure that your cooking area, dining area, and seating are arranged in a way that promotes easy movement. The cook should have a clear line of sight to the dining area and guests, making it easy to interact while preparing meals.
2. Incorporate a Beverage Station
A beverage station or mini bar is a great addition to any outdoor kitchen setup. Stock it with your favorite drinks, glasses, and accessories, so guests can help themselves while you focus on the food. This adds convenience and encourages guests to mingle in the outdoor space.
3. Consider an Outdoor Refrigerator
An outdoor refrigerator is an excellent investment for an outdoor kitchen setup, allowing you to store ingredients, beverages, and leftovers close to your cooking area. This minimizes trips inside and keeps everything you need at arm’s reach while entertaining.
Conclusion: Elevate Your Entertaining with the Right Outdoor Kitchen Setups
In conclusion, outdoor kitchen setups are an incredible way to elevate your outdoor living space and enhance your entertaining experience. By carefully selecting the right appliances, design elements, and features, you can create a functional and stylish outdoor kitchen that is perfect for hosting gatherings, cooking delicious meals, and enjoying time with loved ones. Whether you prefer a minimalist design or a fully equipped cooking station, the possibilities for your outdoor kitchen are endless. Take the time to discover the perfect setup for your needs, and you’ll be well on your way to creating a space that brings people together and makes outdoor entertaining effortless and enjoyable.
Whole-Body Horse Vibration Therapy For Horse Backed By Science
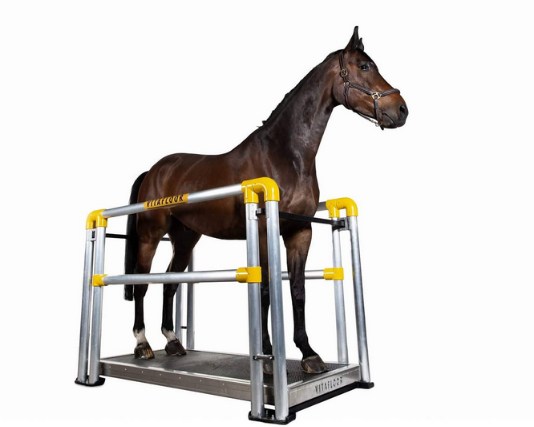
One of the most effective healing techniques in the equestrian’s “toolbox” is whole-body vibration (WBV) therapy. According to research, a vibration plate with stand works to improve circulation and muscle contraction, which strengthens the body’s self-healing capacity. Regular vibration treatment sessions also improve performance and reduce the risk of injury in horses.
What Is Whole Body Vibration Therapy?
Whole-body vibration therapy uses a large vibrating platform. The platform, on which the horse is standing, vibrates at different frequencies (cycles per second) and magnitudes (up and down motion). A normal session would last 20 minutes at frequencies between 30 and 50 Hz, with the user controlling the frequency and setting a timer.
History of Whole-Body Vibration Therapy
Vibration therapy’s advantages have been recognised for decades. More than a century ago, breakfast cereal inventor Dr. John Harvey Kellogg created the first standing vibration plate for people. He thought vibration treatment could help with issues like headaches, constipation, and back discomfort by promoting the body’s natural healing processes.
The 1960s saw a significant increase in the use of vibration therapy. At that point, NASA researchers started looking into how well it worked to prevent muscular weakening and bone loss in astronauts living in zero gravity.
Whole-body vibration therapy has been shown in human trials to enhance muscle mass, improve circulation, reduce back and joint pain, reduce stress, improve bone density, and raise metabolism. Although there isn’t as much research on horses, there is strong evidence that vibration therapy benefits them as well.
Benefits of Horse Vibration Plates:
Horse vibration plates have the following known benefits:
- 1. Growth of the back muscles
In one study, nine horses between the ages of nine and eighteen received whole-body vibration therapy twice daily for thirty minutes, five days a week, for sixty days. Significant increases in the multifidus muscle’s size and symmetry were visible on ultrasounds. This crucial deep back muscle supports healthy posture, mobility, and balance by stabilising the spine. Maintaining a robust multifidus can reduce back pain and avoid or postpone lameness.
- Development of the hoof
In research with 10 horses, horses that received whole-body vibration (WBV) twice daily for 30 minutes every day for 60 days showed notable increases in hoof development rates in the first 30 days of treatment.
- Healing of the ligaments
Injuries to the ligaments and tendons must be treated carefully. The majority of horses with these injuries receive very little activity. WBV therapy speeds up the healing process, improves the quality of the repaired tissue, and stimulates tendons and ligaments without the negative effects of trotting or cantering.
- Pain and stress alleviation
A study says horses may experience pain relief and a relaxing impact from vibration therapy. According to a Michigan State University study, horses receiving whole-body vibration therapy seemed to calm down after each session, whereas control horses showed signs of restlessness. Similarly, a Middle Tennessee State University study discovered that horses receiving WBV therapy had lower heart rates, which may indicate that the treatment eased the animals’ discomfort.
- Chronic immobility
Eight horses with both chronic and current lameness participated in a study at the Peninsula Equine Medical Centre in Menlo Park, California. For 30 days, each horse received WBV twice daily for 30 minutes each time on a vibrating platform. During the first 30 days of WBV therapy, horses’ stride length and chronic lameness improved.
- Reduced amounts of cortisol
When compared to six stalled horses, six horses that received equine vibration treatment for 45 minutes, five days a week, at 50 Hz, had lower cortisol levels and a lower heart rate.