


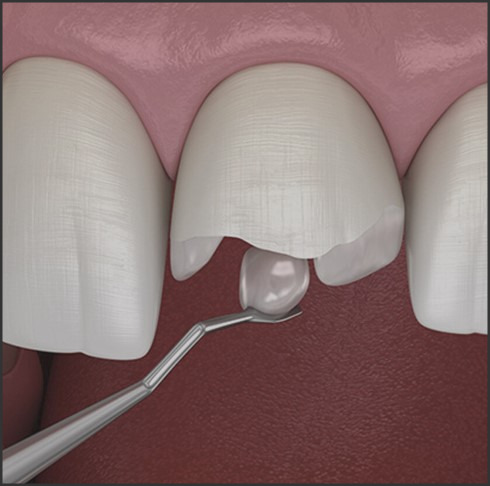
Managing Broken Tooth Pain: Tips for Dental Emergency Care
Source: dentistinbrooklyn.com
If you have ever experienced a broken tooth, you know how painful and uncomfortable it can be. Managing broken tooth pain can be difficult, especially if you are in a dental emergency. Fortunately, there are some tips and strategies you can use to help manage the pain and discomfort associated with a broken tooth. This article will provide you with some tips for dental emergency care and managing broken tooth pain.
How to Manage Broken Tooth Pain: Tips for Emergency Dental Care
If you are experiencing broken tooth pain, it is important to seek emergency dental care as soon as possible. While waiting for your appointment, there are several steps you can take to manage the pain.
First, rinse your mouth with warm salt water. This will help to reduce inflammation and clean the area around the broken tooth. You can also take an over-the-counter pain reliever such as ibuprofen or acetaminophen to help reduce the pain.
If the pain is severe, you can apply a cold compress to the outside of your cheek. This will help to reduce swelling and numb the area. You can also use a topical anesthetic such as benzocaine to help numb the area.
It is important to avoid eating or drinking anything that is too hot or cold. This can cause further irritation and pain. You should also avoid eating hard or crunchy foods that could cause further damage to the broken tooth.
If you are experiencing broken tooth pain, it is important to seek emergency dental care as soon as possible. While waiting for your appointment, you can take steps to manage the pain such as rinsing your mouth with warm salt water, taking an over-the-counter pain reliever, applying a cold compress, and avoiding hot or cold foods. By following these tips, you can help to reduce your pain and ensure that your broken tooth is properly treated.
What to Do When You Have a Broken Tooth: Emergency Dental Care Tips for Pain Relief
If you have a broken tooth, it is important to seek emergency dental care as soon as possible. A broken tooth can be painful and can lead to further complications if not treated promptly. Here are some tips to help you manage the pain and get the care you need.
1. Rinse your mouth with warm salt water. This can help to reduce inflammation and pain.
2. Take an over-the-counter pain reliever such as ibuprofen or acetaminophen.
3. Apply a cold compress to the affected area. This can help to reduce swelling and pain.
4. If the broken tooth is causing severe pain, you may need to take a stronger pain reliever such as codeine or hydrocodone.
5. Contact your dentist as soon as possible. Explain the situation and ask for an emergency appointment.
6. If you cannot reach your dentist, go to the nearest emergency room.
7. If the broken tooth is causing bleeding, apply pressure to the area with a clean cloth or gauze.
8. If the broken tooth is causing severe pain, you may need to take a stronger pain reliever such as codeine or hydrocodone.
9. If the broken tooth is causing severe pain, you may need to take a stronger pain reliever such as codeine or hydrocodone.
10. If the broken tooth is causing severe pain, you may need to take a stronger pain reliever such as codeine or hydrocodone.
By following these tips, you can help to manage the pain and get the care you need for your broken tooth. Remember to contact your dentist as soon as possible to ensure that the problem is addressed promptly.
Conclusion
Managing broken tooth pain can be a difficult and uncomfortable experience. However, with the right knowledge and care, it is possible to reduce the pain and discomfort associated with a broken tooth. It is important to seek professional dental care as soon as possible to ensure that the broken tooth is properly treated and to prevent further damage. Additionally, there are several home remedies that can be used to help manage the pain and discomfort associated with a broken tooth. By following these tips, you can help ensure that your broken tooth is properly cared for and that you can manage the pain and discomfort associated with it.
Travel Books Europe: Inspiring Your Next Continental Adventure

Source : https://blog.ricksteves.com
Welcome to Travel books Europe: Inspiring Your Next Continental Adventure! Whether you’re a seasoned traveler or a first-time explorer, this guide will help you plan the perfect European adventure. From the cobblestone streets of Paris to the rolling hills of Tuscany, Europe is a continent full of culture, history, and beauty. With this guide, you’ll find the best travel books to help you explore the continent and make the most of your trip. From detailed guides to inspiring stories, you’ll find the perfect book to help you plan your next European adventure. So, let’s get started!
Exploring the Best Travel Books for Europe: A Guide to the Continent’s Must-See Destinations.
This guide to the best travel books for Europe is designed to help travelers explore the continent’s must-see destinations. It provides an informative overview of the top books available, offering readers a comprehensive look at the best places to visit in Europe. From the stunning architecture of Paris to the breathtaking beauty of the Swiss Alps, this guide will help travelers plan their perfect European vacation. It covers a wide range of topics, including the best places to stay, the best restaurants, and the best activities to enjoy. With detailed descriptions and helpful tips, this guide is sure to help travelers make the most of their European adventure.
How to Choose the Right Travel Book for Your European Adventure: Tips and Tricks for Finding the Perfect Guide
Planning a European adventure can be an exciting and daunting task. With so many travel books available, it can be difficult to know which one is right for you. To help you find the perfect guide for your trip, here are some tips and tricks to consider when choosing a travel book for your European adventure.
1. Consider the type of traveler you are. Are you a budget traveler, a luxury traveler, or somewhere in between? Different travel books will cater to different types of travelers, so make sure to choose one that fits your style.
2. Look for books that focus on the specific countries or regions you plan to visit. This will ensure that you get the most up-to-date information about the places you plan to visit.
3. Read reviews from other travelers. Reviews can be a great way to get an idea of what other travelers thought of a particular book.
4. Consider the writing style of the book. Do you prefer a more narrative style or a more factual approach? Different books will have different writing styles, so make sure to choose one that fits your preferences.
5. Look for books that include maps and other visuals. Maps can be a great way to get a better understanding of the area you plan to visit.
6. Consider the size of the book. If you plan to carry the book with you, make sure to choose one that is lightweight and easy to carry.
By following these tips and tricks, you can be sure to find the perfect travel book for your European adventure. With the right guide, you can be sure to have an unforgettable experience.
Conclusion
Travel books Europe: Inspiring Your Next Continental Adventure is an invaluable resource for anyone looking to explore the continent. It provides detailed information on the best places to visit, the best activities to do, and the best ways to get around. With its comprehensive coverage of the continent, it is sure to be a valuable asset for anyone looking to plan their next European adventure.
Top 10 things to do in Manali for a memorable trip!

Manali is one of the most popular hill stations in India. This magnificent hill station offers beautiful views of the snow-capped mountains, greenery, and crisp weather. Manali also offers many activities that you can do here. From visiting the ancient temples to partaking in thrilling sports, this hill station will tempt you to come back and experience all the thrill and fun again. Below, we have listed the top 10 things to do in Manali, have a look!
- Go camping
One of the best things to do in Manali is camping. Staying a night under the mesmerizing stars and surrounded by nature will make your Manali vacation memorable. You can choose a riverside, jungle or night camp. Kothi is one of the best places to go camping in Manali. It’s a small village that offers views of snow-capped mountains and glaciers where you can also see the beautiful Beas River.
- Seek blessings of Lord Shiva
During your visit to Manali, visit the ancient Gauri Shankar Temple, which is dedicated to Lord Shiva. The temple is around 800 years old and is one of the famous attractions in this hill station, especially for the devotees of Lord Shiva. The temple is designed in the Shikara style of architecture.
- Mountain biking
Looking for fun activities to do in Manali? There’s no shortage of exciting things to do in this beautiful hill station, and one is mountain biking. Mountain biking has become recently famous in India and is worth a try. The biking starts from the Solang Ski Pass to the Old Manali and costs around Rs. 500 to Rs. 1,000. It’s a fun and thrilling activity for a solo traveler or with friends.
- Paragliding
The adventure enthusiasts are going to have a memorable experience in Manali. You can also go for paragliding in Manali among the many adventurous activities. From a bird’s eye view, you can enjoy the breathtaking sceneries around you, such as the Beas River and the Dhauladhar mountain range. Solang Valley, Marhi, and Gulaba are popular places for paragliding in Manali.
- Skiing in Solang Valley
Skiing is one of the most famous activities in Solang Valley, Manali. The place offers a thick layer of snow where experts and first-timers can indulge in this thrilling sport. If this is your first time skiing, you can get an instructor to guide you in this sport. If you are an expert, then you can also enjoy heli-skiing.
Besides Solang Valley, you can also go skiing in Marhi, Dhundi, and Gulaba. Ski lovers get these places added to your Manali tour packages.
- Take a healing bath in the hot springs
One of the best things to do in Manali, especially if you are visiting here between May and June, is to take a bath in the hot spring water. The Vashisht Village, located near the River Beas, attracts many tourists annually. It is believed that the hot springs here have magical powers of healing. Whether you believe in magic or want to just relax, visit this place during your Manali vacation.
- Explore the artwork in Naggar Castle
Built in 1460, the Naggar Castle was once the residence of the Raja Sidh Singh of Kullu. The castle is constructed of woods and stones, showcasing a beautiful blend of Himalayan and European architecture.
The Naggar Castle was turned into a heritage hotel in 1978 and is run by the Himachal Pradesh Tourism Development Corporation. This is one of the must-visit places for art lovers as you can see the various artworks and paintings on display in the castle.
- Go on a shopping spree in Mall Road
Shopping is a must whenever you go out on a vacation. The Mall Road is the best place to shop and for lunch or dinner. There are many shops where you can buy Tibetan artifacts, jewelry, woolen items, and souvenirs for your friends and family. This location also offers many cafes and restaurants where you can have mouthwatering local dishes.
- Visit the apple orchards
Nature lovers are going to have a wonderful time during their Manali vacation. The scenic hill station has many apple orchards which you can visit. You can even pluck out the apples and taste right at the orchards. Imagine strolling through the apple orchards with the mountains in the background; sound fun, doesn’t it?
- Take the cable car ride
During your visit to the Solang Valley in Manali, don’t miss riding the cable car, which will be a remarkable experience. On your ride in the cable car, you will see many breathtaking views around you. The cable car ride is a fun experience for couples and families.
And the list of the best things to do in Manali goes on. Whether you are a nature enthusiast, an adrenaline junkie, or just looking for some places for a relaxing vacation, Manali has got it all. Planning on a trip to Manali? Hello Travel has the best Manali tour packages and deals for you. Visit the website to check out the different packages and book one for a memorable vacation.
Thai Good Eats: Savoring Delicious Thai Cuisine
Source: cdn-hotels.com
Welcome to Thai good eats! We are passionate about bringing you the best of Thai cuisine. Our mission is to provide you with delicious, authentic Thai dishes that will tantalize your taste buds and leave you wanting more. We strive to use only the freshest ingredients and traditional cooking methods to ensure that you get the most out of your meal. Whether you’re looking for a quick bite or a full-course meal, we have something for everyone. So come on in and let us show you why Thai good eats is the place to go for savoring delicious Thai cuisine.
Exploring the Regional Cuisines of Thailand: A Guide to the Different Flavors of Thai Good Eats
Thailand is a country renowned for its delicious cuisine, with a variety of regional dishes that offer a unique and flavorful experience. From the fiery curries of the south to the milder flavors of the north, each region of Thailand has its own distinct culinary identity. This guide will explore the different regional cuisines of Thailand, highlighting the flavors and ingredients that make each one special.
The cuisine of the north of Thailand is characterized by its milder flavors and lighter dishes. The region is known for its use of herbs and spices, such as lemongrass, galangal, and kaffir lime leaves, which give dishes a fragrant and aromatic flavor. Popular dishes include Khao Soi, a coconut-based curry soup, and Sai Oua, a spicy pork sausage.
In the northeast of Thailand, the cuisine is known for its bold and spicy flavors. The region is famous for its use of chili peppers, which are used to add heat to dishes such as Som Tam, a spicy green papaya salad. Other popular dishes include Larb, a spicy minced meat salad, and Kaeng Khiao Wan, a green curry.
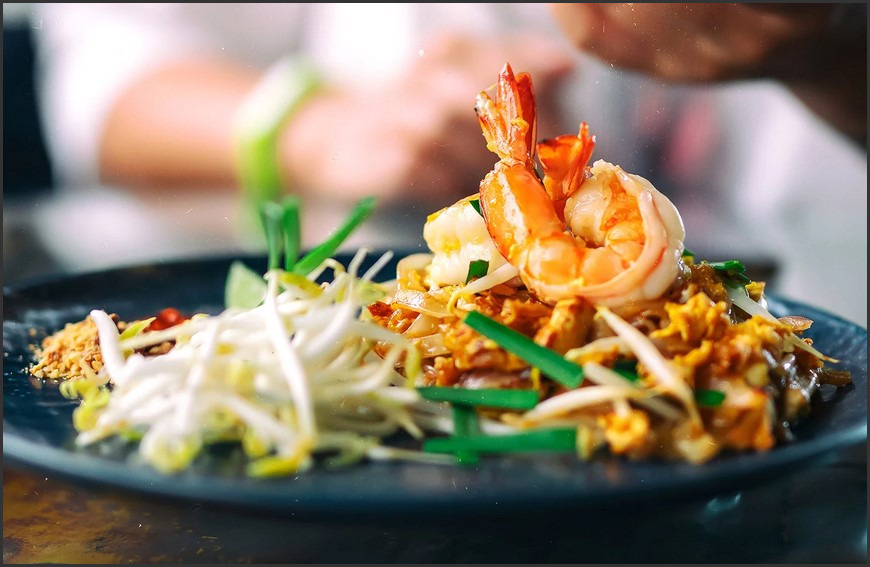
The central region of Thailand is known for its sweet and sour flavors. The cuisine is characterized by its use of tamarind, which is used to add a sour note to dishes such as Pad Thai, a stir-fried noodle dish. Other popular dishes include Khao Pad, a fried rice dish, and Tom Yum Goong, a spicy and sour soup.
The south of Thailand is renowned for its fiery curries and spicy dishes. The region is known for its use of coconut milk, which is used to add a creamy texture to dishes such as Massaman Curry, a mild and sweet curry. Other popular dishes include Kua Kling, a dry curry, and Kaeng Tai Pla, a fish-based curry.
No matter which region of Thailand you visit, you’re sure to find a delicious and unique culinary experience. From the mild flavors of the north to the fiery curries of the south, each region has its own distinct flavors and ingredients that make it special. So why not explore the different regional cuisines of Thailand and discover the flavors that make it one of the world’s most beloved culinary destinations?
The Art of Making Authentic Thai Dishes: Tips and Tricks for Crafting Delicious Thai Good Eats
Thai cuisine is renowned for its unique flavors and fragrant aromas, making it a favorite among food lovers around the world. Crafting authentic Thai dishes can be a daunting task, but with the right tips and tricks, you can create delicious Thai meals that will tantalize your taste buds. Here are some tips and tricks for making authentic Thai dishes.
1. Start with the basics. Before you begin cooking, familiarize yourself with the essential ingredients and flavors of Thai cuisine. This includes ingredients such as lemongrass, galangal, kaffir lime leaves, fish sauce, and curry paste.
2. Use fresh ingredients. Fresh ingredients are essential for creating authentic Thai dishes. Whenever possible, use fresh herbs, vegetables, and proteins.
3. Balance flavors. Thai cuisine is all about balance. Make sure to use a combination of sweet, sour, salty, and spicy flavors in your dishes.
4. Use the right cooking techniques. Thai dishes are often cooked quickly over high heat. This helps to preserve the flavors and aromas of the ingredients.
5. Don’t be afraid to experiment. Thai cuisine is all about experimentation. Try different combinations of ingredients and flavors to create unique dishes.
By following these tips and tricks, you can create delicious and authentic Thai dishes that will tantalize your taste buds. With a little practice and patience, you can become an expert in crafting Thai cuisine.
Conclusion
Thai good eats: Savoring Delicious Thai Cuisine is an excellent resource for anyone looking to explore the flavors of Thai cuisine. With its comprehensive overview of the ingredients, flavors, and techniques used in Thai cooking, this book provides a great introduction to the cuisine. The recipes are easy to follow and the results are sure to please. Whether you’re a novice or an experienced cook, Thai good eats is sure to provide you with a delicious and satisfying experience.
Accutane Before and After: Visualizing the Effects of Acne Medication

Source : https://www.usdermatologypartners.com
Accutane, also known as isotretinoin, is a powerful medication used to treat severe acne. It is a form of vitamin A that works by reducing the amount of oil released by the skin, which helps to reduce the number of acne lesions. Accutane is a powerful medication that can have dramatic effects on the skin, and many people have seen dramatic improvements in their skin after taking Accutane. In this article, we will explore the before and after effects of Accutane, and how it can help to improve the appearance of acne-prone skin. We will also discuss the potential side effects of Accutane, and how to best manage them.
How Accutane Changed the Lives of Acne Sufferers: A Look at Before and After Photos
Accutane, a powerful medication used to treat severe acne, has changed the lives of countless acne sufferers. Before Accutane, many people with severe acne felt embarrassed and ashamed of their skin, and were often unable to find relief from over-the-counter treatments. After Accutane, however, many of these same people have seen dramatic improvements in their skin, with some even achieving clear skin.
Before Accutane, many people with severe acne had to deal with red, inflamed skin, deep cysts, and painful breakouts. These breakouts often caused scarring and discoloration, leaving many feeling embarrassed and self-conscious. Over-the-counter treatments often provided little to no relief, leaving many feeling hopeless.
After Accutane, however, many of these same people have seen dramatic improvements in their skin. Accutane works by reducing the amount of oil produced by the skin, which helps to reduce inflammation and prevent breakouts. After a few months of treatment, many people have seen a dramatic reduction in their acne, with some even achieving clear skin.
Before and after photos of acne sufferers who have taken Accutane are a testament to the power of this medication. In the before photos, many of the acne sufferers have red, inflamed skin, deep cysts, and painful breakouts. In the after photos, however, many of the same people have clear, healthy skin with little to no visible acne.
Accutane has changed the lives of countless acne sufferers, providing them with relief from their severe acne and allowing them to feel more confident in their skin. Before and after photos of acne sufferers who have taken Accutane are a testament to the power of this medication, and a reminder of how it has changed the lives of so many.
Exploring the Benefits of Accutane: A Comparison of Before and After Images
Accutane, also known as isotretinoin, is a powerful medication used to treat severe acne. It is a form of vitamin A that works by reducing the amount of oil released by the skin, which helps to reduce the number of acne lesions. Accutane is a highly effective treatment for severe acne, but it can also have serious side effects. For this reason, it is important to understand the potential benefits and risks of taking Accutane before beginning treatment.
One of the most striking benefits of Accutane is the dramatic improvement in the appearance of the skin. Before and after images of people who have taken Accutane show a remarkable transformation. In the before images, the skin is often covered in red, inflamed acne lesions. After taking Accutane, the skin is usually clear and free of blemishes.
In addition to improving the appearance of the skin, Accutane can also reduce the risk of scarring. Acne lesions can cause permanent scarring if left untreated, but Accutane can help to reduce the risk of scarring. This is especially important for people who have severe acne, as the risk of scarring is much higher in this group.
Finally, Accutane can also help to improve self-esteem and confidence. People who suffer from severe acne often feel embarrassed and ashamed of their skin, but Accutane can help to improve their self-image. After taking Accutane, many people report feeling more confident and comfortable in their own skin.
Accutane is a powerful medication that can have serious side effects, so it is important to discuss the potential benefits and risks with your doctor before beginning treatment. However, the before and after images of people who have taken Accutane show a remarkable transformation, and the potential benefits of taking Accutane can be life-changing.
Conclusion
Accutane is a powerful medication that can have a dramatic effect on acne. While it can be an effective treatment for severe acne, it is important to understand the potential side effects and risks associated with taking Accutane. It is also important to remember that everyone’s experience with Accutane will be different, and the results may vary. However, the before and after images of those who have taken Accutane can provide a visual representation of the potential effects of this medication.