


Teen Dreamscapes: Teen Girls Bedroom Ideas for Stylish Expression
Source : https://stylesatlife.com
Welcome to Teen Dreamscapes, the ultimate resource for teenage girls looking to express their style and personality through their bedroom. Here, you’ll find a variety of bedroom ideas and inspiration to help you create the perfect space for your teenage girl. From modern and minimalist to cozy and eclectic, we have something for every taste and budget. Whether you’re looking for a complete bedroom makeover or just a few small changes, we have the ideas and resources to help you create the perfect space for your teen. So, let’s get started and explore the world of Teen Dreamscapes!
How to Create a Dreamy Teen Girls Bedroom: Tips for Designing a Stylish and Functional Space
Designing a dreamy teen girls bedroom can be a fun and exciting project. With the right tips and tricks, you can create a stylish and functional space that your teen will love. Here are some tips for creating a dreamy teen girls bedroom:
1. Choose a Color Scheme: Start by selecting a color scheme for the room. Consider colors that your teen likes and that will create a calming atmosphere. Soft pastels, muted blues, and neutral tones are all great options.
2. Add a Statement Piece: A statement piece, such as a bed frame or a piece of artwork, can add a unique touch to the room. Choose something that reflects your teen’s personality and style.
3. Incorporate Storage: Make sure to incorporate plenty of storage into the room. This will help keep the room organized and clutter-free. Consider adding shelves, drawers, and baskets to store items.
4. Add Seating: Add seating to the room so your teen can relax and hang out with friends. A comfortable chair or bean bag can be a great addition.
5. Add Lighting: Lighting is an important element in any bedroom. Consider adding a few lamps or string lights to create a cozy atmosphere.
6. Add Accessories: Accessories can add a personal touch to the room. Consider adding items such as pillows, rugs, and wall art to complete the look.
By following these tips, you can create a dreamy teen girls bedroom that is both stylish and functional. With the right design elements, your teen will love spending time in their new space.
Inspiring Ideas for Decorating a Teen Girls Bedroom: Color Schemes, Furniture, and Accessories for a Unique Look
When it comes to decorating a teen girl’s bedroom, it is important to create a space that is both stylish and functional. A bedroom should be a place where a teen can relax, study, and spend time with friends. With the right color scheme, furniture, and accessories, you can create a unique and inspiring bedroom that your teen will love.
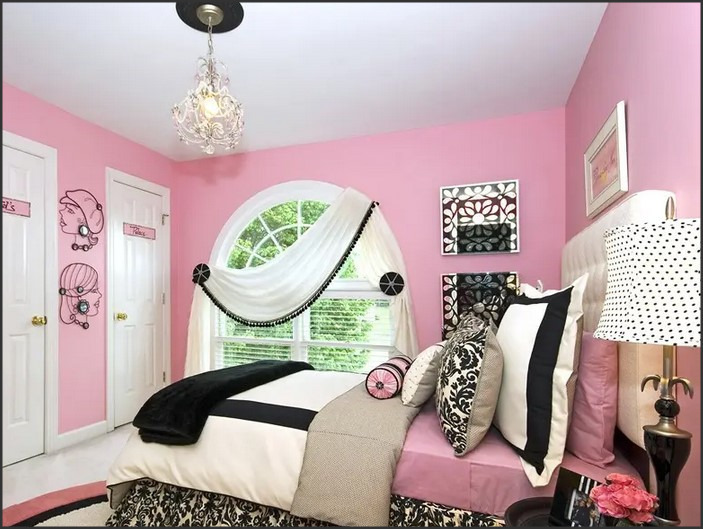
When selecting a color scheme for a teen girl’s bedroom, it is important to choose colors that reflect her personality and style. Consider using bright and bold colors such as pink, purple, and turquoise. These colors can be used to create a fun and vibrant atmosphere. If your teen prefers a more subtle look, consider using softer colors such as pastels or neutrals.
When it comes to furniture, it is important to choose pieces that are both stylish and functional. Consider investing in a bed frame with storage drawers underneath, a desk for studying, and a comfortable chair for relaxing. If space allows, you can also add a dresser and a vanity.
When it comes to accessories, there are many options to choose from. Consider adding a rug, curtains, wall art, and decorative pillows to add color and texture to the room. You can also add a few plants to bring a touch of nature into the space.
By combining the right color scheme, furniture, and accessories, you can create a unique and inspiring bedroom for your teen. With a little creativity and planning, you can create a space that your teen will love for years to come.
Conclusion
Teen Dreamscapes provides a great resource for teenage girls to express their individual style and create a unique and personal space. With a variety of ideas and inspiration, Teen Dreamscapes offers a wide range of options to help teenage girls create a bedroom that reflects their personality and interests. From bold colors and patterns to cozy and comfortable furnishings, Teen Dreamscapes provides the perfect platform for teenage girls to express themselves and create a space that is truly their own.
Freemanhwa: Your Gateway to Korean Comics and Webtoons

Source : https://mykoreanaddiction.com
Welcome to Freemanhwa, your gateway to Korean comics and webtoons! Here, you can explore the world of Korean comics and webtoons, from classic stories to modern masterpieces. We offer a wide selection of titles, from popular series to lesser-known gems. Whether you’re a fan of action, romance, comedy, or horror, you’ll find something to enjoy here. With our easy-to-use platform, you can read your favorite comics and webtoons in a matter of minutes. So come explore the world of Korean comics and webtoons with us!
Exploring the World of Freemanhwa: An Introduction to Korean Comics and Webtoons
Korean comics, or manhwa, and webtoons have become increasingly popular in recent years, with their unique art styles and captivating storylines. From the classic manhwa of the 1980s to the modern webtoons of today, these comics have captivated readers around the world.
Manhwa is a term used to describe comics and graphic novels that originate from Korea. It is a form of visual storytelling that has been around since the early 20th century. Manhwa is typically characterized by its distinct art style, which often features bright colors and exaggerated facial expressions. Manhwa is also known for its unique storylines, which often explore themes of romance, fantasy, and adventure.
Webtoons are a more recent form of Korean comics. They are typically published online and are often free to read. Webtoons are often characterized by their unique art style, which often features bright colors and exaggerated facial expressions. Webtoons are also known for their unique storylines, which often explore themes of romance, fantasy, and adventure.
Freemanhwa is a term used to describe a specific type of manhwa and webtoon. Freemanhwa is characterized by its unique art style, which often features bright colors and exaggerated facial expressions. Freemanhwa is also known for its unique storylines, which often explore themes of romance, fantasy, and adventure.
Exploring the world of Freemanhwa can be a rewarding experience. Whether you are a fan of manhwa or webtoons, there is something for everyone. From classic manhwa to modern webtoons, Freemanhwa offers a unique and captivating experience. So, if you are looking for something new and exciting, why not explore the world of Freemanhwa?
How Freemanhwa is Revolutionizing the Korean Comics and Webtoons Scene
Freemanhwa is revolutionizing the Korean comics and webtoons scene by providing a platform for creators to showcase their work and for readers to access a wide variety of content. Founded in 2018, Freemanhwa is a webtoon platform that offers a unique experience for both creators and readers.
For creators, Freemanhwa provides a platform to showcase their work and reach a wider audience. The platform offers a variety of tools to help creators create and publish their work, including a webtoon editor, a webtoon store, and a webtoon community. The webtoon editor allows creators to easily create and edit their webtoons, while the webtoon store allows them to monetize their work. The webtoon community provides a platform for creators to interact with other creators and readers, allowing them to build a fan base and gain feedback on their work.
For readers, Freemanhwa offers a wide variety of content to choose from. The platform features a variety of genres, including romance, comedy, fantasy, and horror. It also offers a variety of formats, including webtoons, comics, and novels. The platform also features a variety of payment options, allowing readers to purchase individual chapters or entire series.
Overall, Freemanhwa is revolutionizing the Korean comics and webtoons scene by providing a platform for creators to showcase their work and for readers to access a wide variety of content. The platform offers a variety of tools and features to help creators create and publish their work, while also providing readers with a wide selection of content to choose from. With its innovative approach to the comics and webtoons scene, Freemanhwa is sure to become a major player in the industry.
Conclusion
Freemanhwa is an excellent resource for anyone looking to explore the world of Korean comics and webtoons. With its vast library of titles, easy-to-use interface, and helpful customer service, it is the perfect place to start your journey into the exciting world of Korean comics and webtoons. Whether you are a fan of traditional comics or webtoons, Freemanhwa has something for everyone. So, if you are looking for a great way to explore the world of Korean comics and webtoons, look no further than Freemanhwa.
Cobblestone Elegance: Calculating Cobblestone Driveway Cost for Classic Appeal
Source : https://housegrail.com
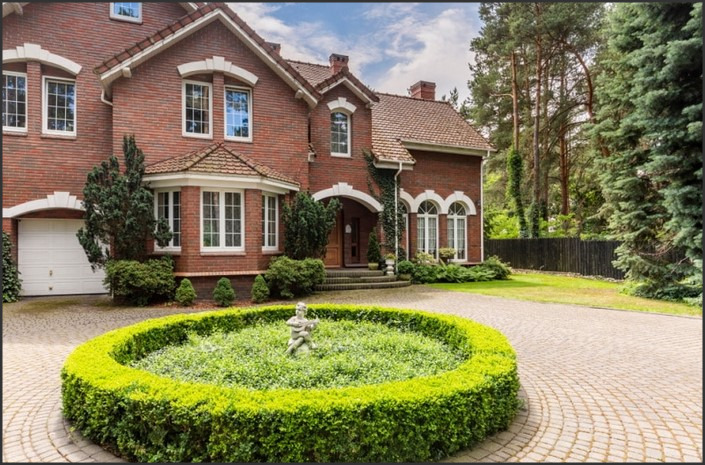
Cobblestone Elegance is a company that specializes in the installation of cobblestone driveways. We provide a classic and timeless look to any home or business. Our experienced team of professionals will help you calculate the cost of your cobblestone driveway and provide you with the best options for your budget. We take pride in our work and strive to provide the highest quality of service. With our expertise and knowledge, we can help you create a beautiful and unique cobblestone driveway that will last for years to come.
How to Estimate the Cost of a Cobblestone Driveway for a Classic Look
A cobblestone driveway is a classic and timeless way to add a touch of elegance to any home. While the cost of a cobblestone driveway can vary depending on the size and complexity of the project, there are some general guidelines that can help you estimate the cost of your project.
First, you will need to determine the size of the driveway. Measure the length and width of the area you plan to pave and multiply the two numbers together to get the total square footage. This will give you an idea of the amount of cobblestones you will need to purchase.
Next, you will need to decide on the type of cobblestones you want to use. Cobblestones come in a variety of sizes, shapes, and colors, so you will need to decide which type best suits your needs. The cost of cobblestones can vary greatly depending on the type you choose, so it is important to do your research and compare prices.
Once you have determined the size and type of cobblestones you need, you will need to calculate the cost of the materials. Cobblestones are typically sold by the ton, so you will need to calculate the total weight of the cobblestones you need and multiply it by the cost per ton. You will also need to factor in the cost of any additional materials such as sand, gravel, and mortar.
Finally, you will need to factor in the cost of labor. Depending on the complexity of the project, you may need to hire a professional contractor to install the cobblestones. The cost of labor will vary depending on the size and complexity of the project, so it is important to get quotes from several contractors before making a decision.
By taking the time to calculate the cost of materials and labor, you can get a better idea of the total cost of your cobblestone driveway. With careful planning and research, you can create a classic and timeless look for your home that will last for years to come.
Design Tips for Creating an Elegant Cobblestone Driveway on a Budget
Creating an elegant cobblestone driveway on a budget is possible with careful planning and design. Here are some tips to help you achieve the look you desire without breaking the bank:
1. Choose the Right Cobblestones: Select cobblestones that are of a uniform size and shape. This will create a more cohesive look and help you save money by avoiding the need for custom cuts.
2. Consider the Layout: Plan the layout of your driveway carefully. Consider the size of the stones, the pattern you want to create, and the overall look you are trying to achieve.
3. Use a Base Layer: A base layer of gravel or crushed stone will help to ensure that your cobblestones stay in place and provide a stable foundation for your driveway.
4. Install Edging: Installing edging along the sides of your driveway will help to keep the cobblestones in place and create a neat, finished look.
5. Use a Professional: If you are not confident in your ability to install the cobblestones yourself, consider hiring a professional. This will ensure that the job is done correctly and will save you time and money in the long run.
By following these tips, you can create an elegant cobblestone driveway on a budget. With careful planning and design, you can achieve the look you desire without breaking the bank.
Conclusion
Cobblestone Elegance is an excellent choice for those looking to add classic appeal to their driveway. The cost of a cobblestone driveway can vary greatly depending on the size and complexity of the project, but with careful planning and research, homeowners can find a cost-effective solution that will add beauty and value to their home. With its timeless beauty and durability, cobblestone is a great choice for any driveway.
Laminate A3: Transforming Your Documents for Durability
Source : https://www.mbb.ph
laminate a3 is a revolutionary product that provides a durable and long-lasting solution for protecting and preserving documents. It is a cost-effective way to protect documents from wear and tear, fading, and other environmental factors. laminate a3 is a great choice for businesses, schools, and other organizations that need to protect important documents. It is easy to use and can be applied quickly and easily to any document. With laminate a3, you can be sure that your documents will remain in pristine condition for years to come.
How to Laminate A3 Documents for Long-Term Preservation
Laminating A3 documents is an effective way to preserve them for long-term use. Laminating provides a protective layer that helps to prevent damage from dirt, dust, and moisture. It also helps to prevent fading and discoloration due to exposure to light. Here are the steps to follow when laminating A3 documents for long-term preservation:
1. Gather the necessary materials. You will need an A3 laminator, laminating pouches, and a pair of scissors.
2. Place the document inside the laminating pouch. Make sure that the document is centered and that there are no wrinkles or air bubbles.
3. Insert the pouch into the laminator. Follow the instructions on the laminator to set the temperature and speed.
4. Once the laminator has finished, remove the pouch and trim the edges with the scissors.
5. Place the laminated document in a safe place to ensure long-term preservation.
By following these steps, you can easily laminate a3 documents for long-term preservation. Laminating provides a protective layer that helps to prevent damage and fading, ensuring that your documents remain in good condition for years to come.
The Benefits of Laminating A3 Documents for Professional Presentations
Laminating A3 documents is an effective way to ensure that professional presentations look their best. Laminating documents can help to protect them from damage, such as tearing, creasing, and fading, and can also help to make them look more professional. Here are some of the benefits of laminating A3 documents for professional presentations:
Durability: Laminating documents can help to protect them from damage, such as tearing, creasing, and fading. This makes them more durable and ensures that they will look their best for longer.
Appearance: Laminating documents can also help to make them look more professional. The glossy finish of the laminate can make documents look more attractive and can help to make presentations look more polished and professional.
Protection: Laminating documents can also help to protect them from dirt, dust, and moisture. This can help to ensure that documents remain in pristine condition for longer.
Cost-effectiveness: Laminating documents can be a cost-effective way to ensure that professional presentations look their best. Lamination is a relatively inexpensive process and can help to save money in the long run.
These are just some of the benefits of laminating A3 documents for professional presentations. Laminating documents can help to protect them from damage, make them look more professional, and can be a cost-effective way to ensure that presentations look their best.
Conclusion
laminate a3 is an excellent choice for transforming documents for durability. It is a cost-effective and easy-to-use solution that can help protect documents from wear and tear, water damage, and other environmental factors. It is also a great way to add a professional look to documents, making them look more polished and presentable. With its many benefits, laminate a3 is an ideal choice for anyone looking to protect and enhance their documents.
ADHD Dysregulation: Understanding Emotional Dysregulation in ADHD

Source : https://d2jx2rerrg6sh3.cloudfront.net
Attention Deficit Hyperactivity Disorder (ADHD) is a neurodevelopmental disorder that affects millions of children and adults worldwide. It is characterized by difficulty with attention, impulsivity, and hyperactivity. While these symptoms are often the focus of treatment, there is another aspect of ADHD that is often overlooked: emotional dysregulation. Emotional dysregulation is the inability to regulate emotions in a healthy way, and it can have a significant impact on the lives of those with ADHD. This article will explore the concept of emotional dysregulation in ADHD, its causes, and potential treatments. We will also discuss strategies for managing emotional dysregulation and improving quality of life.
Exploring the Role of Cognitive Behavioral Therapy in Managing ADHD Dysregulation
Attention Deficit Hyperactivity Disorder (ADHD) is a neurodevelopmental disorder that affects millions of children and adults worldwide. It is characterized by difficulty with attention, impulsivity, and hyperactivity. Cognitive Behavioral Therapy (CBT) is an evidence-based treatment for ADHD that has been shown to be effective in managing symptoms and improving functioning.
CBT is a type of psychotherapy that focuses on changing unhelpful thoughts and behaviors. It is based on the idea that our thoughts, feelings, and behaviors are all interconnected and can influence each other. CBT helps individuals identify and challenge unhelpful thoughts and beliefs, and replace them with more helpful ones. It also helps individuals develop skills to manage their emotions and behaviors.
CBT has been found to be effective in treating adhd dysregulation. It can help individuals identify and modify unhelpful thoughts and behaviors that are contributing to their symptoms. It can also help individuals develop skills to manage their emotions and behaviors. For example, CBT can help individuals learn how to recognize and manage their emotions, develop problem-solving skills, and practice self-regulation strategies.
CBT can also help individuals develop better coping skills and strategies for managing their ADHD symptoms. It can help individuals learn how to set realistic goals, break tasks down into smaller steps, and develop strategies for staying organized and on task. Additionally, CBT can help individuals learn how to manage stress and anxiety, which can be common in individuals with ADHD.
Overall, CBT is an effective treatment for managing adhd dysregulation. It can help individuals identify and modify unhelpful thoughts and behaviors, develop better coping skills, and practice self-regulation strategies. With the help of a qualified mental health professional, individuals with ADHD can learn how to better manage their symptoms and improve their functioning.
Examining the Impact of Diet and Nutrition on ADHD Dysregulation Symptoms
Diet and nutrition play an important role in the regulation of symptoms associated with Attention Deficit Hyperactivity Disorder (ADHD). Research has shown that certain dietary and nutritional interventions can have a positive impact on the symptoms of ADHD, including hyperactivity, impulsivity, and inattention.
The most common dietary interventions for ADHD include the elimination of artificial food additives, such as food dyes and preservatives, as well as the elimination of certain foods, such as sugar and processed foods. Studies have shown that eliminating these substances from the diet can reduce the symptoms of ADHD. Additionally, research has shown that increasing the intake of certain nutrients, such as omega-3 fatty acids, zinc, and iron, can also have a positive effect on ADHD symptoms.
In addition to dietary interventions, research has also shown that nutritional supplementation can be beneficial for individuals with ADHD. Supplementation with certain vitamins and minerals, such as magnesium, vitamin B6, and vitamin D, has been shown to improve symptoms of ADHD. Additionally, supplementation with omega-3 fatty acids has been shown to reduce hyperactivity and impulsivity in individuals with ADHD.
Overall, research has shown that dietary and nutritional interventions can have a positive impact on the symptoms of ADHD. By eliminating artificial food additives and certain foods from the diet, as well as increasing the intake of certain nutrients and supplementing with certain vitamins and minerals, individuals with ADHD can experience a reduction in their symptoms.
Conclusion
adhd dysregulation is a complex disorder that can have a significant impact on an individual’s emotional and behavioral functioning. It is important to understand the underlying causes of emotional dysregulation in order to develop effective interventions and treatments. With the right support and resources, individuals with adhd dysregulation can learn to manage their emotions and lead successful, fulfilling lives.