


Category Archives: Home Improvement
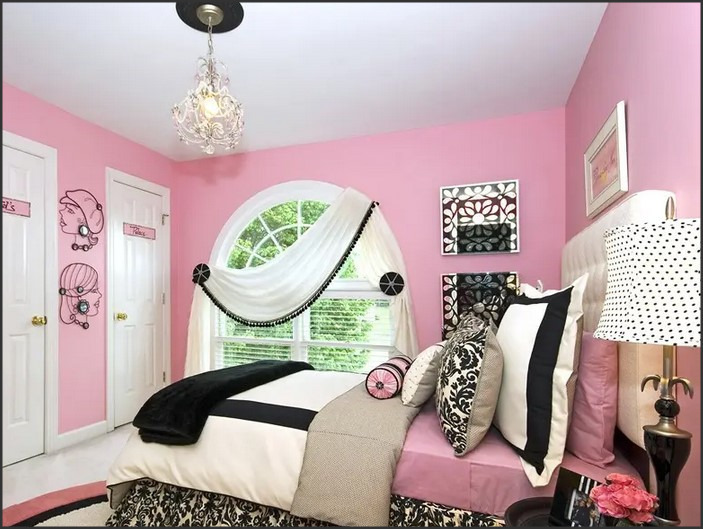
Teen Dreamscapes: Teen Girls Bedroom Ideas for Stylish Expression
Source : https://stylesatlife.com
Welcome to Teen Dreamscapes, the ultimate resource for teenage girls looking to express their style and personality through their bedroom. Here, you’ll find a variety of bedroom ideas and inspiration to help you create the perfect space for your teenage girl. From modern and minimalist to cozy and eclectic, we have something for every taste and budget. Whether you’re looking for a complete bedroom makeover or just a few small changes, we have the ideas and resources to help you create the perfect space for your teen. So, let’s get started and explore the world of Teen Dreamscapes!
How to Create a Dreamy Teen Girls Bedroom: Tips for Designing a Stylish and Functional Space
Designing a dreamy teen girls bedroom can be a fun and exciting project. With the right tips and tricks, you can create a stylish and functional space that your teen will love. Here are some tips for creating a dreamy teen girls bedroom:
1. Choose a Color Scheme: Start by selecting a color scheme for the room. Consider colors that your teen likes and that will create a calming atmosphere. Soft pastels, muted blues, and neutral tones are all great options.
2. Add a Statement Piece: A statement piece, such as a bed frame or a piece of artwork, can add a unique touch to the room. Choose something that reflects your teen’s personality and style.
3. Incorporate Storage: Make sure to incorporate plenty of storage into the room. This will help keep the room organized and clutter-free. Consider adding shelves, drawers, and baskets to store items.
4. Add Seating: Add seating to the room so your teen can relax and hang out with friends. A comfortable chair or bean bag can be a great addition.
5. Add Lighting: Lighting is an important element in any bedroom. Consider adding a few lamps or string lights to create a cozy atmosphere.
6. Add Accessories: Accessories can add a personal touch to the room. Consider adding items such as pillows, rugs, and wall art to complete the look.
By following these tips, you can create a dreamy teen girls bedroom that is both stylish and functional. With the right design elements, your teen will love spending time in their new space.
Inspiring Ideas for Decorating a Teen Girls Bedroom: Color Schemes, Furniture, and Accessories for a Unique Look
When it comes to decorating a teen girl’s bedroom, it is important to create a space that is both stylish and functional. A bedroom should be a place where a teen can relax, study, and spend time with friends. With the right color scheme, furniture, and accessories, you can create a unique and inspiring bedroom that your teen will love.
When selecting a color scheme for a teen girl’s bedroom, it is important to choose colors that reflect her personality and style. Consider using bright and bold colors such as pink, purple, and turquoise. These colors can be used to create a fun and vibrant atmosphere. If your teen prefers a more subtle look, consider using softer colors such as pastels or neutrals.
When it comes to furniture, it is important to choose pieces that are both stylish and functional. Consider investing in a bed frame with storage drawers underneath, a desk for studying, and a comfortable chair for relaxing. If space allows, you can also add a dresser and a vanity.
When it comes to accessories, there are many options to choose from. Consider adding a rug, curtains, wall art, and decorative pillows to add color and texture to the room. You can also add a few plants to bring a touch of nature into the space.
By combining the right color scheme, furniture, and accessories, you can create a unique and inspiring bedroom for your teen. With a little creativity and planning, you can create a space that your teen will love for years to come.
Conclusion
Teen Dreamscapes provides a great resource for teenage girls to express their individual style and create a unique and personal space. With a variety of ideas and inspiration, Teen Dreamscapes offers a wide range of options to help teenage girls create a bedroom that reflects their personality and interests. From bold colors and patterns to cozy and comfortable furnishings, Teen Dreamscapes provides the perfect platform for teenage girls to express themselves and create a space that is truly their own.
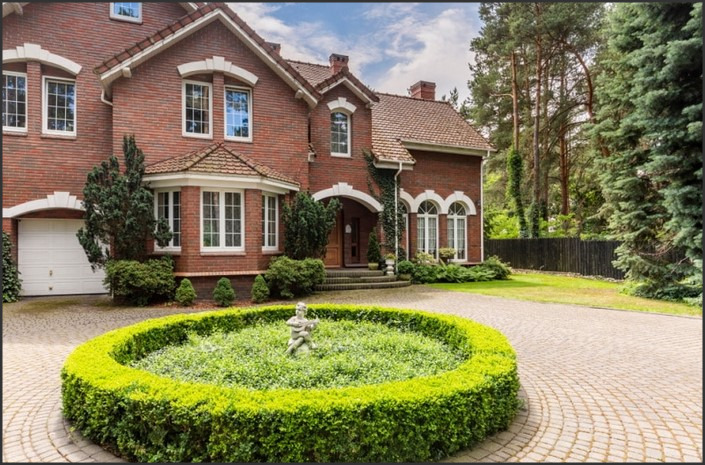
Cobblestone Elegance: Calculating Cobblestone Driveway Cost for Classic Appeal
Source : https://housegrail.com
Cobblestone Elegance is a company that specializes in the installation of cobblestone driveways. We provide a classic and timeless look to any home or business. Our experienced team of professionals will help you calculate the cost of your cobblestone driveway and provide you with the best options for your budget. We take pride in our work and strive to provide the highest quality of service. With our expertise and knowledge, we can help you create a beautiful and unique cobblestone driveway that will last for years to come.
How to Estimate the Cost of a Cobblestone Driveway for a Classic Look
A cobblestone driveway is a classic and timeless way to add a touch of elegance to any home. While the cost of a cobblestone driveway can vary depending on the size and complexity of the project, there are some general guidelines that can help you estimate the cost of your project.
First, you will need to determine the size of the driveway. Measure the length and width of the area you plan to pave and multiply the two numbers together to get the total square footage. This will give you an idea of the amount of cobblestones you will need to purchase.
Next, you will need to decide on the type of cobblestones you want to use. Cobblestones come in a variety of sizes, shapes, and colors, so you will need to decide which type best suits your needs. The cost of cobblestones can vary greatly depending on the type you choose, so it is important to do your research and compare prices.
Once you have determined the size and type of cobblestones you need, you will need to calculate the cost of the materials. Cobblestones are typically sold by the ton, so you will need to calculate the total weight of the cobblestones you need and multiply it by the cost per ton. You will also need to factor in the cost of any additional materials such as sand, gravel, and mortar.
Finally, you will need to factor in the cost of labor. Depending on the complexity of the project, you may need to hire a professional contractor to install the cobblestones. The cost of labor will vary depending on the size and complexity of the project, so it is important to get quotes from several contractors before making a decision.
By taking the time to calculate the cost of materials and labor, you can get a better idea of the total cost of your cobblestone driveway. With careful planning and research, you can create a classic and timeless look for your home that will last for years to come.
Design Tips for Creating an Elegant Cobblestone Driveway on a Budget
Creating an elegant cobblestone driveway on a budget is possible with careful planning and design. Here are some tips to help you achieve the look you desire without breaking the bank:
1. Choose the Right Cobblestones: Select cobblestones that are of a uniform size and shape. This will create a more cohesive look and help you save money by avoiding the need for custom cuts.
2. Consider the Layout: Plan the layout of your driveway carefully. Consider the size of the stones, the pattern you want to create, and the overall look you are trying to achieve.
3. Use a Base Layer: A base layer of gravel or crushed stone will help to ensure that your cobblestones stay in place and provide a stable foundation for your driveway.
4. Install Edging: Installing edging along the sides of your driveway will help to keep the cobblestones in place and create a neat, finished look.
5. Use a Professional: If you are not confident in your ability to install the cobblestones yourself, consider hiring a professional. This will ensure that the job is done correctly and will save you time and money in the long run.
By following these tips, you can create an elegant cobblestone driveway on a budget. With careful planning and design, you can achieve the look you desire without breaking the bank.
Conclusion
Cobblestone Elegance is an excellent choice for those looking to add classic appeal to their driveway. The cost of a cobblestone driveway can vary greatly depending on the size and complexity of the project, but with careful planning and research, homeowners can find a cost-effective solution that will add beauty and value to their home. With its timeless beauty and durability, cobblestone is a great choice for any driveway.
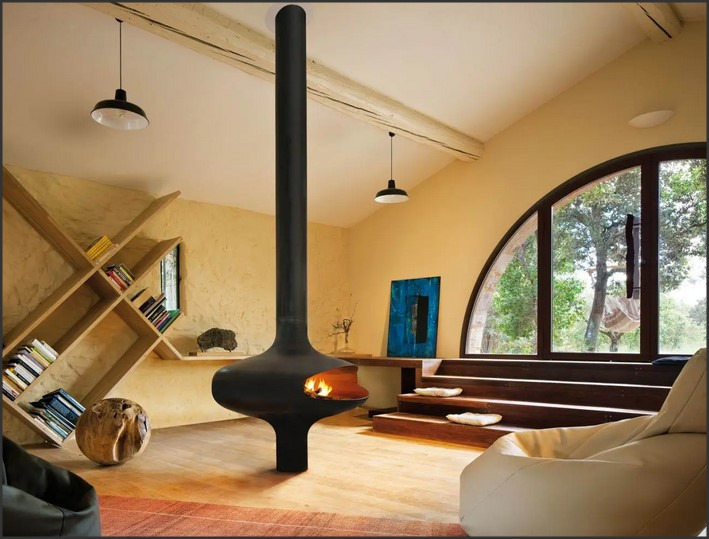
Focal Hearth: Captivating Spaces with a Picture of a Fireplace
Source : https://www.topstak.co.uk
Focal Hearth is a company that specializes in creating captivating spaces with fireplaces. Whether you are looking for a traditional wood-burning fireplace, a modern gas fireplace, or an outdoor fire pit, Focal Hearth has the perfect solution for you. With a wide selection of styles and designs, you can find the perfect fireplace to fit your home and lifestyle. From classic to contemporary, Focal Hearth has something for everyone. With their expert design and installation services, you can be sure that your fireplace will be the perfect centerpiece for your home. So, if you’re looking to add a touch of warmth and style to your home, look no further than Focal Hearth.
How to Create a Cozy and Inviting Space with a Picture of a Fireplace
Creating a cozy and inviting space can be achieved with the help of a picture of a fireplace. Fireplaces are a classic symbol of warmth and comfort, and they can be used to create a cozy atmosphere in any room. Here are some tips for using a picture of a fireplace to create a cozy and inviting space:
1. Choose the right size. When selecting a picture of a fireplace, make sure to choose one that is the right size for the space. A large picture of a fireplace can overpower a small room, while a small picture may not be visible enough to make an impact.
2. Hang it at the right height. When hanging a picture of a fireplace, make sure to hang it at the right height. A picture that is too low can make the room feel cramped, while a picture that is too high can make the room feel empty.
3. Choose the right colors. The colors of the picture should complement the colors of the room. Choose colors that are warm and inviting, such as reds, oranges, and yellows.
4. Add other cozy elements. To create a truly cozy atmosphere, add other elements such as a comfortable rug, cozy throw pillows, and warm lighting.
By following these tips, you can create a cozy and inviting space with a picture of a fireplace. With the right size, height, colors, and other elements, you can create a space that is both inviting and comfortable.
The Benefits of Adding a Picture of a Fireplace to Your Home Decor
Adding a picture of a fireplace to your home decor can be a great way to add a cozy and inviting atmosphere to any room. Fireplaces are a timeless symbol of warmth and comfort, and they can be used to create a unique and inviting atmosphere in any home.
The first benefit of adding a picture of a fireplace to your home decor is that it can create a sense of warmth and comfort. Fireplaces are often associated with cozy evenings spent with family and friends, and a picture of a fireplace can help to evoke these feelings in any room. This can be especially beneficial in rooms that are used for entertaining, as it can help to create a more inviting atmosphere.
The second benefit of adding a picture of a fireplace to your home decor is that it can be used to add a touch of elegance and sophistication to any room. Fireplaces are often seen as a symbol of luxury and sophistication, and a picture of a fireplace can help to create a more luxurious atmosphere in any room. This can be especially beneficial in rooms that are used for formal occasions, such as dinner parties or other special events.
The third benefit of adding a picture of a fireplace to your home decor is that it can be used to create a focal point in any room. Fireplaces are often seen as the centerpiece of a room, and a picture of a fireplace can help to draw attention to this area. This can be especially beneficial in rooms that are used for entertaining, as it can help to create a more inviting atmosphere.
Finally, adding a picture of a fireplace to your home decor can be a great way to add a unique and personal touch to any room. Fireplaces are often seen as a symbol of family and home, and a picture of a fireplace can help to evoke these feelings in any room. This can be especially beneficial in rooms that are used for family gatherings, as it can help to create a more intimate atmosphere.
In conclusion, adding a picture of a fireplace to your home decor can be a great way to add a cozy and inviting atmosphere to any room. Fireplaces are a timeless symbol of warmth and comfort, and they can be used to create a unique and inviting atmosphere in any home. Additionally, fireplaces can be used to add a touch of elegance and sophistication to any room, create a focal point in any room, and add a unique and personal touch to any room.
Conclusion
Focal Hearth is a great way to create a captivating space with a picture of a fireplace. It is a unique and creative way to bring warmth and comfort to any room. With its realistic look and feel, Focal Hearth can be used to create a cozy atmosphere in any home. Whether you are looking for a traditional or modern look, Focal Hearth has something for everyone. With its easy installation and maintenance, Focal Hearth is a great way to add a touch of warmth and comfort to any room.
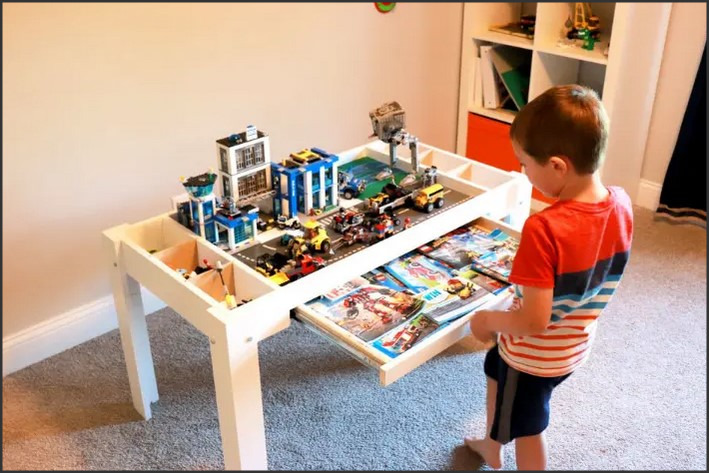
Endless Creations: Constructing a DIY LEGO Table for Playful Learning
Source : https://cdn.itsoverflowing.com
Endless Creations is a company that specializes in creating DIY LEGO tables for playful learning. With their unique designs, they provide a fun and interactive way for children to learn and explore their creativity. The tables are designed to be easy to assemble and can be customized to fit any space. They are perfect for classrooms, playrooms, or any other space where children can have fun and learn. With Endless Creations, you can create a unique and engaging learning environment for your children.
How to Create a Fun and Educational LEGO Table for Kids: A Step-by-Step Guide
Introduction
Creating a fun and educational LEGO table for kids is a great way to encourage creative play and learning. With a few simple steps, you can create a LEGO table that will provide hours of entertainment and learning for your children. This step-by-step guide will show you how to create a LEGO table that is both fun and educational.
Step 1: Gather Supplies
The first step in creating a LEGO table is to gather the necessary supplies. You will need a large, flat surface such as a table or a piece of plywood, LEGO bricks, and any other LEGO accessories you would like to include. You may also want to include a few LEGO-themed decorations to make the table more inviting.
Step 2: Prepare the Surface
Once you have gathered the necessary supplies, you will need to prepare the surface for the LEGO table. If you are using a table, make sure it is clean and free of any debris. If you are using a piece of plywood, make sure it is sanded and smooth.
Step 3: Set Up the LEGO Bricks
Once the surface is prepared, you can begin to set up the LEGO bricks. Start by laying out the base plates and then adding the LEGO bricks. You can create a variety of designs and patterns with the bricks. You can also add any LEGO accessories you have gathered.
Step 4: Add Decorations
Once the LEGO bricks are in place, you can add any decorations you have gathered. This could include LEGO-themed posters, stickers, or other decorations. This will help to make the table more inviting and fun for your children.
Step 5: Enjoy!
Once the LEGO table is set up, it is time to enjoy! Encourage your children to use their imaginations and create whatever they can think of. This is a great way to encourage creative play and learning.
Conclusion
Creating a fun and educational LEGO table for kids is a great way to encourage creative play and learning. With a few simple steps, you can create a LEGO table that will provide hours of entertainment and learning for your children. By following this step-by-step guide, you can create a LEGO table that is both fun and educational.
Unleashing Your Child’s Imagination with Endless Creations: The Benefits of Building with LEGO
LEGO is a beloved toy that has been around for generations, and it continues to be a favorite among children of all ages. Building with LEGO provides children with an opportunity to unleash their imaginations and create endless possibilities. Not only is LEGO fun, but it also offers a variety of benefits that can help children develop important skills.
One of the most important benefits of building with LEGO is that it encourages creative thinking. LEGO pieces come in a variety of shapes and sizes, allowing children to create whatever they can imagine. This encourages them to think outside the box and come up with unique solutions to problems. It also helps them develop problem-solving skills, as they must figure out how to fit the pieces together to create their desired structure.
Building with LEGO also helps children develop fine motor skills. As they manipulate the pieces, they must use their hands and fingers to fit them together. This helps them develop dexterity and coordination, which can be beneficial in other areas of their lives.
In addition, LEGO can help children develop spatial awareness. As they build, they must think about how the pieces fit together in three-dimensional space. This helps them understand how objects interact with each other in the real world.
Finally, building with LEGO can help children develop social skills. As they work together to build a structure, they must communicate and collaborate with each other. This helps them learn how to work together and develop important interpersonal skills.
Overall, building with LEGO is a great way for children to unleash their imaginations and have fun. Not only is it enjoyable, but it also offers a variety of benefits that can help children develop important skills. So, the next time your child is looking for something to do, consider giving them some LEGO pieces and watch their creativity soar!
Conclusion
Endless Creations: Constructing a DIY LEGO Table for Playful Learning is a great way to bring the fun of LEGO play into the home. Not only is it a great way to encourage creative play, but it also provides a safe and secure environment for children to explore their imaginations. With a few simple materials and a bit of creativity, anyone can create a LEGO table that will provide hours of fun and learning for their children.
Rural Charm: Crafting DIY Country Decor for Rustic Elegance
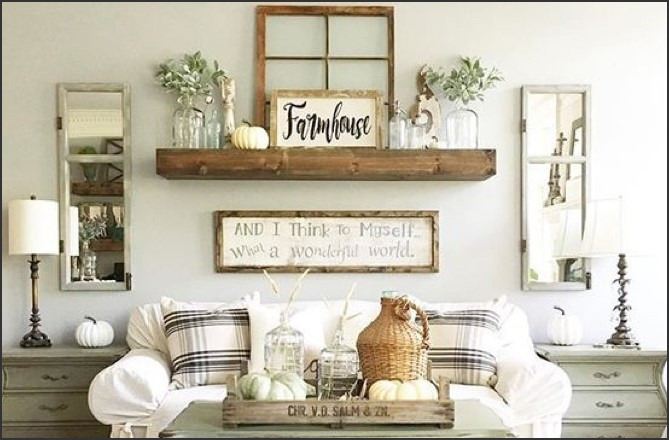
Source : https://theunlikelyhostess.com
Welcome to Rural Charm! If you’re looking for a way to bring a touch of rustic elegance to your home, then you’ve come to the right place. We specialize in crafting diy country decor that will add a unique charm to any room. From rustic furniture to vintage-inspired accents, we have everything you need to create a cozy and inviting atmosphere. Whether you’re looking for a complete makeover or just a few small touches, we have the perfect pieces to help you achieve the perfect look. So come on in and explore our selection of rustic decor and find the perfect pieces to bring a little bit of country charm into your home.
How to Create a Rustic Elegance with DIY Country Decor
Creating a rustic elegance with diy country decor is a great way to add a touch of charm and character to any home. Whether you’re looking to give your living room a cozy, inviting feel or you’re looking to add a touch of rustic charm to your bedroom, there are plenty of ways to create a rustic elegance with diy country decor.
One of the easiest ways to create a rustic elegance with diy country decor is to incorporate natural elements into your home. This can be done by adding wood accents, such as a wooden headboard or a wooden coffee table. You can also add natural elements such as plants, stones, and even antlers to give your home a rustic feel.
Another great way to create a rustic elegance with diy country decor is to incorporate vintage pieces into your home. Vintage furniture, such as an old dresser or a vintage armchair, can add a touch of charm and character to any room. You can also add vintage accessories, such as old clocks, vintage lamps, and even vintage signs to give your home a unique look.
Finally, you can create a rustic elegance with diy country decor by adding a few rustic touches to your home. This can be done by adding a few rustic accents, such as a wooden sign or a rustic mirror. You can also add a few rustic pieces of furniture, such as a rustic bench or a rustic rocking chair.
Creating a rustic elegance with diy country decor is a great way to add a touch of charm and character to any home. By incorporating natural elements, vintage pieces, and rustic touches, you can create a cozy, inviting atmosphere in any room. With a little bit of creativity and effort, you can easily create a rustic elegance with diy country decor.
Crafting the Perfect Country Home: Tips for Incorporating Rural Charm into Your Decor
Creating a cozy and inviting country home is a great way to bring a touch of rural charm into your home. Whether you live in a rural area or simply want to bring a bit of the countryside into your home, there are a few tips and tricks you can use to make your home feel like a true country retreat.
First, consider the colors you use in your decor. Natural, earthy tones are a great way to bring a rustic feel to your home. Think of colors like beige, brown, and green, as well as muted shades of blue and yellow. These colors will help create a warm and inviting atmosphere.
Second, incorporate natural materials into your decor. Wood is a great choice for furniture and accents, as it adds a rustic touch to any room. Wicker and rattan are also great options for furniture and accessories. Natural fibers like jute and linen are great for curtains and upholstery.
Third, add a few rustic touches to your decor. Antique furniture and vintage pieces are a great way to add a bit of character to your home. You can also add a few rustic accents like a wooden ladder, a vintage quilt, or a set of old-fashioned tools.
Fourth, don’t forget to add a few plants to your decor. Greenery is a great way to bring a bit of the outdoors into your home. Choose plants that are easy to care for and that will thrive in your home.
Finally, don’t forget to add a few personal touches to your decor. Family photos, handmade crafts, and other items that reflect your personality are a great way to make your home feel like your own.
By following these tips, you can easily incorporate rural charm into your home. With a few simple changes, you can create a cozy and inviting country home that you and your family will love.
Conclusion
Rural Charm: Crafting diy country decor for Rustic Elegance is a great resource for anyone looking to add a touch of rustic elegance to their home. With easy-to-follow instructions and helpful tips, this book provides readers with the tools they need to create beautiful, unique pieces of country decor. Whether you’re a beginner or an experienced crafter, Rural Charm has something for everyone. With its charming illustrations and helpful advice, this book is sure to inspire you to create your own rustic masterpieces.