


Category Archives: Home Improvement
Precision Surface Protection: Ensuring Quality Results with Masking Tape Blue
 Picture this: You’ve spent three hours meticulously cutting in the edges of your living room ceiling. You pull away the tape, expecting a flawless, razor-sharp line that would make a gallery curator proud. Instead, a chunk of your freshly cured drywall primer comes off with it, leaving a jagged, blurry mess.
In my ten years of managing residential renovations, I’ve seen this exact heartbreak play out on dozens of DIY sites. The culprit isn’t usually bad technique; it’s using the wrong tool for the job.
When it comes to safeguarding your finishes, standard cream-colored masking tape just won’t cut it for critical applications. That is where masking tape blue (commonly known as blue painter’s tape) comes into play. Let’s dive deep into why this specific tool is the unsung hero of precision surface protection and how you can master its use.
The Anatomy of Blue Painter’s Tape: Why Color Matters
To the untrained eye, tape is just sticky paper on a roll. But to a home improvement professional, masking tape blue is a highly engineered piece of equipment.
Standard masking tape uses a high-tack rubber adhesive. It’s designed to stick fast and hold tight, which sounds great until you try to peel it off delicate latex paint or expensive hardwood. It dries out quickly, turns brittle, and leaves a gooey residue that requires harsh chemicals to remove.
+-------------------------------------------------------------+
|               HOW ADHESIVE STRENGTH COMPARES                |
+-------------------------------------------------------------+
| Standard Masking Tape:  [████████████████████] High Tack    |
| Blue Painter's Tape:    [██████████░░░░░░░░░░] Medium/Low    |
+-------------------------------------------------------------+
Think of standard masking tape like superglue’s cousin—it’s aggressive. Masking tape blue, on the other hand, utilizes a specialized acrylic adhesive. This compound provides a medium-to-low tack that creates a secure bond with the surface but releases cleanly, even after being exposed to direct sunlight for up to 14 days.
The Crepe Paper Backing Difference
The backing of quality blue tape isn’t smooth plastic; it has a slight texture. This crepe paper backing allows the tape to stretch slightly, which is essential when you are navigating slight curves, baseboard contours, or textured orange-peel walls. It also features a water-resistant coating that prevents water-based paints from soaking through and bleeding onto your protected surface.
Mastering the Application for Flawless Lines
Achieving a professional-grade paint line requires more than just stretching the tape across a wall and slapping it down. It requires a systematic approach to ensure the adhesive seals correctly.
1. Prep the Canvas First
No tape can adhere to dust, grease, or drywall powder. Before unrolling your masking tape blue, wipe down the surface with a damp microfiber cloth and a mild detergent. Let it dry completely. If you apply tape to a damp surface, moisture gets trapped underneath, destroying the adhesive bond and causing paint to bleed.
2. The “Lay and Press” Technique
Never pull out a long 4-foot strip of tape and try to eye-level it onto the wall; it will stretch, warp, and land crookedly. Instead, pull out about 6 to 8 inches at a time. Roll the tape out against the surface, anchoring it with your thumb as you go.
Pro Tip: Once the tape is down, use a plastic putty knife or a clean wallpaper tool to firmly press down the edges. This process, known as burnishing, activates the pressure-sensitive adhesive and locks out paint leaks.
3. Handling Corners and Transitions
When two taped edges meet in a corner, don’t overlap them loosely. Run the first piece slightly past the corner, cut it flush with a sharp utility knife, and then butt the second piece directly up against it. This creates a seamless barrier that paint cannot penetrate.
The Critical Extraction Phase: When and How to Peel
The job isn’t finished when the painting is done. In fact, the removal process is where most DIY projects go wrong.
   CORRECT REMOVAL ANGLE

   Wall Surface
   ─────────────────────────────
                \  <- Pull Backwards
                 \
                  \  <- 45-Degree Angle
                   \
                    ─────────────────── (Taped Line)
Many homeowners assume they should leave the tape on until the entire paint job is dry. This is a critical mistake. If the paint dries completely over the tape, it forms a solid film bridging the wall and the tape. When you pull the tape away, you pull the dry paint film off the wall.
The Sweet Spot for Removal
The absolute best time to remove masking tape blue is when the paint is dry to the touch but not fully cured—typically about an hour or two after your final coat.
-
Pull the tape back steadily at a 45-degree angle to the painted line.
-
Do not pull outward toward yourself; pull backward over the tape itself.
-
This angle acts like a miniature knife blade, cutting the clean edge between the wall and the tape as you pull.
Hidden Warnings: Avoid These Common Mistakes
While masking tape blue is incredibly forgiving, it isn’t magic. Here are a few job-site realities you need to keep in mind:
-
The Sunlight Trap: Even though UV-resistant blue tape can stay on for 14 days, intense, direct summer sunlight through a window can bake the adhesive if left too long. Aim to remove it within 3 to 5 days for optimal safety on delicate surfaces.
-
Fresh Paint Vulnerability: Never apply tape over paint that was applied yesterday. Even if it feels dry, interior latex paint can take up to 30 days to fully cure and harden. Taping over uncured paint will almost certainly cause pulling.
-
The Bleed Illusion: If you are working on heavily textured plaster or wood grain, paint can still seep through the microscopic gaps under the tape. For these surfaces, seal the edge of the tape with a tiny amount of your base coat color first, let it dry, and then apply your top coat.
Conclusion
At the end of the day, high-quality home improvement is about control. Using the right masking tape blue gives you absolute control over your lines, saves you hours of tedious touch-up work, and protects your home’s surfaces from accidental damage. It is an inexpensive investment that yields professional results.
Have you ever had a taping disaster or a breakthrough moment on your own projects? Drop a comment below and let’s talk about your experiences!
Ensuring Your Home’s Health: Understanding Septic Tank Pumping Services
Why Septic Tank Pumping is Crucial for Your Home’s Health
The Hidden Dangers of Neglecting Your Septic System
Neglecting your septic system can lead to numerous hidden dangers that can severely impact both your property and your health. One of the most alarming issues arising from a poorly maintained septic tank is the risk of sewage backup. This occurs when waste accumulates and becomes unable to flow through the system, causing raw sewage to overflow into your home or yard. Such incidents not only create an unsanitary environment but can also contaminate nearby water sources, leading to further ecological damage. The untreated waste can contain pathogens, which pose serious health risks to humans and pets alike, ranging from gastrointestinal diseases to more severe infections.
Moreover, the structural integrity of your septic system can be compromised if it is not pumped regularly. Over time, solids known as sludge accumulate at the bottom of the tank, which can cause the system to fail. When this happens, you may be responsible for potentially costly repairs or even complete system overhauls, which can run into thousands of dollars. Additionally, a failing septic system can severely affect property value and insurability, making it crucial to ensure that your system is well-maintained and pumped regularly as needed. By understanding these hidden dangers, homeowners can take proactive steps in safeguarding their properties and their health, making septic tank pumping an essential component of home ownership.
Understanding the Science Behind Septic Tank Functionality
Septic tanks are fascinating biosystems, expertly designed to treat wastewater from households. Understanding the science behind their functionality reveals why regular maintenance, particularly pumping, is so critical. At a fundamental level, a septic tank operates using gravity to transport waste from your home into a buried tank. Once the waste enters the tank, it separates into three layers: solids (sludge) which settle at the bottom, liquids (effluent) in the middle, and floating scum of fats, oils, and grease at the top. This separation process is facilitated by anaerobic bacteria—microorganisms that thrive without oxygen, breaking down organic matter and converting it into simpler substances.
Over time, as solids accumulate, the space available for effluent diminishes, and eventually, the tank can become overloaded. If the solid waste fills up too high, it risks being flushed out into drain fields, where it can contaminate groundwater or surface water, causing environmental and public health hazards. Understanding this operational mechanism highlights the necessity of regularly scheduled pumping, typically every 3 to 5 years. This maintenance ensures the balance within the septic system remains intact, prolonging its lifespan and effectiveness. In turn, this knowledge empowers homeowners to take their septic system care seriously, fostering a culture of awareness regarding the importance of these often-overlooked household components.
Signs It’s Time to Call in the Septic Professionals
Recognizing Warning Signals Before It’s Too Late
While many homeowners may not think about their septic tank daily, understanding the warning signals that indicate a need for professional service can save you significant headaches down the line. The first obvious sign that your septic system may need attention is the presence of foul odors. If you smell unpleasant sewage odors around your yard or inside your home, this can indicate a problem such as a backup, overflow, or a breach in the tank. Additionally, if you notice lush, green patches of grass in your yard where the septic drain field is located, it may signify that wastewater is surfacing, indicating a potential failure in the tank or the drain lines. Another alarming indication is the slow draining of sinks, toilets, or showers; this can mean that your septic tank is reaching its capacity and needs urgent attention.
Other signs include frequent backups, especially if more than one plumbing fixture is backing up simultaneously. Such occurrences often point to either a clog within the system or excessive saturation of the drain field. Another less noticeable yet crucial red flag is the frequent bubbling or gurgling sounds in your plumbing; these can signal that air is being tripped in the plumbing lines, a common consequence of a full septic tank. Recognizing these warning signals can empower homeowners to act before costly damage ensues or leading health hazards arise, making it essential to maintain vigilance regarding the health of your septic system.
The Importance of Regular Maintenance: How Often is “Often Enough”?
The question of how often a septic system should be pumped depends on several factors, including tank size, household size, and usage habits. On average, most septic systems should undergo pumping every 3 to 5 years. However, households generating a higher volume of wastewater—due to increased occupancy or a greater number of water-using fixtures—may need to have their tanks pumped more frequently, even on an annual basis. It’s vital to consider the specific characteristics and needs of your household, as neglecting these routine maintenance tasks can lead to unexpected system failures and expensive emergency repairs.
Some homeowners might ask how they can best know when their system is due for pumping. Regular inspections and keeping detailed records of previous pumping dates can aid significantly in creating a maintenance schedule that suits individual needs. Additionally, during inspections, professionals may suggest pumping intervals tailored to your family’s lifestyle, ensuring that your system operates efficiently without overburdening the environment. In doing so, homeowners can prolong the lifespan of their septic system, requiring less frequent repairs and contributing positively to local ecosystems.
Choosing the Right Septic Tank Pumping Service: What to Look For
Evaluating Experience and Customer Testimonials for Peace of Mind
Selecting the right septic tank pumping service is paramount to ensuring the longevity and overall effectiveness of your septic system. As with any home service, it’s important to prioritize experience and qualifications when making your choice. Start by checking for licenses, insurance, and certifications that demonstrate the company’s professionalism and adherence to safety and environmental standards. A reliable septic service should also be equipped with the latest tools and technologies, allowing for efficient diagnoses and repairs that can save you time and money in the long run.
Customer testimonials offer valuable insights and can be a crucial factor in your decision-making process. Check online platforms like Google Review and Yelp, but also consider reaching out directly to previous customers, if possible. Ask them about their experiences; inquire about the timeliness of service, professionalism of staff, and their satisfaction with the workmanship. Additionally, it’s beneficial to obtain multiple quotes from different services before making your decision. Although cost is an important factor, it should not be the sole basis for selection. Balancing cost and quality of service can make a significant difference in your satisfaction, ensuring that the investment provides value and protects your home.
Understanding Pricing Models: What’s Fair and What’s Fishy?
When it comes to pricing for septic tank pumping services, transparency is key. A reputable company will provide a detailed estimate that outlines potential charges and the scope of services included. Typical costs for septic tank pumping can vary widely, generally ranging between $200 and $500 depending on the tank’s size and location, accessibility, and the condition of the system. Be wary of excessively low bids that sound too good to be true; these prices often reflect either inadequate service or hidden fees that can arise later.
As a consumer, also consider asking about additional costs that might emerge during service, such as septic tank repairs, pumping additives, or environmental fees. Many companies may offer package deals that include regular maintenance checks alongside pumping, which can result in cost savings and give homeowners peace of mind that their system’s health will be monitored over time. By educating yourself about what constitutes fair pricing and understanding the various elements in the cost structure, you can make a more informed decision while avoiding potential pitfalls associated with this necessary home maintenance.
After the Pumping: Best Practices for a Healthy Septic System
Simple Changes You Can Make to Extend Your Septic Tank’s Life
Proper septic tank care extends far beyond the act of pumping; it requires a holistic approach involving various practices that can significantly enhance your system’s life. One of the most effective changes you can implement is to practice water conservation. Simple measures like fixing leaks, taking shorter showers, and using water-efficient appliances can reduce the amount of wastewater entering your septic system, preventing overload. This not only alleviates strain on the system but also saves you money on your water bill.
Another beneficial practice is to be mindful of what enters your septic system. Avoid flushing non-biodegradable items, grease, and harsh chemicals down your drains. These can disrupt the natural bacteria that facilitate the digestion of waste in the tank, leading to system failures over time. Instead, opt for eco-friendly cleaning products that are easier on your septic system. Additionally, regular inspection of the drain field area is important; it should remain undisrupted by plant roots or heavy machinery, which can lead to blockages and necessitate costly repairs.
Common Misconceptions That Could Harm Your System
There are numerous misconceptions surrounding the best care practices for septic systems, and believing in them can harm your system’s health. One prevalent myth is that septic systems can “clean” themselves indefinitely; this leads many homeowners to underestimate the importance of regular pumping and maintenance. Another misconception is that adding various chemicals or additives to the septic tank can enhance its functionality. Though some products may temporarily alleviate issues, they often do more harm than good by disrupting the natural bacterial breakdown process essential for septic health. It is essential to prioritize routine inspection, proper waste disposal practices, and genuine preventive measures over quick-fix solutions.
Furthermore, some homeowners mistakenly believe that it’s okay to plant trees or shrubs near the septic system as long as they are not planted directly on top. In truth, tree roots can penetrate the septic tank and drain field, causing extensive damage that may necessitate costly repairs. Educating yourself on these common myths versus facts can help you make informed decisions that preserve your septic system in the long run, ensuring that it functions smoothly and efficiently for years to come.
Custom-Built Garden Sheds: Organize Your Tools with Style

Source:https://cdn.shopify.com
When it comes to gardening, having a dedicated space to store your tools, equipment, and supplies is essential for keeping your outdoor area neat and efficient. A custom-built garden shed offers the perfect solution, combining functionality with personalized design to create a space that works for you. Whether you’re a seasoned gardener or a hobbyist looking to elevate your outdoor space, a custom-built garden shed not only helps you organize your tools and equipment but also adds a stylish element to your garden. In this article, we’ll explore the benefits of having a custom-built garden shed, the key considerations when designing one, and how it can enhance your gardening experience.
The Benefits of Custom-Built Garden Sheds
Investing in a custom-built garden shed offers a wide range of benefits, from better organization to enhancing the overall aesthetic of your backyard. Whether you need additional storage or want a more cohesive outdoor design, a custom garden shed can serve multiple purposes while adding value to your home.
1. Tailored to Your Needs
One of the most significant advantages of choosing a custom-built garden shed over a pre-made option is that it can be tailored to your specific needs. Custom sheds allow you to design the space according to the types of tools and equipment you have, ensuring that everything has its place. Whether you need extra shelving for pots and planters, a workbench for repairs, or specific storage for larger equipment like lawnmowers or garden carts, a custom-built shed can be designed with all these requirements in mind.
You also have the flexibility to choose the size, layout, and features of your shed. If you have a small garden and limited space, your custom shed can be designed to maximize every inch. If you have a larger garden or more equipment, a bigger shed with dedicated sections for various tools may be the best option. The ability to customize your shed means you’ll end up with a storage solution that perfectly suits your needs and preferences.
2. Improved Organization
Gardening tools can quickly become disorganized, leading to wasted time searching for the right item and even losing tools in the process. A custom-built garden shed helps you keep your tools neatly organized and easily accessible. With built-in shelving, pegboards, hooks, and storage bins, everything can be arranged in a way that makes sense for your gardening routine.
For example, you can have designated areas for small hand tools like pruners, trowels, and weeding forks, as well as larger sections for power tools and other bulky equipment. Specialized storage options such as tool racks or sliding drawers can also be integrated to keep your space clutter-free. With the right design, a custom shed ensures that you spend less time searching for tools and more time enjoying your garden.
3. Durability and Longevity
A custom-built garden shed is built to last. By working with a contractor or a skilled shed builder, you can ensure that the materials and construction methods used are top quality, providing a shed that can withstand the elements. Whether you live in an area with heavy rainfall, intense sun, or freezing winters, a custom shed can be designed to endure.
Most custom garden sheds are constructed from durable materials such as pressure-treated wood, steel, or vinyl. These materials offer superior resistance to weathering, rot, and insects compared to mass-produced models. Additionally, you can select roofing materials that are designed to withstand harsh conditions, ensuring that your shed remains in excellent condition for years to come.
4. Aesthetic Appeal
While the primary function of a garden shed is to provide storage, it can also serve as an attractive focal point in your outdoor space. A custom-built garden shed can be designed to complement your home’s architecture and your garden’s overall aesthetic. Whether you prefer a rustic, cottage-style shed with wooden slats and vintage accents or a modern, minimalist structure with clean lines and metal finishes, the design possibilities are endless.
By matching the style of your shed to your home’s exterior or your garden’s design theme, you create a cohesive and visually appealing outdoor space. The shed becomes more than just a utility structure—it becomes an integral part of your garden’s overall charm and character.
Key Considerations When Designing a Custom-Built Garden Shed
When planning your custom-built garden shed, several factors should be taken into account to ensure that the final design meets your functional and aesthetic needs. Here are some key considerations to keep in mind:
1. Space and Size
Before you begin designing your shed, assess the available space in your garden. Measure the area where you want to place the shed and consider the amount of space you’ll need to store all your gardening tools and equipment. Keep in mind that you may want additional room for movement, a workbench, or even a potting station.
Choosing the right size is crucial to maximizing storage while maintaining a balanced look in your outdoor space. A too-large shed can overpower your garden, while a too-small shed might not provide the storage you need. Take the time to plan out the layout to ensure it’s both functional and well-proportioned.
2. Functionality and Layout
Think about how you plan to use the shed. Will it be used for tool storage alone, or will it also serve as a workspace for potting plants or performing garden maintenance? A good layout is essential for maximizing the functionality of your shed. If you’re using it as a multi-purpose space, consider including a potting bench, worktable, or even electrical outlets for running tools like a fan or heater.
Also, consider the placement of shelves, hooks, and storage bins. A custom-built garden shed allows you to have dedicated areas for everything, making organization easier and more efficient.
3. Material Selection
The material you choose for your shed will impact its durability, appearance, and maintenance requirements. Wood is a popular choice for custom sheds due to its natural look and versatility. Cedar and redwood are both durable and resistant to rot, making them ideal for outdoor use. If you prefer a low-maintenance option, vinyl or metal sheds are a great alternative.
Think about your climate and the amount of maintenance you’re willing to invest in. While wooden sheds offer a rustic appeal, they may require regular staining or sealing to protect them from the elements. Vinyl and metal sheds are more durable with less upkeep but may lack the charm of natural wood.
4. Style and Design
The style of your custom-built garden shed should reflect your personal taste and complement your garden’s aesthetic. Whether you prefer a classic gable roof, a modern shed with flat lines, or a charming barn-style design, you have the freedom to choose a style that fits seamlessly into your outdoor space. You can also choose from a variety of finishes, colors, and decorative accents to create a shed that suits your personality.
Consider adding windows for natural light and ventilation, or a porch area where you can relax and enjoy your garden. You can also personalize the shed with unique touches such as hanging plants, vintage signage, or custom hardware.
A custom-built garden shed is an investment that pays off in both functionality and style. It allows you to organize your tools, protect your equipment from the elements, and create an inviting space in your backyard. With the ability to design your shed according to your needs, preferences, and available space, you’ll have a personalized storage solution that enhances your gardening experience. By focusing on key considerations such as size, layout, materials, and style, you can build a shed that not only meets your practical needs but also serves as a beautiful addition to your garden. Whether you’re storing tools or using the space as a potting area, a well-designed custom garden shed adds both utility and charm to your outdoor space.
Rustic Home Accessories: Add Charm and Character to Your Home
Source:https://blog.canadianloghomes.com
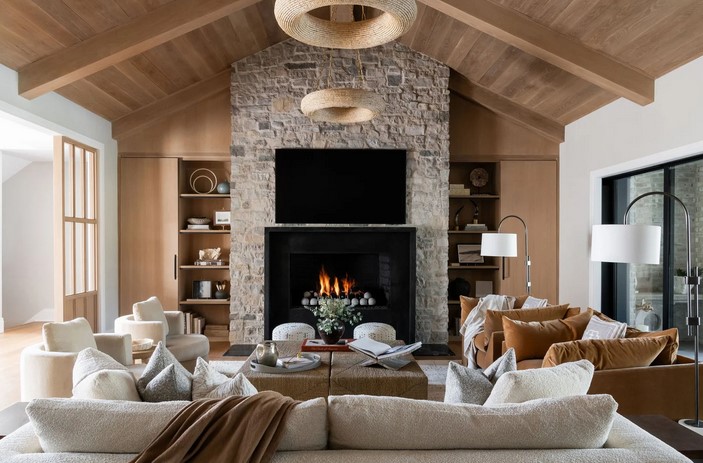
When it comes to creating a cozy, welcoming, and timeless atmosphere in your home, rustic home accessories are the perfect way to inject warmth, charm, and character into any space. Whether you’re designing a cabin in the woods or simply want to bring the beauty of nature into your urban apartment, rustic decor has a unique ability to transform any room into a relaxing retreat. By incorporating natural materials, vintage-inspired elements, and handcrafted pieces, you can create a space that feels both grounded and stylish. In this article, we’ll explore how rustic home accessories can elevate your home’s decor, offering practical tips and ideas on how to use these items to enhance the overall aesthetic of your living space.
The Timeless Appeal of Rustic Home Accessories
Rustic home accessories are synonymous with warmth, authenticity, and simplicity. Rooted in a tradition of country living and rural craftsmanship, rustic decor brings an organic, earthy vibe that celebrates natural textures and materials. These accessories are often inspired by the outdoors, making them ideal for anyone looking to create a space that feels inviting, relaxed, and connected to nature.
1. Natural Materials for Authentic Charm
One of the most defining features of rustic home accessories is the use of natural materials. Wood, stone, metal, and woven textiles all play a significant role in creating that rustic, homey feel. From reclaimed wood furniture to metal lanterns, these materials evoke a sense of history and craftsmanship that can’t be replicated with mass-produced items.
Wooden elements, such as a weathered coffee table, open shelving, or a wooden mantel, are common in rustic homes and offer a sense of timelessness. Stone accents—such as stoneware vases, rustic fireplaces, or decorative stone wall tiles—bring a raw, natural aesthetic into the space.
For textiles, materials like burlap, linen, and wool add texture and comfort. A rustic throw blanket draped over a sofa or a set of linen cushions can soften the look of a room while maintaining the earthy, rustic theme. These materials help establish a grounded, organic atmosphere that connects the indoors with the natural world outside.
2. Vintage-Inspired Touches for Character
Rustic home accessories often draw inspiration from the past, incorporating vintage or antique elements to add depth and history to your space. Think of wrought-iron candle holders, reclaimed wood picture frames, antique mirrors, or old-fashioned metal trays. These accessories bring character and nostalgia, creating a space that feels both lived-in and loved.
Incorporating vintage finds into your decor not only helps to create a more personalized and unique space, but it also supports sustainability by reusing items that have stood the test of time. Consider adding a vintage rug, an old-fashioned clock, or a set of antique mason jars to infuse your home with rustic charm and create a conversation-worthy centerpiece in any room.
3. Handcrafted Pieces for a Personal Touch
Another essential aspect of rustic home accessories is their handmade quality. Artisan-made decor items such as woven baskets, hand-carved wooden bowls, or hand-forged iron hooks add a distinct personal touch to your space. These handcrafted pieces often come with a story, providing an extra layer of meaning and uniqueness to your home.
When you choose rustic home accessories that are handcrafted, you’re not just investing in decor, you’re investing in artistry. Handcrafted pieces support local artisans and celebrate the beauty of human craftsmanship, which can make your home feel more authentic and meaningful.
Key Rustic Home Accessories to Enhance Your Space
Now that you understand the qualities that make rustic home accessories so special, let’s explore some of the key pieces that can instantly elevate the charm and character of your home. From functional items to decorative accents, these accessories are perfect for introducing rustic elements into your living space.
1. Rustic Lighting Fixtures
Lighting plays a significant role in setting the tone of a room, and rustic lighting fixtures can create a warm, inviting glow in your home. Whether it’s a large chandelier made of reclaimed wood and wrought iron, or a set of rustic pendant lights above a kitchen island, lighting fixtures are essential rustic home accessories. For added charm, opt for lights that feature antique finishes, exposed bulbs, or industrial designs.
For a cozier, more intimate atmosphere, you might also consider rustic table lamps or lantern-style sconces. These can bring a touch of vintage charm to your living room or bedroom while offering practical illumination.
2. Rustic Furniture Pieces
When it comes to rustic home accessories, the furniture is the cornerstone of the overall design. The key to achieving a rustic look is to choose pieces that reflect natural materials and simple, functional designs. Large wooden dining tables with a distressed finish, farmhouse-style chairs, and sturdy bookshelves made from reclaimed wood are some classic choices for rustic interiors.
For smaller spaces, consider a rustic coffee table made from reclaimed barn wood or a metal-framed accent chair. These pieces add character and warmth, and they can seamlessly blend into both traditional and modern spaces. The beauty of rustic furniture is that it works well in various settings, creating a relaxed, down-to-earth environment without being overly ornate or fussy.
3. Decorative Accents and Wall Art
Wall art and decorative accents are the finishing touches that bring your rustic space together. Consider hanging a landscape painting in earthy tones, or display vintage signage with a weathered look. If you prefer a more minimalist approach, framed nature photography or botanical prints in simple wooden frames can complement the rustic aesthetic.
Incorporate other decorative elements like hand-woven baskets, ceramic pots, or brass animal figurines. You could also use rustic wooden shelves to showcase a collection of antique books, dried flowers, or other cherished items. These accessories give your home a lived-in, cozy vibe, making the space feel both inviting and personal.
4. Textiles and Soft Furnishings
Textiles play a crucial role in softening the rough edges of rustic decor, adding warmth and comfort to your home. Think plush woolen throws, cotton or linen slipcovers, and handwoven area rugs. Layering different textures—such as mixing a jute rug with a cozy wool blanket or a cotton cushion with a leather chair—can add depth to your rustic theme.
Rustic curtains made from burlap or linen can also enhance the natural feel of your space, creating a gentle flow of light while maintaining a warm, organic aesthetic. Don’t be afraid to mix and match different textures and colors to create a space that feels lived-in and comfortable.
How to Style Your Home with Rustic Accessories
Now that you’ve chosen your rustic home accessories, it’s important to style them thoughtfully to achieve a cohesive, balanced look. A few tips for styling your rustic space include:
- Mix and Match: Don’t be afraid to combine different rustic elements—wood, metal, wicker, and textiles. The beauty of rustic decor lies in its eclectic, lived-in nature, so mixing styles and materials is perfectly acceptable.
- Go for Simplicity: Rustic decor thrives on simplicity, so avoid overcrowding your space with too many accessories. Instead, focus on selecting a few statement pieces that stand out and allow the natural beauty of the materials to shine.
- Balance Functionality and Aesthetics: Rustic home accessories should be both functional and beautiful. Items like wooden trays, baskets, and shelves not only add charm but also help organize your space, blending form and function seamlessly.
Incorporating rustic home accessories into your living space is an excellent way to create a warm, inviting atmosphere that feels both timeless and personal. Whether you’re drawn to the natural beauty of wood and stone, the vintage appeal of antique pieces, or the charm of handmade crafts, there are endless ways to add rustic elements to your home. By thoughtfully selecting accessories like rustic lighting, furniture, and textiles, you can transform any room into a cozy, character-filled retreat. A well-curated collection of rustic home accessories not only enhances your home’s decor but also provides a comforting and nostalgic escape from the outside world.
Custom Home Saunas: Create Your Own Relaxing Retreat at Home
Source:https://www.finnleo.com
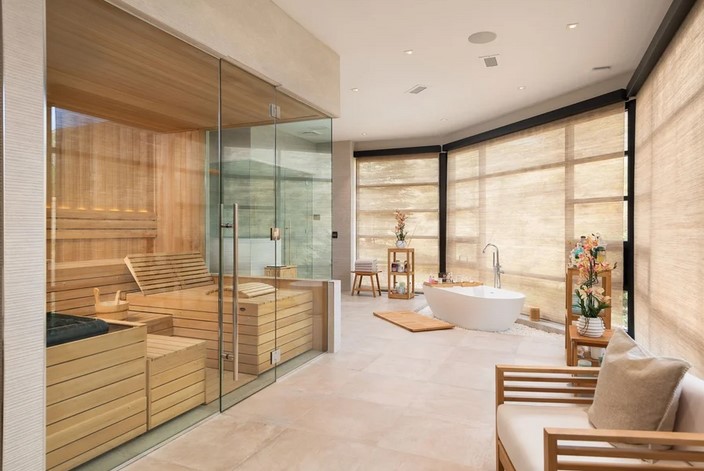
In today’s fast-paced world, creating a space for relaxation and rejuvenation at home has become more important than ever. A custom home sauna offers a private sanctuary where you can unwind, reduce stress, and improve your overall health—all from the comfort of your own home. Whether you’re looking to design a luxurious spa experience or a simple, serene retreat, custom home saunas provide the flexibility and personalization to meet your needs. In this article, we’ll explore the benefits of having a sauna at home, the different types of custom home saunas available, and the steps to designing the perfect sauna space for your home.
The Benefits of Custom Home Saunas
Adding a sauna to your home is more than just a luxurious indulgence—it offers a wide array of health benefits that can significantly improve your physical and mental well-being. A custom home sauna can be designed to suit your lifestyle, whether you are seeking relaxation, pain relief, or improved skin health.
1. Stress Relief and Relaxation
One of the most immediate and noticeable benefits of a sauna is the relaxation it provides. The heat in a sauna induces a state of relaxation by stimulating the release of endorphins—your body’s natural feel-good chemicals. This helps to relieve stress, promote mental clarity, and create an overall sense of well-being.
After a long, hectic day, stepping into a custom home sauna allows you to relax both physically and mentally. The soothing heat encourages muscle relaxation, while the quiet, private environment offers a perfect setting for mindfulness or meditation. Whether you are unwinding after work or simply seeking some quiet time, a sauna provides a peaceful escape.
2. Detoxification and Skin Health
Regular sauna use promotes detoxification by encouraging perspiration, which helps the body eliminate toxins through the skin. When you sweat in a sauna, your pores open up, and impurities are flushed out, leaving your skin feeling refreshed and rejuvenated. Over time, this can lead to healthier, more radiant skin by improving circulation and increasing collagen production.
For individuals with acne or other skin conditions, a custom home sauna can be an excellent addition to your skincare routine. The heat and sweat stimulate blood flow to the skin’s surface, helping to clear pores and reduce the appearance of blemishes.
3. Pain Relief and Muscle Recovery
If you suffer from chronic pain or sore muscles, saunas can offer significant relief. The heat from the sauna helps to improve blood circulation, which in turn accelerates the healing process of sore or stiff muscles. Whether you’re an athlete recovering from a workout or someone dealing with joint pain, the heat therapy of a sauna can ease tension and discomfort.
A custom home sauna allows you to take full advantage of this therapeutic effect whenever needed. Simply stepping into the sauna after a workout or after a long day of sitting at a desk can help relax muscles, reduce inflammation, and speed up recovery time.
Types of Custom Home Saunas
When considering a custom home sauna, there are several options to choose from. Each type has its own unique benefits, and the right choice will depend on your available space, preferences, and wellness goals. Here are the main types of home saunas:
1. Traditional Finnish Saunas
Traditional Finnish saunas are one of the most popular types of home saunas. These saunas use dry heat generated by a stove or heater, with temperatures often ranging from 150°F to 190°F (65°C to 87°C). The high heat helps to promote sweating, detoxification, and relaxation.
In a custom home sauna, you can select the materials and design that best suit your style. Most traditional saunas use wood, such as cedar, hemlock, or pine, to create a calming and natural environment. A Finnish sauna offers an authentic, time-honored sauna experience, perfect for those who enjoy the traditional heat therapy of a sauna.
2. Infrared Saunas
Infrared saunas are a modern alternative to traditional saunas, using infrared light to heat the body directly rather than warming the air. Infrared saunas operate at lower temperatures (typically between 120°F and 140°F or 49°C to 60°C) compared to traditional saunas, making them a comfortable option for individuals who find high-heat saunas too intense.
Infrared saunas are known for their ability to penetrate deeper into the skin, promoting muscle relaxation, enhanced detoxification, and improved circulation. The gentle heat is ideal for those with sensitive skin or for individuals who want a more mild sauna experience. Many custom home saunas are designed with infrared technology, allowing you to enjoy the benefits of the sauna without the extreme heat of traditional models.
3. Steam Saunas
Steam saunas, also known as steam rooms, are another popular choice for home use. Unlike traditional or infrared saunas, steam saunas use moisture-rich air to create a hot and humid environment. The temperature in a steam sauna typically ranges from 110°F to 120°F (43°C to 49°C), but the humidity is much higher, often reaching 100%.
The benefits of steam saunas include improved respiratory health, hydration for the skin, and relaxation. They can be especially soothing for individuals with respiratory conditions, such as asthma or allergies, as the steam helps open up airways and relieve congestion. If you’re looking for a sauna that promotes skin hydration and respiratory benefits, a steam sauna might be a great choice for your custom home sauna.
Designing Your Custom Home Sauna
Now that you’re familiar with the different types of saunas, it’s time to consider how to design the perfect custom home sauna for your space. The key to a successful sauna installation lies in thoughtful planning and customization to fit your specific needs.
1. Choose the Right Location
When designing your sauna, the first step is to select the right location in your home. Ideally, you’ll want to place your sauna in a quiet, private space where you can fully relax without distractions. Many people opt for a basement or a bathroom, but saunas can also be installed in larger closets, attics, or even in outdoor sheds or cabins.
Consider the size and layout of the space to ensure that the sauna fits comfortably. Keep in mind that saunas require proper ventilation and access to electrical outlets for heaters or infrared panels, so the location should be equipped with these necessities.
2. Select Materials and Finishes
Choosing the right materials is essential for creating an inviting and functional sauna environment. Wood is a popular material for sauna construction because it naturally absorbs moisture and helps regulate temperature. Cedar is a top choice due to its aromatic properties and resistance to mold, but other options like hemlock, pine, and redwood can also create a beautiful and durable sauna.
You can also customize the interior of your custom home sauna with different finishes, seating options, lighting, and accessories. LED lights, backrests, and custom shelving for towels or aromatherapy oils can elevate the sauna experience. If you’re opting for a steam sauna, consider adding a tiled interior for easy cleaning and a more luxurious feel.
3. Install High-Quality Sauna Equipment
The key to a truly effective sauna is the equipment inside. Choose high-quality sauna heaters or infrared panels, as these are the heart of the sauna experience. Make sure the equipment is properly sized for the space and meets your desired heat level.
For traditional saunas, ensure that the stove is capable of producing high temperatures and is equipped with adjustable controls for convenience. If you’re designing an infrared sauna, opt for energy-efficient infrared panels that provide deep heat for therapeutic benefits.
Investing in a custom home sauna allows you to create your own private retreat for relaxation, health, and rejuvenation. With various types of saunas to choose from, including traditional, infrared, and steam options, you can select the best design to suit your needs and preferences. A sauna not only enhances your wellness by offering stress relief, pain reduction, and skin health benefits, but it also adds a touch of luxury to your home. By carefully designing your sauna space, selecting the right materials, and incorporating high-quality equipment, you can enjoy the ultimate home spa experience every day. Whether you want to relax, recover, or detox, a custom home sauna is an investment in your health and well-being that will pay off for years to come.