Daily Archives: May 6, 2025
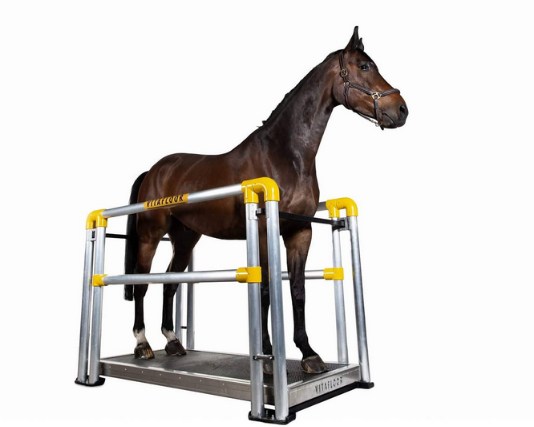
Whole-Body Horse Vibration Therapy For Horse Backed By Science

One of the most effective healing techniques in the equestrian’s “toolbox” is whole-body vibration (WBV) therapy. According to research, a vibration plate with stand works to improve circulation and muscle contraction, which strengthens the body’s self-healing capacity. Regular vibration treatment sessions also improve performance and reduce the risk of injury in horses.
What Is Whole Body Vibration Therapy?
Whole-body vibration therapy uses a large vibrating platform. The platform, on which the horse is standing, vibrates at different frequencies (cycles per second) and magnitudes (up and down motion). A normal session would last 20 minutes at frequencies between 30 and 50 Hz, with the user controlling the frequency and setting a timer.
History of Whole-Body Vibration Therapy
Vibration therapy’s advantages have been recognised for decades. More than a century ago, breakfast cereal inventor Dr. John Harvey Kellogg created the first standing vibration plate for people. He thought vibration treatment could help with issues like headaches, constipation, and back discomfort by promoting the body’s natural healing processes.
The 1960s saw a significant increase in the use of vibration therapy. At that point, NASA researchers started looking into how well it worked to prevent muscular weakening and bone loss in astronauts living in zero gravity.
Whole-body vibration therapy has been shown in human trials to enhance muscle mass, improve circulation, reduce back and joint pain, reduce stress, improve bone density, and raise metabolism. Although there isn’t as much research on horses, there is strong evidence that vibration therapy benefits them as well.
Benefits of Horse Vibration Plates:
Horse vibration plates have the following known benefits:
- 1. Growth of the back muscles
In one study, nine horses between the ages of nine and eighteen received whole-body vibration therapy twice daily for thirty minutes, five days a week, for sixty days. Significant increases in the multifidus muscle’s size and symmetry were visible on ultrasounds. This crucial deep back muscle supports healthy posture, mobility, and balance by stabilising the spine. Maintaining a robust multifidus can reduce back pain and avoid or postpone lameness.
- Development of the hoof
In research with 10 horses, horses that received whole-body vibration (WBV) twice daily for 30 minutes every day for 60 days showed notable increases in hoof development rates in the first 30 days of treatment.
- Healing of the ligaments
Injuries to the ligaments and tendons must be treated carefully. The majority of horses with these injuries receive very little activity. WBV therapy speeds up the healing process, improves the quality of the repaired tissue, and stimulates tendons and ligaments without the negative effects of trotting or cantering.
- Pain and stress alleviation
A study says horses may experience pain relief and a relaxing impact from vibration therapy. According to a Michigan State University study, horses receiving whole-body vibration therapy seemed to calm down after each session, whereas control horses showed signs of restlessness. Similarly, a Middle Tennessee State University study discovered that horses receiving WBV therapy had lower heart rates, which may indicate that the treatment eased the animals’ discomfort.
- Chronic immobility
Eight horses with both chronic and current lameness participated in a study at the Peninsula Equine Medical Centre in Menlo Park, California. For 30 days, each horse received WBV twice daily for 30 minutes each time on a vibrating platform. During the first 30 days of WBV therapy, horses’ stride length and chronic lameness improved.
- Reduced amounts of cortisol
When compared to six stalled horses, six horses that received equine vibration treatment for 45 minutes, five days a week, at 50 Hz, had lower cortisol levels and a lower heart rate.
Easy tips to install a bathtub surround without help

Tired of that outdated or grimy bathtub surrounds? Dreaming of a fresh, clean look in your bathroom? The good news is, you don’t necessarily need to call in a professional and empty your wallet. Installing a bathtub surround yourself is a totally achievable DIY project! While having an extra pair of hands can be helpful, with a little patience and the right approach, you can absolutely tackle this solo.
This guide will walk you through some easy tips to install a bathtub surround without help, transforming your bathroom into the oasis you deserve. Let’s dive in!
- Gather Your Arsenal:
Before you even think about lifting a panel, make sure you have all your tools and materials ready. This will save you countless trips back and forth and keep your momentum going. Here’s what you’ll likely need:
- Your new bathtub surround kit: Carefully unpack it and familiarize yourself with the different panels and any included hardware.
- Measuring tape: Accuracy is key!
- Pencil or marker: For marking measurements.
- Level: To ensure everything is straight.
- Construction adhesive: Choose one specifically designed for bathroom applications to resist moisture.
- Caulk gun and silicone caulk: For sealing edges and preventing water damage. Look for mildew-resistant varieties.
- Gloves: Keep your hands clean and protected.
- Painter’s tape: To temporarily hold panels in place while the adhesive sets.
- Clean rags or sponges: For wiping away excess adhesive or caulk.
- Optional but helpful: A helper bar or temporary support to hold panels while the adhesive dries.
- Prep is Paramount:
A smooth, clean surface is important for a successful installation. Take the time to properly prepare the area:
- Remove the old surround (if applicable): This might involve scoring caulk lines and carefully prying off the old panels. Be soft to avoid damaging the underlying wall.
- Clean the walls thoroughly: Remove any soap scum, mildew, or loose debris. A good scrub with a bathroom cleaner will do the trick..
- Repair any wall damage: Fill any holes or cracks with appropriate patching compound and sand it smooth.
- Measure Twice, Cut Once (If Necessary):
Carefully measure the dimensions of your bathtub area. Compare these measurements to your surround panels. Most kits are designed to fit standard-sized tubs, but you might need to make some minor adjustments.
- Score the panel: Instead of trying to cut all the way through, use your utility knife or scoring tool to make several passes along the marked line. This will create a clean break.
- Snap the panel: Properly bend the panel with the scored line until it snaps cleanly.
- Dry Fit First:
Before applying any adhesive, do a dry run. This step allows you to identify any potential issues or the need for further trimming without making a sticky mess. Pay attention to how the panels interlock or overlap.
- Adhesive Application: The Sticky Situation:
Now for the main event! Follow the makers instructions for the recommended pattern and amount. Avoid getting adhesive too close to the edges, as it will squeeze out when you press the panel against the wall.
- Position and Secure:
Carefully align the first panel with the wall, starting in a corner. Press it properly into place, ensuring it’s level. Position it to hold the panel securely against the wall while the adhesive begins to grab.
Repeat this process for the remaining panels, making sure they interlock or overlap correctly. Use painter’s tape along the edges to further secure the panels and prevent them from shifting while the adhesive dries completely. Follow the adhesive manufacturer’s recommended drying time – usually several hours or overnight.
Wrapping up
You’ve successfully installed a new bathtub surround without any outside help. Take a back seat and admire your handiwork. Your bathroom has a fresh, new look, and you can bask in the satisfaction of a job well done – all on your own!


