


Philo Free Trial: Testing Out the Streaming TV Service

Source : https://www.freewarefiles.com
The rise of streaming services has revolutionized how we watch television, offering more flexibility, variety, and affordability than traditional cable. One such service gaining attention is Philo, a budget-friendly TV streaming platform that provides an excellent selection of channels at a fraction of the cost of cable. For potential users considering this service, Philo offers a Philo free trial, giving them the opportunity to explore its features and content before committing to a subscription. In this article, we’ll walk you through what you can expect during the Philo free trial, its features, and whether it’s worth trying out for your streaming needs.
What is Philo and How Does It Work?
Philo is a live TV streaming service that offers a variety of channels for entertainment, lifestyle, and news, all for a competitive price. Unlike other streaming services, Philo does not include sports channels or local broadcast stations, which allows them to keep the cost low. For $25 per month, subscribers get access to more than 60 channels, including popular networks like AMC, A&E, Comedy Central, MTV, and Discovery Channel. Philo’s focus on entertainment and lifestyle content, rather than sports, makes it a great choice for users who prioritize those genres.
Key Features of Philo
Philo offers several key features that set it apart from other streaming services:
- Affordable Pricing: One of the standout aspects of Philo is its pricing. At just $25 per month for its base plan, it’s significantly cheaper than many other live TV streaming services. There are no hidden fees, and users can cancel at any time without penalties.
- Cloud DVR: Philo offers an impressive cloud DVR feature that allows you to record up to 1,000 hours of content. This means you can record your favorite shows and movies and watch them at your convenience.
- Simultaneous Streaming: With Philo, you can stream content on up to three devices at the same time, making it a great option for families or households with multiple users.
- Unlimited Streaming on Demand: Philo also provides on-demand content, allowing users to watch shows and movies whenever they want, even after they’ve aired.
Getting Started with the Philo Free Trial
The Philo free trial is a great way to test out the service before committing to a subscription. When you sign up for the free trial, you’ll get access to all of Philo’s features and channels for a period of 7 days. Here’s how to get started:
1. Sign Up for the Free Trial
The first step to accessing the Philo free trial is to visit their website and create an account. You’ll need to provide basic information, such as your email address and a password, and you’ll be asked to enter payment details. Don’t worry – you won’t be charged until after the free trial ends, and you can cancel at any time before the trial expires.
2. Browse the Channel Lineup
Once you’ve signed up, you can immediately begin exploring Philo’s channel offerings. You’ll have access to a variety of entertainment and lifestyle channels, from popular cable networks like TLC and Food Network to niche channels like Smithsonian Channel and DIY Network. While Philo doesn’t include sports networks or local broadcast channels, it offers a solid lineup for those who are primarily interested in entertainment, movies, and TV shows.
3. Test the Streaming Experience
During your Philo free trial, take some time to test out the streaming quality and user interface. Philo supports streaming on a variety of devices, including smart TVs, laptops, tablets, and smartphones. The service offers HD-quality streaming, and the interface is straightforward and easy to navigate, with access to live channels, on-demand content, and DVR recordings.
4. Explore the Cloud DVR Feature
One of the most appealing features of Philo is its cloud DVR. With up to 1,000 hours of storage, you can record your favorite shows, series, and movies and access them at your convenience. During your trial, be sure to test out this feature to see how it works and whether it meets your needs for storing and watching recorded content.
Advantages and Disadvantages of Philo
While Philo offers many benefits, it’s important to consider both the advantages and disadvantages before deciding whether to continue with the service after the free trial.
Advantages of Philo
- Affordable Price: Philo’s pricing is one of its biggest advantages. At $25 per month, it offers great value compared to other streaming services that can cost $50 or more per month.
- Large Channel Selection: While Philo doesn’t include sports or local channels, it does provide a solid selection of entertainment, lifestyle, and news channels, which should meet the needs of most users.
- No Hidden Fees: Philo’s transparent pricing model is refreshing, with no hidden fees or extra charges for things like equipment rental.
- Cloud DVR and Simultaneous Streaming: The ability to record up to 1,000 hours of content and stream on three devices at once makes Philo an excellent choice for households with multiple viewers.
Disadvantages of Philo
- No Sports Channels: If you’re a sports fan, you’ll likely be disappointed that Philo doesn’t offer any sports channels, such as ESPN or NFL Network. This may be a deal-breaker for those who want live sports in their TV lineup.
- Lack of Local Channels: Philo does not provide access to local broadcast channels, meaning you won’t be able to watch live news or major network events like those broadcast on ABC, NBC, or CBS.
- Limited Content for News Junkies: If you’re someone who relies heavily on 24/7 news coverage, you might find the channel selection on Philo somewhat limiting. While Philo does offer a few news channels like CNN and MSNBC, it’s not as comprehensive as services that include local news networks or additional news channels.
Conclusion: Is the Philo Free Trial Worth It?
The Philo free trial is a great opportunity for users to test the service’s features and see if it meets their needs for live TV streaming. With its affordable pricing, extensive channel lineup for entertainment and lifestyle content, and useful features like cloud DVR and simultaneous streaming, Philo is an excellent option for users who want a budget-friendly alternative to cable. However, if you’re looking for a service that offers sports channels or local broadcast stations, Philo may not be the best fit.
Ultimately, the Philo free trial provides a risk-free way to explore the service and see if it’s right for you. If you enjoy entertainment, movies, and TV shows and don’t need sports or local channels, Philo may just be the ideal streaming solution for your home.
Word Count in Mac Pages: Tracking Document Length with Ease
Source : https://cdn.osxdaily.com
Whether you’re writing an essay, drafting a report, or composing a novel, keeping track of your document’s length is essential for meeting deadlines, word limits, or just gauging your progress. One of the most useful features of word processing software is the ability to monitor word count, and with Mac’s Pages application, tracking the word count in Mac Pages is quick and easy. This article will guide you through the process of accessing and utilizing the word count feature in Pages, helping you maintain your writing goals and optimize your document formatting.
Why Tracking Word Count in Mac Pages Matters
For writers and professionals alike, understanding the length of a document is crucial, especially when adhering to specific word limits or deadlines. Mac Pages offers a simple and effective way to check the word count of your documents. Word count data can be helpful for a variety of reasons:
1. Meeting Specific Word Limits
If you’re writing for a publication, completing an academic assignment, or working on a business proposal, word limits are often set to ensure the content remains concise, focused, and within the expected parameters. Knowing your document’s word count helps you stay on track, ensuring that you don’t exceed or fall short of the required length.
2. Tracking Progress
For longer projects like novels, research papers, or dissertations, knowing your word count allows you to monitor your progress as you go. For example, if you’re aiming for a target of 5,000 words, Pages will show you exactly where you stand, which can motivate you to keep going.
3. Improving Readability
By keeping an eye on word count, you can adjust your writing style and structure. For instance, if your document is approaching the maximum word count, you may want to trim unnecessary details to make the content more concise. Conversely, if the word count is too low, you can ensure that the document reaches the desired level of detail.
How to Check Word Count in Mac Pages
Tracking word count in Mac Pages is a straightforward process. Whether you are in the middle of writing or have already finished a draft, the word count feature can be accessed with just a few clicks. Here’s a simple step-by-step guide:
1. Enable Word Count Display
By default, Pages doesn’t display word count directly on the screen while you’re typing, but it’s easy to turn on. To see the word count while you write, follow these steps:
- Step 1: Open your document in Pages.
- Step 2: From the menu bar at the top of the screen, click on “View.”
- Step 3: Select “Show Word Count” from the dropdown menu.
Once you enable this feature, you’ll see the word count in the lower-left corner of the Pages window, which updates in real time as you write.
2. Check Word Count for Specific Sections
If you want to check the word count of a specific section, such as a paragraph, heading, or chapter, the process is equally simple. Just highlight the section you want to count, and follow these steps:
- Step 1: Highlight the section of text you want to track.
- Step 2: Click on the word count display in the lower-left corner of the page.
Pages will then update to show the word count for just the selected portion of text. This is particularly useful if you need to meet a word limit for individual sections or chapters within a document.
3. Using the Word Count for Entire Document
If you want to check the total word count for the entire document, simply ensure that no text is selected, or click anywhere within the document without highlighting specific sections. The word count at the bottom will show the full word count for your document. This can be helpful when preparing the final draft of your work.
Additional Features Related to Word Count in Mac Pages
In addition to the basic word count feature, Pages also includes other tools that can enhance your writing and editing process. Here are a few more features that can assist you when working with word counts:
1. Character Count and Other Metrics
If you need more detailed information beyond just the word count in Mac Pages, you can also track other metrics such as character count, sentence count, and paragraph count. To access these additional stats:
- Step 1: Click on the word count display in the lower-left corner.
- Step 2: Select “Show More Info” from the drop-down menu.
This will provide you with a comprehensive breakdown of your document’s length, helping you make more detailed adjustments if needed. For example, if you are required to write within a specific character range, this feature will be especially useful.
2. Words Excluding Textboxes, Footnotes, and Comments
Sometimes, you might want to exclude specific parts of your document, such as textboxes, footnotes, or comments, from the word count. To exclude these elements, you can adjust the word count settings by clicking on the word count display and selecting “Include Textboxes, Footnotes, and Comments” to toggle the option off.
3. Real-Time Updates During Writing
One of the standout features of tracking word count in Mac Pages is the real-time updates. As you type, Pages automatically updates the word count, allowing you to track your progress instantly. This live feedback can help you stay on course without the need to manually check the length after every paragraph or section.
Common Issues and Troubleshooting
While the word count feature in Pages is generally intuitive and reliable, there are a few common issues users may encounter. Here are some troubleshooting tips:
1. Word Count Not Displaying
If you’ve followed the steps to enable word count, but it still isn’t showing up, make sure that you’re using the most up-to-date version of Pages. Outdated software can sometimes cause features to malfunction. Updating Pages or restarting the application can often resolve these types of issues.
2. Inaccurate Word Count
In some cases, you may notice that the word count seems off or not updating properly. This can happen if there are hidden sections of text (such as comments or track changes) that are being counted or excluded. Double-check your settings to ensure the word count is being tracked according to your preferences, and confirm that any footnotes or comments are either included or excluded properly.
In conclusion, tracking the word count in Mac Pages is an essential tool for writers who want to maintain control over their document’s length and ensure it adheres to specific word limits or goals. With easy-to-use features like real-time word count updates, the ability to track specific sections, and access to detailed metrics like character count and paragraph count, Pages provides a powerful tool for managing your writing projects. Whether you’re working on a simple report or a complex manuscript, mastering the word count feature will help you produce polished, focused, and well-structured documents.
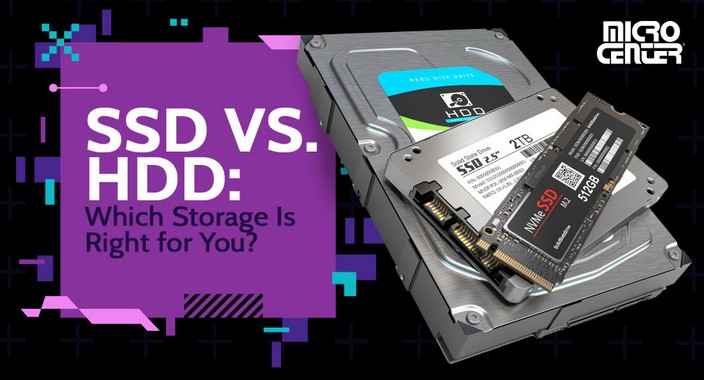
SSD Versus NVMe: Exploring the Battle of Storage Speeds
Source : https://60a99bedadae98078522-a9b6cded92292ef3bace063619038eb1.ssl.cf2.rackcdn.com
When it comes to storage solutions for modern computing, two terms are frequently discussed: SSD and NVMe. Both have revolutionized how we store and access data, but the key difference between them lies in their performance and the technology that powers them. SSD versus NVMe is an ongoing debate, especially as both technologies continue to evolve. SSDs (Solid-State Drives) have become the standard for storage in many devices due to their faster speeds compared to traditional hard drives. However, NVMe (Non-Volatile Memory Express) has emerged as an even faster option, leveraging PCIe (Peripheral Component Interconnect Express) technology to drastically improve read and write speeds. This article will explore the differences between SSD and NVMe, examining their performance, benefits, and which technology might be best suited for different needs.
Understanding SSD Technology
Solid-State Drives (SSDs) are a significant upgrade over traditional Hard Disk Drives (HDDs) because they use flash memory to store data rather than spinning disks. This allows for much faster read and write speeds, resulting in improved performance, faster boot times, and quicker data retrieval. SSDs come in several forms, with the most common being SATA-based SSDs.
SATA SSDs: The Traditional SSD
SATA (Serial ATA) SSDs are the most well-known type of solid-state drive. They use the same interface as traditional HDDs, meaning they are backward compatible with older systems that only support SATA connections. However, despite being much faster than HDDs, SATA SSDs are limited by the data transfer speeds of the SATA interface itself, which maxes out at about 600 MB/s.
While SATA SSDs are still a huge improvement over traditional hard drives in terms of speed, they are increasingly being outpaced by newer technologies like NVMe. SATA-based SSDs are ideal for users who are looking for an affordable upgrade from HDDs, but they are not the optimal choice for those who need cutting-edge speed and performance.
What is NVMe and How Does It Work?
Non-Volatile Memory Express (NVMe) is a storage protocol designed specifically for SSDs to take full advantage of the high-speed data transfer capabilities of modern NAND flash memory. Unlike SATA SSDs, which use the SATA interface and are limited by its bandwidth, NVMe SSDs connect directly to the CPU via the PCIe interface, offering much faster speeds.
PCIe: The Key to NVMe’s Speed
The PCIe interface is what sets NVMe apart from SATA SSDs. PCIe is capable of offering a data transfer rate that far exceeds SATA’s capabilities, with the latest generation of PCIe (PCIe 4.0 and PCIe 5.0) supporting up to 16 GB/s and 32 GB/s of bandwidth, respectively. This allows NVMe SSDs to achieve speeds that are orders of magnitude faster than SATA SSDs.
NVMe SSDs also benefit from lower latency and greater scalability, allowing them to perform better in tasks that require constant, high-speed data access, such as gaming, video editing, or running virtual machines. For users who demand the highest levels of performance, NVMe is often the preferred choice.
SSD Versus NVMe: A Performance Comparison
The most significant difference between SSD and NVMe lies in their performance. While both offer vastly improved speed over traditional HDDs, NVMe is generally considered the faster and more efficient technology.
Speed and Latency
One of the most noticeable differences between SSD versus NVMe is the speed. SATA SSDs offer read and write speeds up to 600 MB/s, while NVMe SSDs can achieve speeds exceeding 3,500 MB/s on PCIe 3.0 systems, and even higher speeds with newer PCIe 4.0 and 5.0 interfaces. This translates to faster boot times, quicker file transfers, and better overall system performance.
Latency is another area where NVMe excels. Since NVMe SSDs communicate directly with the CPU through the PCIe bus, they experience less latency compared to SATA SSDs, which have to go through a separate controller. This reduced latency is particularly beneficial for applications that require rapid access to large volumes of data, such as real-time data analytics, scientific computing, or high-performance gaming.
Cost and Compatibility
While NVMe offers significant performance gains, it is also more expensive than traditional SATA SSDs. The higher cost is due to the advanced technology, increased performance, and the premium associated with PCIe drives. Additionally, not all systems support NVMe drives. Older motherboards or devices may not have the necessary M.2 slots or PCIe lanes required for NVMe SSDs, meaning that users may need to upgrade their hardware to take advantage of NVMe speeds.
On the other hand, SATA SSDs are typically more affordable and are widely compatible with a variety of systems. They are an excellent choice for general users who want a fast, reliable storage solution but do not require the extreme speeds offered by NVMe.
Which is Right for You: SSD or NVMe?
Choosing between SSD and NVMe largely depends on your needs and budget. If you are a general consumer looking to upgrade from a hard drive to an SSD, a SATA SSD is an excellent option. It will provide faster boot times, better performance, and a noticeable improvement in overall system responsiveness. SATA SSDs are also a more cost-effective option for users who do not need the ultra-fast speeds that NVMe offers.
However, for power users, gamers, or professionals working with large files or demanding applications, an NVMe SSD is the better choice. NVMe’s superior speed, lower latency, and greater scalability make it the ideal solution for anyone seeking top-tier performance. While the price difference between the two technologies is significant, the performance gains may justify the investment, especially for tasks that require constant, high-speed data transfers, such as 4K video editing, gaming, or running virtual machines.
In conclusion, the SSD versus NVMe debate boils down to speed, performance, and cost. While SATA SSDs are still a massive upgrade over traditional hard drives, NVMe SSDs offer a new level of performance that is unmatched by any other storage solution currently available. If you require high-speed data access, low latency, and maximum system responsiveness, NVMe is the clear winner. However, if you’re looking for a budget-friendly option that still offers significant improvements over HDDs, an SSD is an excellent choice. Ultimately, the decision depends on your specific use case and budget, but both options provide a noticeable leap in performance compared to traditional storage technologies.
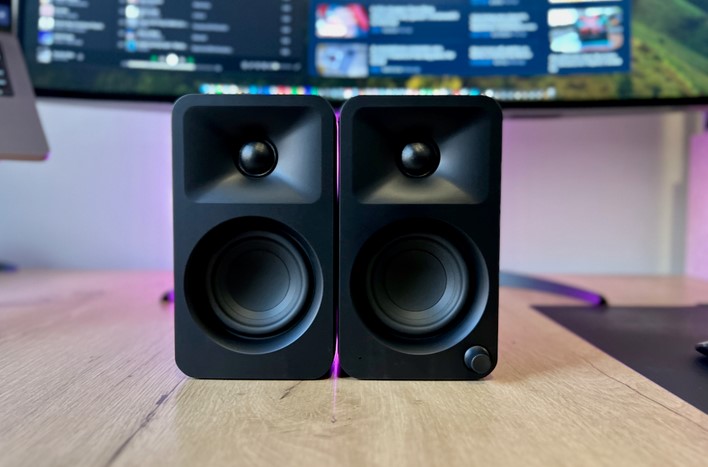
Best Passive Bookshelf Speakers: Immersive Sound without the Fuss
Source : https://www.digitaltrends.com
When it comes to achieving high-quality sound in a compact and affordable form, passive bookshelf speakers are often the ideal solution. These speakers are known for their ability to deliver clear, rich audio without the complexity or size of larger systems. If you’re in the market for the best passive bookshelf speakers, you’re likely searching for a product that offers superb sound quality, a sleek design, and an easy-to-use setup. This article will explore the features of passive bookshelf speakers, how to choose the best ones for your needs, and some top recommendations that stand out in today’s competitive audio market.
Understanding Passive Bookshelf Speakers
Passive bookshelf speakers are a type of loudspeaker that require an external amplifier or receiver to power them. Unlike active or powered speakers, which have built-in amplification, passive speakers rely on a separate device to provide the necessary power to produce sound. The main advantage of passive speakers is their flexibility—since the amplifier or receiver is separate, you can customize your audio setup to suit your preferences and ensure optimal performance.
Why Choose Passive Over Active Speakers?
There are several reasons why audiophiles and casual listeners alike often choose passive bookshelf speakers over active ones. One of the primary advantages is the ability to upgrade or replace individual components. If you’re using an amplifier or receiver that doesn’t meet your needs, you can easily swap it out for a more powerful or feature-rich model. This gives you the freedom to tailor your system to your specific taste.
Additionally, passive speakers tend to offer better sound quality for the price when compared to active speakers. Since the drivers, crossovers, and other internal components are often higher quality in passive designs, they can deliver more detailed, nuanced sound. Furthermore, passive speakers are generally more affordable upfront, as you don’t have to pay for the built-in amplification.
Features to Look for in the Best Passive Bookshelf Speakers
When shopping for the best passive bookshelf speakers, there are a few key factors to consider to ensure you’re making an informed purchase. Understanding what features to look for can help you find a pair that matches your acoustic preferences and fits your living space.
1. Sound Quality
The primary purpose of any speaker is to deliver excellent sound, and passive bookshelf speakers are no exception. Look for speakers that offer a balanced frequency response, meaning they perform well across the low, mid, and high ranges. A good pair of passive bookshelf speakers should have a clear, natural sound with well-defined bass, mids, and treble. You’ll want to look for reviews or specifications that describe the speaker’s sound profile to ensure it matches your musical taste.
2. Size and Design
Bookshelf speakers are compact by nature, so they should fit easily into smaller spaces like bookshelves, desks, or entertainment centers. However, the design of the speaker also matters. Look for speakers with an attractive finish and durable construction. Materials like MDF (medium-density fiberboard) are common in high-quality passive speakers because they help reduce vibrations and resonance, leading to clearer sound. Additionally, consider the aesthetic of the speakers and how they’ll complement the rest of your home decor.
3. Impedance and Sensitivity
Impedance refers to the resistance a speaker offers to the electrical current supplied by the amplifier. Passive speakers typically have an impedance rating of 4, 6, or 8 ohms. When pairing with an amplifier, it’s important to match the speaker’s impedance with the amplifier’s output capacity to avoid damage to either component.
Sensitivity, on the other hand, measures how efficiently a speaker converts power into sound. A higher sensitivity rating (usually in the range of 85-90 dB) means that the speaker will produce louder sound with less power, making it easier to drive with smaller amplifiers.
4. Power Handling
Power handling refers to the amount of power a speaker can safely handle from the amplifier without distortion or damage. When selecting passive bookshelf speakers, check the speaker’s power rating and ensure it matches your amplifier’s output. For most casual listeners, a power range of 50-100 watts is ideal for home use.
Top Recommendations for the Best Passive Bookshelf Speakers
Now that we’ve explored the key factors to consider when shopping for passive bookshelf speakers, here are a few highly-rated models that deliver exceptional sound and value:
1. ELAC Debut 2.0 B6.2 Bookshelf Speakers
ELAC has built a reputation for producing high-quality speakers at an affordable price, and the Debut 2.0 B6.2 is no exception. These speakers offer an impressive combination of clarity, warmth, and depth. With a frequency response of 44 Hz to 35 kHz, they provide a broad range of sound that suits everything from classical music to rock and electronic genres. The newly designed woofer and tweeter create a more accurate soundstage, while the sturdy MDF cabinets reduce unwanted vibrations.
2. KEF Q350 Bookshelf Speakers
KEF is known for producing some of the best-sounding speakers in the world, and the Q350 is a great example of their commitment to quality. These speakers feature KEF’s innovative Uni-Q driver array, which positions the tweeter at the center of the woofer to create a more uniform sound dispersion. This design provides a wider soundstage and more precise imaging, making it ideal for audiophiles who demand exceptional performance. The Q350 speakers deliver crisp highs, detailed mids, and punchy lows, making them one of the best passive bookshelf speakers on the market.
3. Wharfedale Diamond 225 Bookshelf Speakers
The Wharfedale Diamond 225 speakers are a great choice for anyone looking for an affordable, high-performance speaker. With a well-balanced sound profile, these speakers offer deep bass, smooth mids, and clear treble. Their 8-ohm impedance ensures compatibility with a wide range of amplifiers, and their compact size makes them ideal for smaller rooms. The speakers’ high-quality components and build ensure durability and longevity.
In conclusion, finding the best passive bookshelf speakers involves considering several factors, including sound quality, design, impedance, and power handling. By understanding your needs and preferences, you can choose a pair that suits your space, amplifies your music, and provides an immersive listening experience. Whether you opt for the precision of KEF’s Uni-Q technology or the value-packed performance of Wharfedale or ELAC, passive bookshelf speakers remain an excellent choice for anyone seeking high-quality audio without the complexity of larger systems.
Best Law Enforcement Flashlight: Illuminate The Path Of Safety And Justice

Police and law enforcement officers depend on reliable and handy tools to effectively carry out their duties and provide safety and justice to the public. A tiny Law enforcement flashlight is not just a tool but also equipment that helps in major work like patrolling the streets, investigating a crime scene, or responding to an emergency. Look out for the best law enforcement flashlight, and consider a powerful and dependable light that can make all the difference—choosing the right one from so many options available in the market can be overwhelming. Thus, we will examine and suggest the top flashlights made especially to satisfy the particular requirements of law enforcement personnel in this extensive guide.
Performance, dependability, and durability are critical factors in the selection of the best flashlights for law enforcement officers.
These flashlights have features designed to meet the exacting standards of law enforcement work in addition to offering strong illumination in a variety of environments. Discover the best flashlights that can improve police officers’ efficiency and safety while they are on duty by reading our in-depth reviews and buying guide.
Which Flashlight is Best for Police Officers?
For law enforcement operations to be both safe and successful, police officers’ flashlights are vital equipment. With their endurance, brightness, and adaptability, these specialised flashlights are made to satisfy the particular requirements of police operations and can assist cops in a variety of scenarios.
Police flashlights’ high brightness levels, which are usually expressed in lumens and offer the best vision in low light, are one of their primary characteristics. During nighttime operations, this brightness is essential for illuminating possible dangers, exploring dark areas, and searching for vehicles. To accommodate various lighting requirements in the field, a lot of police flashlights also have adjustable beam settings.
Additionally, a lot of police flashlights have features like weapon attachment possibilities, rechargeable battery alternatives, and strobe mode for signalling. These extra capabilities increase the flashlight’s usefulness for police officers and enable them to carry out their responsibilities in a range of law enforcement situations safely and effectively.
Reviews of the Best Flashlights for Police Officers
1. Elite Series
Professionals’ demands are the focus of the Elite SeriesTM. It has hands-free work lights, multiple flash patterns and brightness settings, industry-specific colours, and powerful lighting on all sides. It offers you unparalleled adaptability in a single light thanks to its integrated Magnet Mounting System, which is fast and securely fastens to all Guardian Angel mounts.
2. Highway Patrol to K-9s
Officers on the Highway Patrol and K-9s only use equipment they can rely on to function in any situation, which is why our law enforcement safety lights are constructed to exacting specifications using the best materials and patented technology. All of our lights are dustproof, shockproof, and waterproof, and they provide hands-free 360° lighting that is visible for miles.
Why Strong Flashlights Are Essential for Law Enforcement Officers
Numerous scenarios that law enforcement personnel encounter call for strong and dependable lighting. A good torch is crucial for a variety of tasks, such as searching in low light, indicating for help, or spotting possible dangers.
The best law enforcement flashlights offer outstanding brightness and beam control and are made to endure the demands of regular use. They frequently have sophisticated features like strobe modes and tactical switches, as well as robust construction, waterproof and shockproof ratings, and more.
A bright flashlight has more uses than only practical ones; it can also work as a psychological deterrent, giving police a sense of security and confidence in potentially hazardous circumstances. Controlling the surroundings, confusing any attackers, and having clear communication with coworkers and suspicions are all made possible by the strong beam.